Here are some examples of combat resolved using Hell Broke Loose. It would be advantageous, especially in relation to the third example, for you to have read the previous posts on Hell Broke Loose before embarking on this one. Better yet, print off the quick play sheets I sent you (if I did) or the 'melee table' at the end of this post.
Combat 1
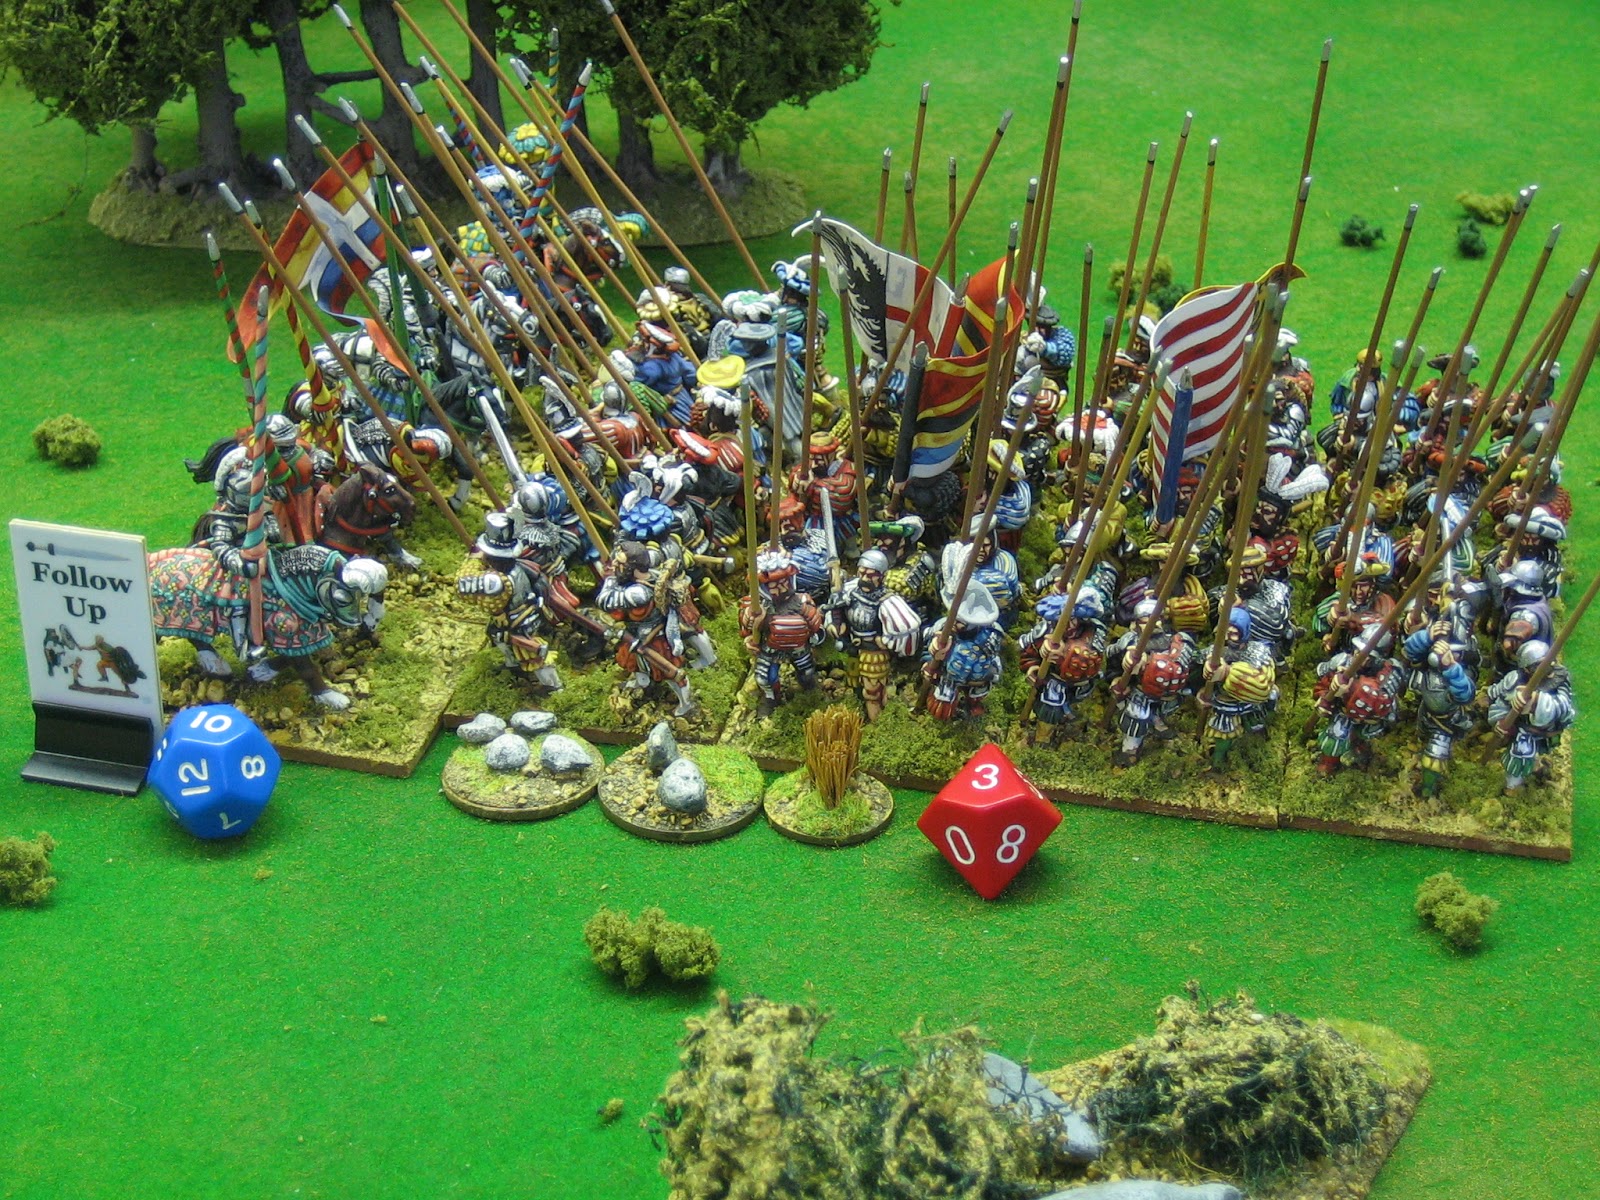
A simple combat between a unit of condottiere Lance Spezzate and a unit of French 'archer' cavalry.
Note: For those unfamiliar with the period, knightly cavalry (Gendarmes, Lance Spezzate, etc.) went into battle with two to four underlings that were typically found in the second and subsequent ranks. Some of these were heavy cavalry, confusingly called archers, armed with lance. As the period progressed archer cavalry were often detailed off into their own units.
Blue:
1 unit of Fierce, Class 'B' Italian condottiere Lance Spezzate.
CD 10, DD 8.
4 unit integrity (UI).
Red:1 unit of Class 'C' French 'archer' cavalry.
CD 8, DD 6
4 unit integrity (UI).
The two units have come to contact, but it is Red who turns a Melee card first. Red initiates the melee.
- Red: CD 8: Up 1 for initiating; Up 1 for being formed cavalry in type I (open) terrain; Down 1 for fighting fully armoured. This gives a D10 (D8, Up 2, Down 1 = D8 Up 1 = D10): The roll is 8.
- Blue: CD 10: Up 1 for being formed cavalry in type I terrain; Up 1 for having superior armour. This gives D12+1 (D10, Up 2, = D12+1): The roll is (6+1) 7.
- This gives a positive difference of 1 pip to Red. This is a 'hard fought with marginal advantage' result. Both sides lose 1 UI and 1 morale chip. Red scores higher and will get a marginal advantage in the next round - it will count as following up.
Note: A useful 'follow up marker' is shown. The sword shows direction of follow up. (These were made for my Punic stuff - I'll get around to doing some for this at some point - a Gendarme with levelled lance for direction might be suitable).
A Melee card is turned. This is an ongoing melee, it must be resolved.
- Red: CD 8: Up 1 for following up; Up 1 for being formed cavalry in type I (open) terrain; Down 1 for fighting fully armoured; Down 1 for UI loss. This gives a D8 (D8, Up 2, Down 2 = D8): The roll is 7.
- Blue: CD 10: Up 1 for being formed cavalry in type I terrain; Up 1 for having superior armour; Down 1 for UI loss. This gives D12 (D10, Up 2, Down 1 = D12): The roll is 7.
- This is an absolute draw. It gives a 'hard fought no advantage' result. Both sides lose 1 UI and 1 morale chip. Neither side will count as following up in the following round.
Note: The 'follow up' marker is turned to show no advantage. The marker is not removed as it also shows that this is an ongoing melee.
A Melee card is turned. The melee is still ongoing melee, it must be resolved.
- Red: CD 8: Up 1 for being formed cavalry in type I (open) terrain; Down 1 for fighting fully armoured; Down 2 for UI loss. This gives a D4 (D8, Up 1, Down 3 = D8 Down 2 = D4): The roll is 3.
- Blue: CD 10: Up 1 for being formed cavalry in type I terrain; Up 1 for having superior armour; Down 1 for UI loss. This gives D10 (D10, Up 2, Down 2 = D10): The roll is 9.
- This is a 6 pip difference in favour of Blue. It gives a 'decisive loser routed' result. The loser takes 1 UI loss for each three pips difference - red loses 2 UI and 2 morale chips. Red is routed. It immediately turns and routs 12". Blue rolled an odd die result (odd = 1, 3, 5, 7, 9, etc.) so must pursue.
Combat 2
Another simple combat that is complicated by it being a flank attack.
Blue:
1 unit of Fierce, Class 'A' French Gendarmes.
CD 12, DD 8.
4 unit integrity (UI).
Red:1 unit (12 stand) of Class 'B' Landsknechts.
CD 10, DD 8
8 unit integrity (UI) 4 of which are stubborn.
The Gendarmes move to contact. A Melee card is not required to resolve the melee because it is a flank attack.
- Blue: CD 12: Up 1 for initiating; Up 1 for being formed cavalry in type I (open) terrain; Up 1 for flanking; Up 1 for being superior armour: This gives a D12+4 (D12, Up 4 = D12+4): The roll is 12 (10+4 = 12 because the highest score possible on a D12 is 12.
- Red: CD 10: Up 1 for being close formed infantry in type I terrain; Up 1 for superior weapon (pike is superior Vs cavalry); Down 1 for fighting fully armoured; Down 1 for being flanked: This gives D10 (D10, Up 2, Down 2 = D10): The roll is 9.
- This is a difference of 3 pips in favour of Blue. It gives a 'decisive with marginal advantage' result. For every 3 pips difference in the result the loser will suffer 1 UI loss. Red loses 1 UI and 1 morale chip. The Landsknechts should be pushed back vexed, but they have not lost their stubborn UI yet so they spend a further morale chip to negate it. However, they have lost a melee delivered against a flank - they are vexed. Blue won the melee so it will count as following up in the following round.

Following the melee result, having not been routed, the Landsknechts turn their flank stands to face the attack. They no longer count the modifier for being flanked. The Gendarmes still count the modifier for flanking as their opponents have not fully turned to face - they need a formation change card to do this.
A Melee card is turned. The melee is ongoing and the troops are formed / close formed. It must be resolved.
- Blue: CD 12: Up 1 for following up; Up 1 for being formed cavalry in type I (open) terrain; Up 1 for flanking; Up 1 for being superior armour; Down 1 for facing frontal pike: This gives a D12+3 (D12, Up 4, Down 1 = D12+3): The roll is 12 (10+3 = 12 because the highest score possible on a D12 is 12.
- Red: CD 10: Up 1 for being close formed infantry in type I terrain; Up 1 for superior weapon; Down 1 for fighting fully armoured; Down 1 for being vexed: This gives D10 (D10, Up 2, Down 2 = D10): The roll is 3.
- This is a difference of 9 pips in favour of Blue. It gives a 'decisive loser routed' result. Red loses 3 UI and 3 morale chips. The Landsknechts should be routed, but they have not lost their stubborn UI yet so they spend a further morale chip to convert it to a push back vexed. They are also vexed for losing to a flank attack. The unit is already vexed so it loses a UI and a morale chip for each subsequent cause of vexation - overall, this result causes the loss of 5 UI (3 for pips difference in the melee dice, and 2 for vexation) and cost Red 6 morale chips, OUCH! Blue won the melee so it will count as following up in the following round.

Red turns a Command card. The situation is desperate. Red move the Landsknecht's command group officer and attaches him. He then attempts to restore order. He is D10 quality.
- D10: Up 1 for attached officer, Up 1 for the unit having a D8 Defence Die (DD); Down 1 for being in contact: This gives D12 (D10, Up 2, Down 1 = D12). The roll is 11.
- Blue rolls a D8 in opposition (it is always an unadjusted D8 versus a rally attempt). The roll is 2.
- The difference is 9 pips in Red's favour. A positive result always rallies vexation. The difference of 9 will rally back up to 3 UI if Red pays a morale chip for each. This is a valuable unit on its knees - Red spends 3 morale chips and rallies back 3 UI.
A Melee card is turned. The melee is ongoing and the troops are formed / close formed. It must be resolved.
- Blue: CD 12: Up 1 for following up; Up 1 for being formed cavalry in type I (open) terrain; Up 1 for flanking; Up 1 for being superior armour; Down 1 for facing frontal pike: This gives a D12+3 (D12, Up 4, Down 1 = D12+3): The roll is 7 (4+3 = 7) 12.
- Red: CD 10: Up 1 for being close formed infantry in type I terrain; Up 1 for superior weapon; Down 1 for fighting fully armoured: This gives D12 (D10, Up 1 = D12): The roll is 11.
- This is a difference of 4 pips in favour of Red. It gives a 'decisive with marginal advantage' result. Blue loses 1 UI and 1 morale chip. The Gendarmes are pushed back vexed. The Landsknechts cannot follow up to a flank so the melee is ended.
- They do have one more choice to take. Having forced the Gendarmes off, they can turn the refused flank back, they can leave the flank refused (this will pin the unit until it turns it back on a Formation Change card), or it can turn the whole unit to face the beaten enemy (in effect, a free formation change).
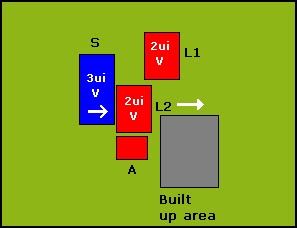
Combat 3
A complex combat showing the assault of a very large Swiss pike square against superior numbers of Landsknecht pike with artillery support.
Blue:
1 unit of Fierce, Class 'A' Swiss pike, 18 stands strong.
CD 12, DD 8.
10 unit integrity (UI), 6 of which are stubborn.
Red:
2 units of Class 'B' Landsknecht pike, each 12 stands strong.
CD 10, DD 8.
Each 8 unit integrity (UI), 4 of which are stubborn.
1 unit of Class 'D' artillery, 1 stand strong.
CD 6, DD 4.
2 unit integrity (UI).
Blue has the initiative, it turns a March card and declares an intention to move:
It rolls its D10 Command motivation die versus D8 for movement and scores 'more than and even'. The Swiss pike can move twice ('more than'). They can fight one automatic melee resolution for being Fierce ('even').
Red declares it will shoot its artillery unit (which is loaded) before the Blue actually moves. After firing it is marked as 'unloaded'.
- The artillery has a D6 Combat Die. Close range Up 2; Versus pike square Up 2: D6 Up 4 = D12+1.
- The Swiss pike square has a D8 Defence Die.
- D12+1 roll is 9+1; the result is 10. D8 result is 3. The difference is 7 pips.
- 7 pips inflicts 2 unit integrity (UI) loss (7 divided by 3 is 2); 7 pips difference results in one move lost - the Swiss can now only move once; the Defence Die is an odd result (3) causing vexation. Red loses 2 morale chips for UI loss.
- Red measures the distance between his unit and the enemy units. The distance is 9". The distance cannot be covered in a single move, but the UI loss on the unit is less than 6 (stubborn UI) so blue can spends another morale chip to negates the move loss.
The Swiss are fierce. They choose to fight a melee against Landsknecht Pike Block 1 without a melee card.
- Blue: CD 12: Up 1 for initiating; Up 1 for being close formed in type I terrain; Up 1 for being a pike square fighting frontally; Down 1 for being vexed. This gives D12+2. The roll is a 8+2, result 10.
Note that there are no downs for UI loss. Stubborn UI do not count towards losses in the melee combat tables - they are 'free'.
- Red: CD 10: Up 1 for being close formed in type I terrain; Up 1 for being a pike square fighting frontally. This gives D12+1. The roll is a 3+1, result 4.
- The difference in the rolls is 6. This causes 2 UI loss, 2 morale chip loss, and the Landsknechts are routed. But, the Landsknechts started the melee with stubborn UI, so Red chooses to spend another morale chip and convert the rout to a push back. The Landsknechts fall back 3" vexed. The Swiss cannot follow up because they are pinned by L2.
Blue still has the iniative and keeps turning cards. It draws a Melee card and chooses to resolve the melee Vs L2. This melee is optional because the melee has not yet been started.
- Blue: CD 12: Up 1 for initiating; Up 1 for being close formed in type I terrain; Up 1 for being a pike square fighting frontally; Down 1 for being vexed. This gives D12+2. The roll is a 4+2, result 6.
- Red: CD 10: Up 1 for being close formed in type I terrain; Up 1 for being a pike square fighting frontally. This gives D12+1. The roll is a 3+1, result 4.
- The difference in the rolls is 2. Normally, this is a 'hard fought with marginal advantage' result. Both sides would stay in position and lose 1 UI and 1 morale chip each. The Swiss, rolling higher, would gain following up advantage in the next round. But the Swiss are Fierce and this automatically converts marginal results into push backs: the Landsknechts (not being fierce) flinch and fall back 3" vexed.
- But, they are pinned by type III terrain to their rear and can't physically fall back. They are vexed again. Every vexation after the first causes the loss of one more UI and one more morale chip. Stubborn troops cannot prevent 'hard fought push backs' versus fierce troops.
- The melee becomes ongoing.

Another melee card is turned. It does not matter which side turned it. There is an ongoing melee, and formed troops must fight ongoing melees.
- Blue: CD 12: Up 1 for following up; Up 1 for being close formed in type I terrain; Up 1 for being a pike square fighting frontally; Down 1 for being vexed. This gives D12+2. The roll is a 1+2, result 3.
- Red: CD 10: Up 1 for being close formed in type I terrain; Up 1 for being a pike square fighting frontally; Down 1 for being vexed. This gives D12. The roll is a 6.
- The difference in the rolls is 3. This is a 'decisive with marginal advantage' result. The Swiss lose 1 UI and 1 morale chip. Normally, they would be pushed back 3" vexed: but they are still on stubborn UI and choose to spend a further morale chip to prevent retrograde movement and consequent vexation. The melee is still ongoing.
Red now turns sequence cards that swing the balance in its favour. They turn a March card, allowing L1 to come back into the fray.
Then Red turns an Artillery Action card which it uses to wheel its artillery. Artillery can only perform one action on its card, it cannot wheel and reload; artillery is very 'tardy' under these rules.
This is immediately followed by the turn of another Artillery Action card (what timely luck!) - the battery reloads and fires, ending unloaded.
Firing into an ongoing melee is a risky thing to do. The artillery unit must resolve fire versus both friend and foe.
- Versus Blue: CD 6: Up 2 Vs pike square, Up 2 for close range, Up 1 versus flank: This gives D12+2. The roll is a 12+2, result 12. (12 is a good as it gets). The Swiss roll their DD 8 and score 4. The difference is 8. This causes 2 UI and morale chips loss. The DD result is an 'even' result so the Swiss are not vexed. At 6 UI loss, the Swiss have now run out of stubborn UI.
- Versus Red: Up 2 Vs pike square, Up 2 for close range, Up 1 versus flank; Down 1 versus friends: This gives D12+1. The roll is a 5+1, result 6. The Landsknechts roll their DD 8 and score 5. The difference is 1. This causes no UI loss. The DD result is less and 'odd' so the Landsknechts are vexed; but they are vexed already so lose 1 UI and a morale chip.
Red turns a melee card. It must fight L2's ongoing melee before it can opt to initiate a new melee with L1.
- Red: CD 10: Up 1 for following up; Up 1 for being close formed in type I terrain; Up 1 for being a pike square fighting frontally; Down 1 for being vexed. This gives D12+1. The roll is a 7+1. Result 8.
- Blue: CD 12: Up 1 for being close formed in type I terrain; Up 1 for being a pike square fighting frontally; Down 1 for being vexed. This gives D12+1. The roll is a 8+1, result 9.
- The difference in the rolls is 1. Normally, this is a 'hard fought with marginal advantage' result. Both sides would stay in position and lose 1 UI and 1 morale chip each. The Swiss, rolling higher, will gain following up advantage in the next round. But the Swiss are Fierce and this converts marginal results into push backs: the Landsknechts (not being fierce) flinch and fall back 3" vexed.
- But, they are pinned by type III terrain to their rear and can't physically fall back. They are vexed again. Every vexation after the first causes the loss of one more UI and one more morale chip. Stubborn troops cannot prevent push back versus fierce troops on marginal results. The double vexation, ontop of existing vexation costs L2 2 more UI and morale chips.
- The melee becomes ongoing.
Red now initiates a new melee with L1.
- Red: CD 10: Up 1 forinitiating; Up 1 for being close formed in type I terrain; Up 1 for being a pike square fighting frontally; Down 1 for being vexed. This gives D12+1. The roll is a 7+1. Result 8.
- Blue: CD 12: Up 1 for being close formed in type I terrain; Up 1 for being a pike square fighting frontally; Down 1 for being vexed; Down 1 for 1 UI lost (it has only 3UI now). This gives D12. The roll is a 1.
- The difference in the rolls is 7. The Swiss lose 2UI, 2 morale chips, and they are routed. They no longer have stubborn stands, so they cannot convert the result to a push back. The Swiss have, after fierce fighting, been beaten.
If I have totted everything correctly, this combat cost Red 9 morale chips and 8 UI. It cost Blue 11 morale chips and 9 UI. This combat was fictional - I rolled virtual dice to get the results I wanted.
Here, by the way, is the Up / Down combat modifier table. It is in 'classic Piquet' format. It is the best format for factors that I know. It is clean, simple and compact. Sorry about the quality of the image; images do not transfer well from MS Word, via MS Paint, to here.