Wednesday 29 December 2021

Last unit of Anglo-Portuguese infantry - My local regiment.

I'm getting soooo close to finishing the Anglo Portuguese for the Peninsular that I'm beginning to believe it's going to happen.

These figures represent my local regiment: Their regimental museum is in Halifax. I give you the 51st Regiment of Foot, 2nd West Riding, Light Infantry.

Actually, if I'd lived back then and joined up, I'd more likely be with the 27th (the Inniskillings) or some such but, that's another story. 

Figures are by Front Rank. 

I actually bought this unit as an afterthought last summer, tagging it onto my Spanish army order. I'm glad I did because it seems to be taking ages to sort out the sale of Front Rank to Gripping Beast - meanwhile it's not trading.
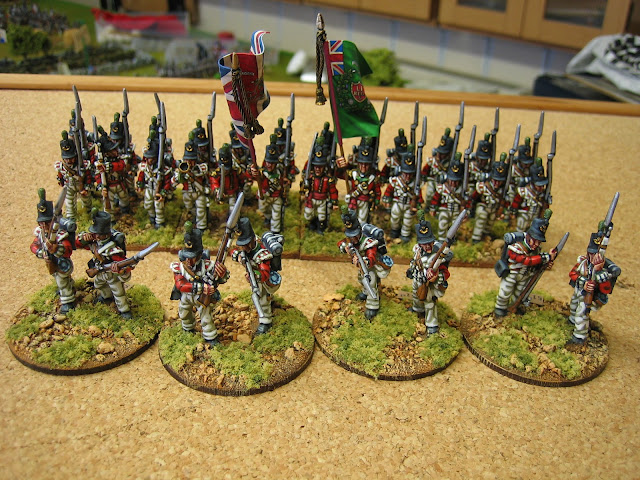
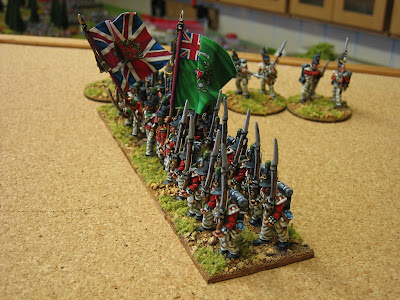
I bought them so that I have enough light infantry units to field (at my chosen divisional figure scale of 1 unit to 1000 men) 1st Division, 7th Division and the Light Division at the same time. 

The 51st served with 7th Division, the Mongrels: So named because its battalions had coats in red, blue, green, brown or black.  
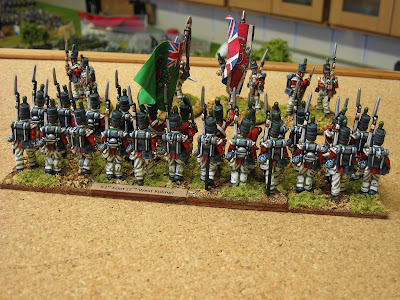
Green facings, which always goes strikingly well with red. They were painted, in enamels, a few weeks before Christmas. 

I was hoping this unit would feature with the last unit of the Anglo-Portuguese army (the 10th Portuguese Cavalry) but, I've been too busy to finish them; I wanted to get this posted before New Year to register the 51st on the blog as a unit painted in 2021. 

I'll finish the Anglo Portuguese army early next year: The Portuguese cavalry are base painted, hands and faces done, etc.

So, that's it for 2021. 

Happy New Year, to all. I hope everyone has a good 2022.


Thursday 23 December 2021

Roll Call: Parading the Fleet

So that Peter J. can see what I have, so he can use a Squadron Builder site to create his own squadrons, I've decided to parade my X-Wing stuff.

EDIT: Four ships were added as of 31/12/21 and are now included in the totals. Classes with changed numbers have been highlighted yellow.

I'm not exactly sure how I've managed to collect this amount of stuff for a game I've played less than half a dozen times but, there you have it, I'm a collector, obviously. Most of these ships have never fired a shot, sorry laser.

It was Peter who started me off down this road. One Christmas, several twin moons ago, he brought a starter set round to play and I was immediately hooked. It looked perfect, as a 'filler game', to play between larger historical games.

Initially I thought to buy a dozen ships but, it seems X-Wing models are like crack cocaine: Unlike figures, which you need to paint and base before you can use them, X-Wing models provide instant 'ready painted / ready to go' gratification; you can use an X-Wing model immediately after taking it out of its box; for me, this was quite novel and very addictive.

Since splurging on ebay (I probably bought over half the collection in the first year), when you could pick up ships relatively cheaply (66% cost, or less), I've curbed the number of ships I buy: Now I usually only buy ships after Christmas or my Birthday, using up the Amazon vouchers I invariably receive. 

This year I'm adding at least one more ship, a present from my wife for Christmas, an Imperial Raider Corvette: I can't wait for that to arrive. It's the biggy!

However, looking forward, being a collector of version 1 (now outdated), pickings will be slim. Most V1 ships are unobtainable and those that are seem to be quite expensive (K-Wing £25). Long gone, it seems, are the days of reasonable ebay bargains. 

My Christmas present Raider is a case in point, it was bought on ebay in used condition and there wasn't much change from a ton. In my first year of collecting they were coming up regularly for £50 - £70 each. Plus, although I can see a small base for the Advanced Tie Fighter that comes with a complete Raider package I'm not expecting to see one in my ebay purchase - or will I be surprised? Blimey, that would be a cosy bonus because I'm looking for one!

I think X-Wing is a great fun game and the pre-painted models are superb. I really should get it out and play with it more often. Obviously, anyone contemplating getting this game from a standing start should go for the version 2 edition - more ships and readily available. I'd upgrade myself but, the cost would be horrific!

Anyway, enough said, onto the roll call. The following pictures have been added to show just how good these little models are.

A-Wing x2
B-Wing x4
E-Wing x2
K-Wing x2
X-Wing x6
Y- Wing x2 (Note: +1 in Scum faction ships).
Z95 x 1 (Note: +2 in Scum faction ships).
HWK-290 x1 (Note: Can also be a Scum faction ship, I only have one model).
Sheathipede-Class Shuttle x1
Tie Fighter (Captured) x1

Tie Fighter x8
Tie Interceptor x5
Tie Bomber x2
Tie Punisher x2
Tie Defender x3
Tie Reaper x1
Tie Advanced x2
Tie Phantom x2
Tie Aggressor x2
 
M3-A Interceptor x2
Starviper x1
G-1A Starfighter x2
Quadjumper x1
Scurrg H-6 Bomber x1
Kihraxz Fighter x2
Z95 x 2 (Note: +1 in Rebel faction ships).
Y- Wing x1 (Note: +2 in Rebel faction ships).
HWK-290 x1 (Note: Can also be a Rebel faction ship, I only have one model).
B/SF-17 Bomber x2
YT2000 x1
YT1300 (Millennium Falcon) x1 
Lambda-Class Shuttle x1
Upsilon-Class Shuttle x1
VT49 Decimator x1
Firespray 31 x1 (Note: I have cards for this to be either an Imperial or Scum faction ship).
Lancer-class Pursuit Craft x1
Jumpmaster 5000 x1
YV-666 x1
C-ROC Cruiser x1
GR-75 Medium Transport x1
Gozanti-Class Cruiser x1
Raider class Corvette x1

There is also a home made escape pod and an asteroid base, plus some asteroids, space buoys and debris clouds.


Friday 10 December 2021

What if: Vimeiro 1808. Battle Report, Part 3

 Turn 4

On the Eastern Ridge the French and British are hotly engaged.

The British are firing for all they are worth as the French press forward where they still can.

Then the French charge home and two of Nightingall's and Furgusson's units are forced to recoil shaken. This combined command is now on the brink of total collapse - it has one divisional morale point left.


....and the French keep on coming, hitting the British with a fresh charge and rout a British unit of infantry. 

Nightinghall and Furgusson's division is shaken, sending three units to the rear (or into the casualty box). Vive l'Empereur!

Wellesley loses five army morale points.

At Vimeiro Hill the fortunes are mixed. 

The now exhausted British light dragoons are finally put to flight by the French dragoons who, in turn, are slaughtered by decisive British volleys, delivered at close range by the 43rd Monmouthshire Light Infantry.

Note: All of the British infantry on the hill are represented by the correct units - my collection hit its mark by absolute fluke.

A French column (pictured), at full strength and its dander up, charges up the slope and into the British line. The British are ready for them and even though the French are rolling D12 Vs D10, the British beat the French by 9 clear pips - the French are broken beyond recall (eliminated).

The British get lucky: They draw a 5:6 domino Vs a 0:0, and get eleven points of initiative without response. They use it to pour volley after volley into the French, nibbling away at their numbers. 

The French immediately respond with a 5:6 Vs 1:1 and get thirteen to two initiative points.

Solignac attempts to rally his troops, all of which are shaken and unable to close with the British because of it. He rolls a natural 1 and is downed, he rolls another 1, indicating his wound is mortal and must be carried from the field.

Things are starting to go very badly for the French. 

The legere moving to flank the second British line on Eastern Ridge are subjected to the most terrible fire as they emerge from the pine wood, fail a morale challenge, and flee back the way they came.

As an act of bravado, more than anything else, the French try to equal things up on Vimeiro Hill with cannon shot. 

They do serious damage to the 50th West Kent. Unfortunately, this French 'division' is so short of morale points it can't spare one for a morale challenge.
However, French efforts are all for naught. The British turn another Infantry Firepower card. 

The last of Charlot's infantry are put to flight by the constant British musketry but, it is Kellerman's grenadiers that take the worst of it (4 UI loss) and are routed.

At Vimeiro Hill, the French are spent.
 
On the Eastern Ridge, the Frenchmen's last huzzah is to rout the last of Furgusons infantry with two effective if very ragged volleys. 

It is a worthless act, because it is the fresh British line, comprising the battalions of Bowes and Craufurd, that are doing the real killing.
At Vimeiro Hill, the British advance down the slopes to finish off Thomiere and Charlot's brigades.
Up on the ridge, Bowes' men charge, sending Brenier's last legere battalion packing. 

It's done. The French have too little left to carry the battle and are sorely short of divisional morale points. Before the army's retreat can be forced into a rout, the French choose to withdraw. The British have no cavalry with which to pursue so most of the French will be able to march from the field.
This picture of the French strength on the Eastern Ridge is deceptive. All but two units are shaken, and there isn't a single unit that hasn't felt the sting of the relentless British musketry. In contrast, almost all of the British here are fresh.

At Vimeiro Hill, it looks like a retreat might well become a rout, and the last unit of Kellerman's grenadiers, being completely surrounded, looks like it is going to be captured in Vimeiro.

The field at the end of a thoroughly enjoyable solo game. 

At one point, especially on the Ridge, I thought the French might carry it. Unfortunately for them, the British got both initiative and cards at the right time, and in the right order, to stop them in their tracks - the French were simply worn down by relentless volleys of musketry before they could get to grips. 

However, not a single French command group ended the game shaken (though at the end of the game they couldn't amass more than a dozen divisional morale points between them), whilst the brigades of Nightingall and Furgusson were both very roughly handled and did become shaken: They took the brunt of the French attack on the Eastern Ridge: In a campaign game this would be important, of course.

Note: Although Sacre Bleu!, the name I have given the set of rules I'm using, is Piquet-esque, it isn't the same and has several key mechanical differences. It isn't a set of minor house amendments to a set of rules, it's virtually a complete set of house rules in its own right. I might do a post on them at some point. 

Wednesday 8 December 2021

Olicanalad's Games reaches 1,500,000 page views!

Would you Adam and Eve it? 

Today this blog went over the 1.5 million page views, and this post marks the event. 

Thank you very much, to one and all, for dropping in as often as you have. I hope you have liked the show so far; there is plenty more to come.

In other 'Blog News', on 7th November this year, this blog was monetised with some content matched advertising (including garden sheds today - LOL). In effect I'm now busking so, if you want to drop a penny in my hat, click on an ad before you leave. Thanks.

There was some discussion when I proposed monetising this blog as to whether or not it would be worthwhile bothering - I certainly didn't know but thought it worth an experiment. In the 24 days adverts ran on the blog in November, those kind enough to visit and click on the odd ad dropped just under £18 into the ring fenced hobby collection bucket: This was rather more than I expected: Thanks, yet again. At the end of October next, I'll cash in and plough the money back into the industry - so everyone's a winner

Next stop, 2,000,000. 

ALL ABOARD!

What if: Veimeiro 1808. Part 2.

 Turn 2

With only two initiative points to spend in the first initiative phase things work out well for the British: They turn a Cavalry Move card first up and move their unit of light dragoons to counter Margaron's enveloping cavalry. A charge follows soon afterwards and the British sweep the French dragoons away but, only partly preventing a full pursuit, are now a shadow of the unit they were.
Up on the Eastern Ridge, Brenier and Solignac go forward losing casualties and cohesion to British volleys, only to rally [unit integrity losses back] for another effort.
Following a few minor initiative phases, the French get a big swing of initiative points by drawing 5:5 versus a British 4:3. This gives them a hefty 17 points of initiative versus 4 for the phase. It's fairly easy to work out how that was done; I'll leave it with you.

With such a healthy wodge of initiative the French choose to cycle through their deck to find the right cards for the moment, hoping to steal a march on the British and end the turn early.
Finally, after much card turning, Infantry Move: Kellerman's Grenadiers take possession of Vimeiro's churchyard.

Riflemen, seeing that they must hold [not evade] to slow the grenadier's advance and give fire shoot at the onrushing grenadiers advancing down the road in an attempt to cut the village off from Vimeiro Hill. It is a fruitless effort.
Up on the ridge, the French advance to charge reach (3").

Here Brenier's legere are hoping to catch the 71st in square before they can change back into something more suitable to fend of an infantry attack.
On the other side of the ridge, several sharp volleys of French musketry and artillery shot, poorly answered by the British on this occasion, force one of Nightinghall's units to take to its heals in full retreat. The gap is immediately filled by the onrushing French of Solignac's brigade: "Ils courent, Monsieur!" [They are running, Sir!] 

At this moment, the Eastern Ridge is the Schwerpunkt. The battle may well be decided here.

As turn to ends, the British have turned just seven cards. They have used a lot of their initiative buying back opportunity chips with which to fend off the French with 'reactive fire'. A good turn for the French.

Turn 3

Trusting to their bayonets, Kelllerman's grenadiers rush the riflemen on the Toledo road and, after a brief clash, send send them packing to the rear with significant losses.
On the Eastern Ridge, Solignac exploits the gap created by the retreating British unit but become engaged with Nightinghall's second line. A spirited bayonet charge by the British will force the French legere to recoil.
Meanwhile, with Furgusson's troops occupied with holding back massed French infantry, Brenier redirects his dragoons and a unit of legere to begin a flanking move through the pine woods at the foot of the northern slopes of the Eastern Ridge.
On the summit of Eastern Ridge the battle hangs in the balance. 

After a to and fro musketry duel, and a desperate British bayonet charge, the British front line has fallen back in some disarray and left their battery isolated. 

The gunners, firing canister for all they are worth, are flanked and charged - "We're doomed! We're doomed!" And, they are.
On the southern flank of the army, the British light dragoons, flushed with their recent victory over their heavier counterparts, find themselves on the flank of more French dragons. 

Though disordered, lighter and depleted, they chance their arm [their flank position still gives them D10 Vs D8]. The dice do not go their way, their charge is halted and the French turn to face.

However, the British cavalry can feel satisfied. They have successfully changed the axis of French cavalry advance. Also, the next card is Command and the light dragoons rally from the disorder caused by the combat; with the threat of the cavalry gone, their formerly threatened infantry can come out of square on the same card.
As the bishop said to the actress "It's not only the French who can swing." 

The British get 19 initiative points to 5. Craufurd and Trant move up on the ridge and begin to form a new reserve line around Bowes.

The men of Hill's brigade [pictured] are grateful to get their feet wet crossing the R. Maceira: It's a blisteringly hot day and the water is refreshingly cool. 

Then, as Asquith's men advance down from the slopes of the Eastern Ridge in support, Hill's men occupy the western side of Vimeiro to contest the French incursion into the eastern side.
At that point a same domino draw [both draw a 5:1 domino] abruptly ends the turn.

The game is at a critical juncture. Just about everyone is hotly engaged, or at least close enough to smell the eye stinging powder smoke.  

This picture shows the situation as a whole. The scenario is working well. Both combats (Vimeiro and Ridge) are definitely separate combats. 

The combat for Vimeiro will, with the [fictional] arrival of Hill's brigade, probably go the way of the British, though it's not nailed on (60 - 40). The British defence now looks like a bastion.

The Eastern Ridge combat, with both French brigades arriving at the same time [the big, what if], is making life tense for the British.

The combat for Vimeiro and its associated hill, as seen from the Ridge. 

In the foreground is Acland's battery. His infantry, having moved down from the slopes and crossed the 'brook', are now advancing on Vimeiro - historically they got their before the French.

On the Eastern Ridge a pell mell battle is about to errupt. 

To the rear of the combat zone Craufurd and Trant's brigades can be seen forming a new reserve line around Bowes' position. 

The combat doesn't seem quite so confusing from this angle. The lines of scrimmage can clearly be seen - it's all about to get very tasty.

Note that I have a new rule for cavalry and trees. Cavalry, I'm reliably informed, find woods more difficult than infantry. I now make woods one terrain type more difficult for them. That's why these dragoons are disordered [movement disorder: tuft marker] and moving more slowly than the legere unit. 

BTW: The two barrels marker indicates that the dragoons are moving on infantry cards, as part of Brenier's infantry division, as a minority unit. Stones indicate UI loss (count the stones), and broken wheel's (not in this picture?) indicate shaken.

Stay tuned for part 3....

Monday 6 December 2021

What if: Vimeiro 1808. Battle Report part 1.

I'm playing this solo using my Sacre Bleu! rules - basically heavily amended Piquet. Consequently, quite a lot happens in a multi-initiative turn. Initiative split in each phase of the turn is being decided by dominos and the sequence deck for each side is 24 cards strong.

Turn 1. 

In the initial stages, the French gain much the upper hand in the split of game initiative winning 27 to 9 points. They use this to press attacks on both the Eastern Ridge and Vimeiro Hill.

First blood is taken by the British who pour canister, and long range musket volleys into the oncoming French columns on the Ridge. This forces the leading French units to fan out into line.
As the French columns advance on Vimeiro Hill the Rifles, supported by Acland's artillery, nibble away at their numbers, choosing to falling back (opportunity evades) to avoid close contact.
Back on the Ridge the first French unit to give way is one of Solignac's Legere units, which makes its withdrawal through Ventosa.
The initiative starts to balance up, allowing the British to extend their front on the Ridge by bringing the 71st into the front line whilst, from the west, Bowes, Craufurd and Trant hurry eastward to the staccato rhythm of the musketry up ahead.
On the Ridge, the musketry duel between the skirmish clad lines is somewhat desultory but men are falling on both sides and French artillery is now adding to the tumult.
At Vimeiro Hill, the brigades of Thomiere and Charlot's are beginning to press home but, the British musketry volleys and artillery fire are far from desultory. The leading French columns are being harshly treated and close to withdrawing.

However, the British are also in trouble. Two late Cavalry March cards allow Margaron's dragoons to move around the right flank of the British line. With no move cards left to respond this turn their position is looking somewhat undermined but, game mechanics might still give them time to deal with the threat (exciting stuff).
At the end of turn one the French attack on Vimeiro Hill is well underway but the leading elements of the French columns are getting battered.

Kellerman's grenadiers have emerged from the pine woods and are heading towards Vimeiro itself. With Anstruther and Fane hard pressed to release troops to cover this sector, Acland may well need to play his historical part. Towards the end of the turn I began to think that Kellerman has decisively moved too early - I think his grenadiers might have been better used to press home the attack on the hill - but, we will see.

French cavalry, with still more in reserve, is looking like a real threat to the British in this sector of the battlefield.

Up on the ridge the British look to be fairly well set and have certainly had the better of the musketry and artillery duel so far. But, here too, French cavalry is encroaching the British flank areas. Wellesley's lack of cavalry must have been a real headache for the man.

Note that the top right hand corner of the table is where I stand with my French hat on; that's all the French player's game gubbins that you can see there: Red bag of dominos, sequence clock, cards, dice, game markers, etc.


Sunday 5 December 2021

What if: Vimeiro 1808. (Version 2)

Rather than edit the previous post "What if: Vimerio 1808" I'm posting this instead. Think of both posts as 'cluttered mind scenario development'. 

So, why the changes before the game has been played? 

Several years ago I read a very good account of Vimeiro then, at some point, forgot where I'd read it - a by-product of reading too many books about more or less the same thing, I guess. Looking at my book shelf nothing rang any bells so I assumed I'd read it on the web. By chance I was looking up something else and came across it: The [highly recommended] account is by Peter Edwards in his book Talavera, which has the full title Talavera, Wellingtons Early Peninsular War Victories 1808-9. The full title isn't on the spine.

However, having found the piece, I decided to redo the terrain and slightly change some of the deployments. I also decided to change a few of the scenario notes and I will detail these below. OOBs are unchanged and I will not repeat them in this post.

One point I would like to reemphasise is that this is not a recreation of the battle as it occurred: It is a  'what if' scenario that allows all of the French attacks to go in at once, to make a proper game of it.


Changes to terrain (N.B. Table orientation - the left hand side of the table is roughly north).
  1. The Eastern Ridge has been lengthened by 20" and broadened at its eastern end to a little over 36" wide; it is now 8' long. The summit of the ridge now undulates with three higher areas (second contour), along its length. N.B. The undulating Western / Eastern Ridge (cut by the R. Maceira's ravine) is enormous: It is five miles long and towers 500 feet above Vimeiro; its sides are steeply sloping open terrain; I will class them as rough going, no cover. 
  2. The new length of the ridge has allowed me to push Ventosa further east, and to put it on higher ground.
  3. The road system only vaguely resembles the one on the maps but, I have tried to keep the important ones running in roughly the right directions and emphasise Vimeiro's importance as a road hub. For this set up, I changed the river and road system around Vimeiro to better reflect how it worked. It is worth noting that, although I have nearly twenty eight feet of rubber road, I didn't quite have enough to to justice to the network: I may tinker with it again, especially at the eastern end of the table where the roads should be straighter.
  4. Because I have compressed the terrain (north-south) to feature both French attacks, Toledo, and the wall on the Toledo road, now have an important game function. The French troops destined to attack Vimeiro are not allowed to cross the Toledo road east of the orchard until Vimerio and Vimeiro hill are taken; they can cross the road west of that point should they choose to do so. A similar  rule applies to the British, though I'm fairly sure they will have their hands too full dealing with Solignac and Brenier to even contemplate a move south.
  5. I have reduced Vimeiro Hill to one contour high because it was not a high feature (80-100 feet above Vimeiro) and I have discovered it was fairly flat topped. I will class it as open terrain, with a terrain advantage in melee if higher.
  6. Because Edwards' narrative describes the French coming up the slopes of the hill quite quickly after passing over ground well suited to skirmishing I have moved the Vimeiro Hill's associated vineyard (representing scrub, hedges, vineyards and trees) well in front of the hill to allow freer movement closer in - it is rough terrain; soft cover. 
  7. I have removed several fields and added a few pine woods; again a feature of Edwards' narrative. They are rough terrain, soft cover.
  8. I've added the eastern end of the Western ridge (slightly out of position) for Hill's Brigade to have something aesthetically pleasing to set up on. The Western ridge should be more expansive and the gap between it and the Eastern Ridge should form a ravine cut by the R. Maceira. This was too hard to do, given the space at the edge of the table and my road and river sections. However, as I'm classing everything west of the River Maceira as off table anyway, this isn't a big deal. 
The deployments at the eastern end of the Eastern Ridge are significantly different since I lengthened and broadened the ridge. 

I am now going to allow both French brigades at this end of the table to start the game activated. Stopping Brenier from activating for a  short time, to stagger arrivals, would have been pointless. I believe the French player would have simply slowed Solignac's attack so that Brenier could catch up.

I think this combat is going to end up being a gripping encounter, and the will be British hard pressed to hold.

Note Wellesley's new position.
In my initial set up, I had wrongly put Wellesley here on Vimeiro Hill. He actually spent the whole battle up on the Eastern Ridge from where he could get a view of everything. He's been moved.

At Vimeiro Hill, except for the riflemen now well out in front in the repositioned vineyards, the deployments haven't changed much. Incidentally, this also works because the riflemen had to be withdrawn before the artillery could open up effectively (with canister?).
Minor repositioning has meant that the French deployment to assault Vimeiro Hill is effectively the same as it was. They are positioned as though they have made a full move into effective artillery range.

According to Edwards, pine woods covered the French approach in this sector and provided a rallying point for Thomieres Brigade. I knew I'd read about woods somewhere! Today there is barely a tree in sight.
Because Brenier is activated at the start of the turn, so too are Craufurd and Trant. They will need to move up that road quickly if they are going to arrive in time to support Nightingall, Furgusson and Bowes. 

Historically, this column did have some Portuguese guns (the road from the ravine was so steep that infantry had to help their teams pull them up it) but, I'm not adding them to the OOB. This is because the British probably have too many 'scaled' guns already.
Hill's Brigade, now aesthetically deployed off table awaiting activation on the Stratagem card. 

This Brigade didn't take any part in the battle. In theory they might have been brought up if Wellesley had ordered it, so I'm going to have them as another 'what if' possibility. 

However, I'm not going to make it easy for the British players to get Hill on table: On the appearance of the Stratagem card, roll D4 Vs D8: If the D4 is higher Hill's Brigade is activated and can set up anywhere west of the R. Maceira.

Those are the changes I've made. 

There is no game here for the next two weeks, possibly before Christmas, so I'm going to run this scenario solo. Partly, this is to test some new movement and skirmish rules on myself before I unleash them on the guinea pigs, sorry, my wargame chums; as well as test the scenario, of course.

As my solo games tend to be episodic, played as and when time allows, I think I will do a serialised blow by blow battle report on progress. Stay tuned....