Monday 30 April 2018

The Battle of Liegnitz 1760 fought solo. Turn 3

Initiative P8 / A5: The Brummers are in great danger of being overrun by the Austrian grenadiers of the Reserve then, (the sequence cards fall nicely for the Prussians, they turn Heroic Moment followed by Artillery Move) their officer sees his chance and withdraws them through the infantry line to safety. The other guns re-position themselves to obliquely spray canister into the packed ranks of the Austrian Reserve. 

Meanwhile the Austrian cavalry on their right moves up and seeing it's chance AHR24 (just in shot at the end of the Austrian infantry line) charges uphill towards a battery of Prussian guns (it doesn't have the initiative point to fight the melee).


Initiative P8 / A4: The Prussians launch a massed cavalry charge down the slope onto the advancing Austrian cavalry below and (with Cavalry Move in the Open closely followed by Shock Cavalry Resolution) a large cavalry battle erupts on the right for a second time.  


  • PCR8 Vs AHR24 = AHR24 routed with 1 UI loss (the guns are saved!), PCR8 rallies back.
  • PHR2a Vs ADR6 = PHR2a shaken, ongoing melee.
  • PHR2b Vs ADR24 = ADR38 routed with 1 UI loss, PHR2b rallies back.


The initiative continues into the next picture.


The Austrians bring up their infantry. The infantry of the 'First Line' shakes out into a contiguous line of three units with a unit in reserve in preparation for a follow up assualt on the Prussians that the grenadiers have already mauled. The remainder of the 'First Line' units race for Panten in preparation for it's defence. On the right, the 'Second Line' struggles to get organised - it is vulnerable to being caught in line of march by the Prussian cavalry coming down from the slopes above.
Initiative P7 / A0: The cavalry melee continues between ADR3 and PHR2a. PHR2a is routed with 1 UI loss, ADR6 is unsble to rally back (no room) so stands in place disordered.

Desultory shooting by Zeuner's advancing infantry cause insignificant (1UI) loss to the Austrian elite squadrons of the reserve but, up on the slopes the Prussian artillery blasts away another unit of grenadiers.

(Note, I now have enough grenadier figures to represent the three units of grenadiers that remain. I have used them so that things look as they should). 
Initiative A13 / P3: The Austrians bring more cavalry into the fray. ACR21 charges PDR11 and (melee actually resolved at the end of the phase) PDR11 is routed with 3UI loss, ACR21 is unable to pursue due to intervening Prussian infantry and mills about in confusion half way up the slope. 

(In the picture ACR21 are the cavalry in offset column).

Muller tries to rally his depleted ranks of Grenadiers with marginal success (1UI recovered).

Zeuner advances towards Panten, refusing his left in the face of the advance by units of the Austrian 'First Line'.
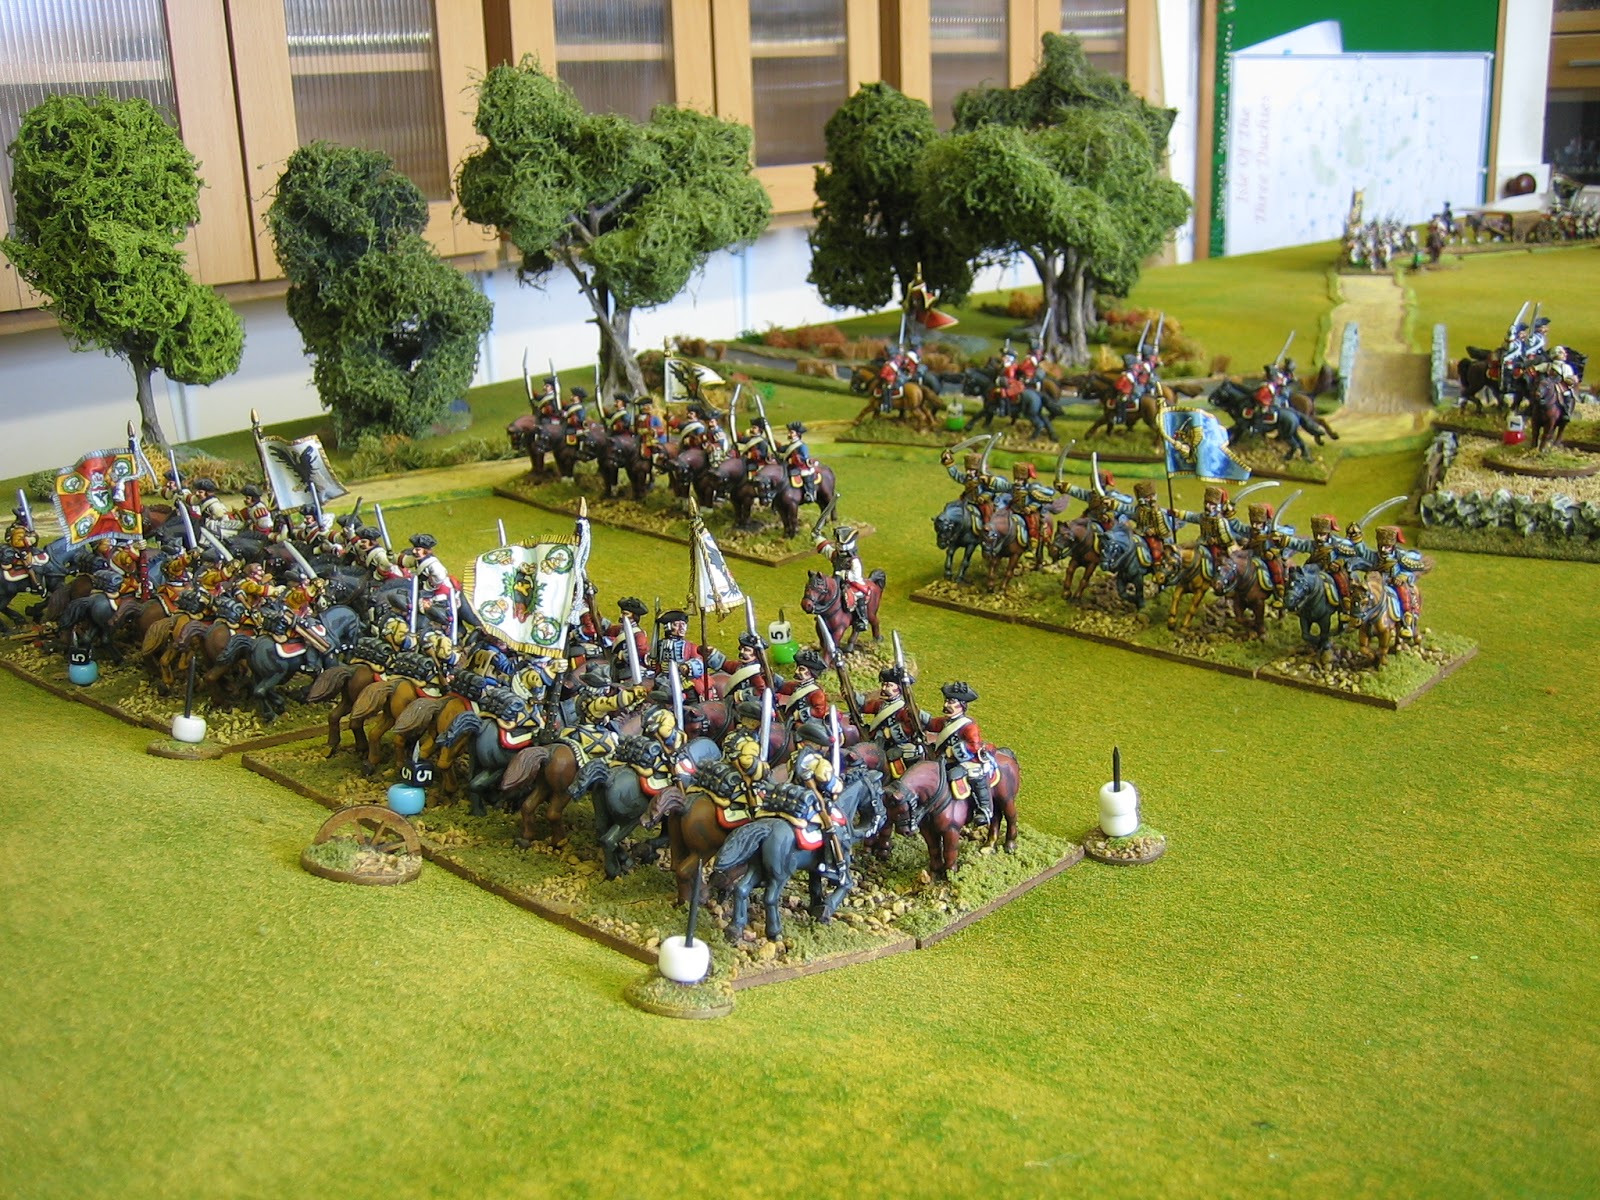
A general shot of the battle from Bienowitz, midway through turn 2. I think we can safely say that the action is now general.

Initiative P10 / A3: The cavalry combat continues: Whilst ACR21 is milling around and ADR6 are disordered they are charged by PCR5 and PHR2b and melee immediately ensues (no resolution sequence card is required Vs disordered troops).

PCR5 Vs ACR2 = ACR21 routed with 2UI loss, PCR5 pursues.
PHR2b Vs ADR6 = ADR6 routed with 3UI loss, HR2b rallies back.

Up on the slopes the canister fire from the batteries is devastating. One unit of grenadiers is now shaken (with 3UI loss) whilst another is completely torn to shreds (destroyed).

(I'm predicting a Prussian victory but there are, as yet, a lot of uncommitted Austrians entering the fray. The action this phase continues into the next shot).


The Austrians of the 'Second Line' deploy into line. Now their serried ranks really do look daunting to the Prussians.
Initiative P10 / A2: Standing Grenadier Battalion VI (PCGVI) of the reserve wheels onto the flank of the Austrian grenadier line and delivers a fatal volley - the Austrian grenadiers run.

PIR15 (the Garde) in Zeuner's command fires into the Kolowrat dragoons (elite squadrons) at point blank range (they are shaken with 3UI loss) then scattered by PIR2. The second line of elite squadrons (ADR1) are no longer screened and PIR15 lets go more volleys - ADR1 is routed. The way to Panten is almost clear!
P9 / A1: Zeuner's infantry reach the outskirts of Panten rolling over a battery of (unloaded) Austrian guns as they go.
P9 / A6: Zeuner's infantry move into Panten, occupying the builds on its western side. On the slopes of the plateau, Prussian infantry moves to roll up the attack of the Austrian 'First Line'.

(The action in this phase continues into the next picture).
The Austrians begin their attack up the hill. Much of the second line is being hampered by the number of routing and pursuing cavalry in front of them. The Austrian infantry around Panten deploys into line to deal with their unwanted guests.
Initiative A7 / P2: The rearward Austrian cavalry of the 'First Line' deploy into line in the centre of the field. The routing cavalry clears the path for the 'Second Line'. 

(In our version of the rules, routers and pursuers move on all Major Morale cards turned -  there are two in each deck. We do not use the standard Major Morale rules, ours are better, we think).

On the slopes AIR23 of the 'First Line' is routed exposing the Austrian lines to a possible flank attack - if one can be organised!


Initiative P13 / A4: The Prussians can see the opportunity (and luckily they have an Artillery Move card left as they close the turn) and push their artillery forward into a position (if they can deploy) from which to rake the Austrian lines as they come up the hill.

The Prussians have exhausted their sequence deck and end the turn - no intiative for the Austrians this phase. The initiative in turn has been decidedly with the Prussians - 63 to 40 and it has shown. At the end of Turn 3 the Prussians have only two units in rout. The Austrians have five in rout plus a further 9 beyond recall.

Here are three more shots of the action at the end of Turn 3.


Sunday 29 April 2018

The Battle of Liegnitz 1760 fought solo. Turn 2

Turn 2 

Initiative A9 / P2: The Austrian grenadiers of the reserve (almost immediately turning an Infantry Move in the Open card)  assault the Prussian line of guns and infantry. The assault is launched into a hail of deadly (opportunity fire) musketry and canister (which causes 5 UI loss and forces one unit into retreat) but the second line is in close support and the formation presses the attack. 

Meanwhile the columns of the first and second line continue to come up and begin to form into line. They even manage to deploy more artillery. This has been a nice flow of cards and initiative for the Austrians. 


Initiative A10 / P2: The grenadiers of the Austrian reserve now pour in their own fire which is effective but fails to break the Prussians at the summit of the slope (they lose 5 UI overal and the Brummers and PCGrIV are both shaken) but retaliatory (opportunity) fire routs another unit of Austrian grenadiers. Muffling rides to rally one of the grenadier units before it has retreated entirely out of the fray. The Austrian fusillade is renewed and the Prussians suffer further casualties (2 UI loss overall).

Prussian efficiency in musketry now begins to tell (they have more Musket Reload cards than the Austrians and draw two cards back to back (reloading all of the units that fired opportunity fire and standing ready to go again on the next) - they don't have the initiative to use the second card but its mere appearance is daunting for the Austrians.


Initiative P18 / A 4: The Prussians open up a devastating round of musketry and one of the Austrian grenadier units is shattered beyond recall. The Prussian guns add to the general carnage. 

On the Prussian left the cavalry under Krokow advances to cover the retreat of PCR2. 

On the right Zeuner advances his line towards Panten whilst the reserve moves troops up to fill the gap. 

The Prussian officers also do their stuff rallying (lost UI) the infantry which have been heavily engaged.


Initiative A8 / P5: The Austrians bring up the last of their artillery. Muller rallies another unit of grenadiers which, to keep the Prussians busy, wheels to face the oncoming infantry of Zeuner's command.
Initiative A11 / P0: The Austrians find few cards to aid with their assault by the grenadiers and use this free of reply initiative phase to hurry the columns of the first and second line into the action. 

The Grenadiers have done their stuff. They have prevented the Prussians interfering with the build up of Austrian troops north of Panten.

This is the last intiative phase of turn 2 - the next domino draw was double four and double one and this ended the turn. 

Here are three more shots of the action at the end of turn 2.

A general shot of the battle so far. The Austrian grenadiers of the reserve are keeping the Prussians occupied at the summit of the plateau. Zeuner's infantry (foreground) have descended the slopes and are about to launch an attack on Panten. Just north of Panten half the infantry of the 'first line' have deployed in readiness to launch an attack of their own whilst the rear units of the column race to occupy Panten before Zeuner's Prussians arrive. At the top of the picture the Austrians have massed cavalry to cover the deployment of the infantry of the 'second line' currently crossing the northern bridge.  

Infantry of the 'first line'. Four units with artillery support prepare to attack. The remainder of the command can be seen, in column, racing into Panten. In the distance, infantry of the 'second line' and cavalry are still arriving in the battle area.

Austrian cavalry of the van massing to cover the deployment of the 'second line'.

The Austrian view from behind their right- that windmill, the key to victory, looks a long way off  and well defended.

The view from behind the Austrian's extreme left. Elite squadrons of the reserve and a battery of guns are all that stand between Zeuner and Panten.

I have somehow managed to field quite a high percentage of the actual units that fought at Liegnitz. The unit of the Garde (3rd battalion of IR15) on the extreme left of the picture (with striped silver and white flag) were present on the day in 1760, as were IR1 at the other end of Zeuner's line (but with the other wing). The Kolowrat dragoons (painted as the elite squadron unit in blue, with a very nice red and white eagle crest on its flag) and the Erzerherzog Dragoons (elite squadrons in green) were also there. 
Back to the game. An AAR of Turn 3 will follow shortly.

Saturday 28 April 2018

The Battle of Liegnitz 1760 fought solo. Turn 1

As my wife and son are away this weekend; they have tickets to see Shakspeare being performed by the Globe Company at Westminster Abbey. So I've decided to open a curtain of my own and perform all the parts in a re-fight of Liegnitz 1760 before I set it all up again for the boys to play on Wednesday night.

I'll be using the scenario described earlier this month, using The Ilkley Lads' amended Piquet rules for fighting large 18th century battles. Being a solo game I can play it, at my own speed, whilst taking notes and photos as I go along. Note that the initiative will be decided by drawing two dominoes (one for each side) for each 'initiative phase'. I'll explain the system later but, suffice to say that unless one side draws double blank, each side gets some initiative on each draw.

Where necessary I will give unit designation by the actual (what the unit was painted as) wargame unit present. PCR2 is Prussian Cuirassier Regiment number 2; ADR28 is Austrian Dragoon Regiment number 28; PIR3 is Prussian Infantry Regiment number 3; etc.

I will detail the refight in a series of short posts. O.K. luvvies: Camera, action!

Turn 1.

Intiative A5 / P1: The Austrians move their van cavalry from the second line column across the bridge going left and right in order to form into a third line behind the van cavalry of the first line.

Initiative P9 / A5: Holsteins lead cavalry regiments thunder down the hill and immediately melee (the sequence cards flowing nicely) the Austrian vanguard cavalry. The melee is inconclusive - PCR2 narrowly gets the edge on ACR2 whilst PCR8 narrowly loses against ADR28 - and the losers are shaken without loss. On the right Zeuner begins to bring his infantry forward .

The photo shows the positions after the melee has been resolved. The Prussian cavalry have used a 'blown' marker (white bead) for charging. The wheel denotes PCR8 being shaken. In the background the Austrian cavalry of the second line can be seen moving to form a third line.

The cavalry melee continues in the Austrian phase. This time the Austrians suffer heavily in the ongoing fight. Both ACR14 and ADR28 are routed with three unit integrity (UI) loss. PCR8 does not pursue and rallies back. PCR2 is forced to pursue but it's path being blocked by the Austrian second line can't go forward so it 'mills about'.


Intiative A8 / P2: The Austrian guns fire on PCR8 now standing at the top of the plateau and suffer heavily (2UI loss). ADR6 in the second line of the Austrian van charge PCR2 which stands in great disorder to their front but are repulsed. 

The Prussians withdraw PCR8 behind their infantry line whilst the cavalry under Krokow advances to cover the left flank of the infantry line.

Note ADR28 routing towards the guns - soon they will leave the table without a chance of being rallied.


Intiative A8 / P4: The Austrians can do little but cycle through useless cards in their sequence deck. As the last pips are used, they manage to organise their cavalry into line.

The Prussians open fire with their artillery on the grenadiers of the reserve to little effect (1 UI loss).
Intiative P7 / A4: Zeuner continues to bring his infantry forward into a line facing east. The fusiliers of the Prussian reserve come up into line behind PIR4 and PCGrVI.

The routing  Austrian cavalry has now begun to exit the field at Pantern.


Initiative A3 / P0: The Austrian infantry begins to come up. 
O.K. So the next initiative threw up a big roll to the Prussians and this is a good time to explain how the initiative points for each side are determined. At the start of each initiative phase each side draws a domino, sight unseen, from a bag. The player with the most spots wins the initiative and gets the sum of both halves of his domino (e.g. 5/2 = 7) as initiative points. The loser gets the high side of his domino (e.g. 5/1 = 5). If the either side draws a double the winner gets the sum of both dominoes at his total initiative, whilst the loser either gets the high side of his domino or both sides if he drew the double (e.g. in the pictured example, the Prussians drew 6/4 and the Austrians drew 4/4; the Prussians win 10 to 8 but because the Austrians drew a double four the Prussians bag the lot and get 18 points of initiative; because the Austrians drew the double they get 8 points. 

The picture shows the dominoes and the initiative clock. The clock is used to count down initiative as it is spent. The picture also shows the sequence deck (it's the Austrian one). Turning a card costs an initiative point and each action carried out generally costs an initiative point. The last card the Austrians turned (in the last initiative) was Infantry Move in the Open, any infantry commands that have not acted on the card may do so in the next initiative phase providing initiative points are available.

Initiative P18 / A8: The Prussians cycle through their deck without finding the appropriate cards on which to act decisively. As the last pip is spent Zeuner forms his line on the right, the Prussian howitzers of the reserve deploy and the artillery causes three UI loss to the grenadiers of the Austrian reserve.

The Austrians reserve ascends the slope with ineffective artillery support, whilst the columns move up. Latterly the lead elements of the columns manage to deploy.

The next domino draw is double 3 double 1. One thing I forgot to mention. If double double dominoes are drawn at the same time, the turn immediately ends and the sequence card decks are shuffled ready for the next turn.

Pictures showing the field at the end of turn 1


The grenadiers of the Austrian reserve are assaulting up the hill. Visible in the foreround, ACR14 is about to leave the table in rout.

Austrian infantry of the first line is formin up in and to the north of Pantern.  On the far side of the field the  situation following the cavalry engagement can be clearly seen. Note that wagos represent limbered artillery (I don't have limbers yet).

The columns of the first and second lines are coming up into position ready to assault the Prussian position. There is sure to be a bottleneck, and the Austrians will be forced to attack in waves.
Now back to the table for Turn 2.

Sunday 22 April 2018

About to go past 1,000,000

Well, it looks like today is the day. Olicanalad's Games will pass 1,000,000 hits. This bog was started in May 2008, and over the last ten years the monthly hit count has gradually risen. Recently, the monthly hit counter chugs along at about 8,000 in a quiet month and at around 12,000 when I post more frequently.


The USA and UK provide the bulk of the readership, for obvious reasons, with almost exactly similar numbers of hits, with Russia coming a good third. Having lived on the NBC training base at RAF Winterbourne Gunner near Salisbury I wish not to speculate as to the reasons for this but, I know some of the Russian hits are from real wargamers because they email me from time to time. The top ten visiting countries are as follows:

USA  289203
United Kingdom
288484
Russia
70943
France
44002
Australia
35000
Germany
30386
Canada
22926
Italy
21132
Spain
19886
New Zealand
11679

The most popular of my 566 previous posts still available to read have been:

6 Jun 2017, 23 comments
5123
9 Oct 2011, 25 comments
2964
1 Nov 2011, 13 comments
2697
2201
2180

So, that's the news. 

I'd just like to say a big thank you to everyone who has visited over the years for your support, encouragement and comments. 

My Best Regards,

James Roach (a.k.a. olicana).

Thursday 19 April 2018

FOR SALE - Three Gallic warbands

THESE UNITS HAVE BEEN SOLD

Once every so often, I put something up for sale. This time I'm putting up three Gallic warbands, each of twenty two painted and based 28mm figures by Renegade. 

All were painted in enamels, and based, by yours truly for my own collection - these are not the runts of the litter; each base was picked at random and I'd be happy to swap any of them with the sixty bases that I'm keeping.


Warband  lot 1


Warband lot 2


Warband lot 3


SOLD