An Overview Of The Battle
The Russian plan of campaign for 1759 was a simple one. Their army of 60,000 men, including Cossacks, now under the affable command of the greying Petr Semenovich Saltykov, would operate alongside the Austrians for limited objectives on the Oder river. In late June the army set out from Posen towards the middle Oder.
Facing the Russians, with orders to defend the middle Oder, was a corps of 28,000 men under the "combatitve if rather stupid" Lieutenant-General Kurt Heinrich von Wedel. Wedel lost no time in moving to engage the enemy, first shadowing their line of march and then establishing himself across it and offering battle at Züllichau.
Saltykov declined to attack and nimbly side-stepped Wedel during the night of 22 - 23 July. Hours later, Saltykov had marched the Russians, via a northerly route, around and behind Wedel and taken up a defensive position at the village of Paltzig which lay astride the Prussian's main line of communication with its supply base at Crossen.
 |
| The Russian position before Paltzig |
The position chosen by Saltykov was a good one. Sandstone hillocks provided ideal anchors at the northern and southern end of his line. On these hillocks Saltykov planted two strong batteries of guns, whilst other batteries were placed along the length of his formidable double infantry line. In front of the whole position was the Eichemühlen-Fliess. This broad and swampy stream, which was almost impassable along it's northern sector, would disrupt any aggressive movement by the Prussians. It is also worth noting that the Paltzig position is the first recorded instance in the war of the Russians pacing their artillery in hastily constructed entrenchments.
 |
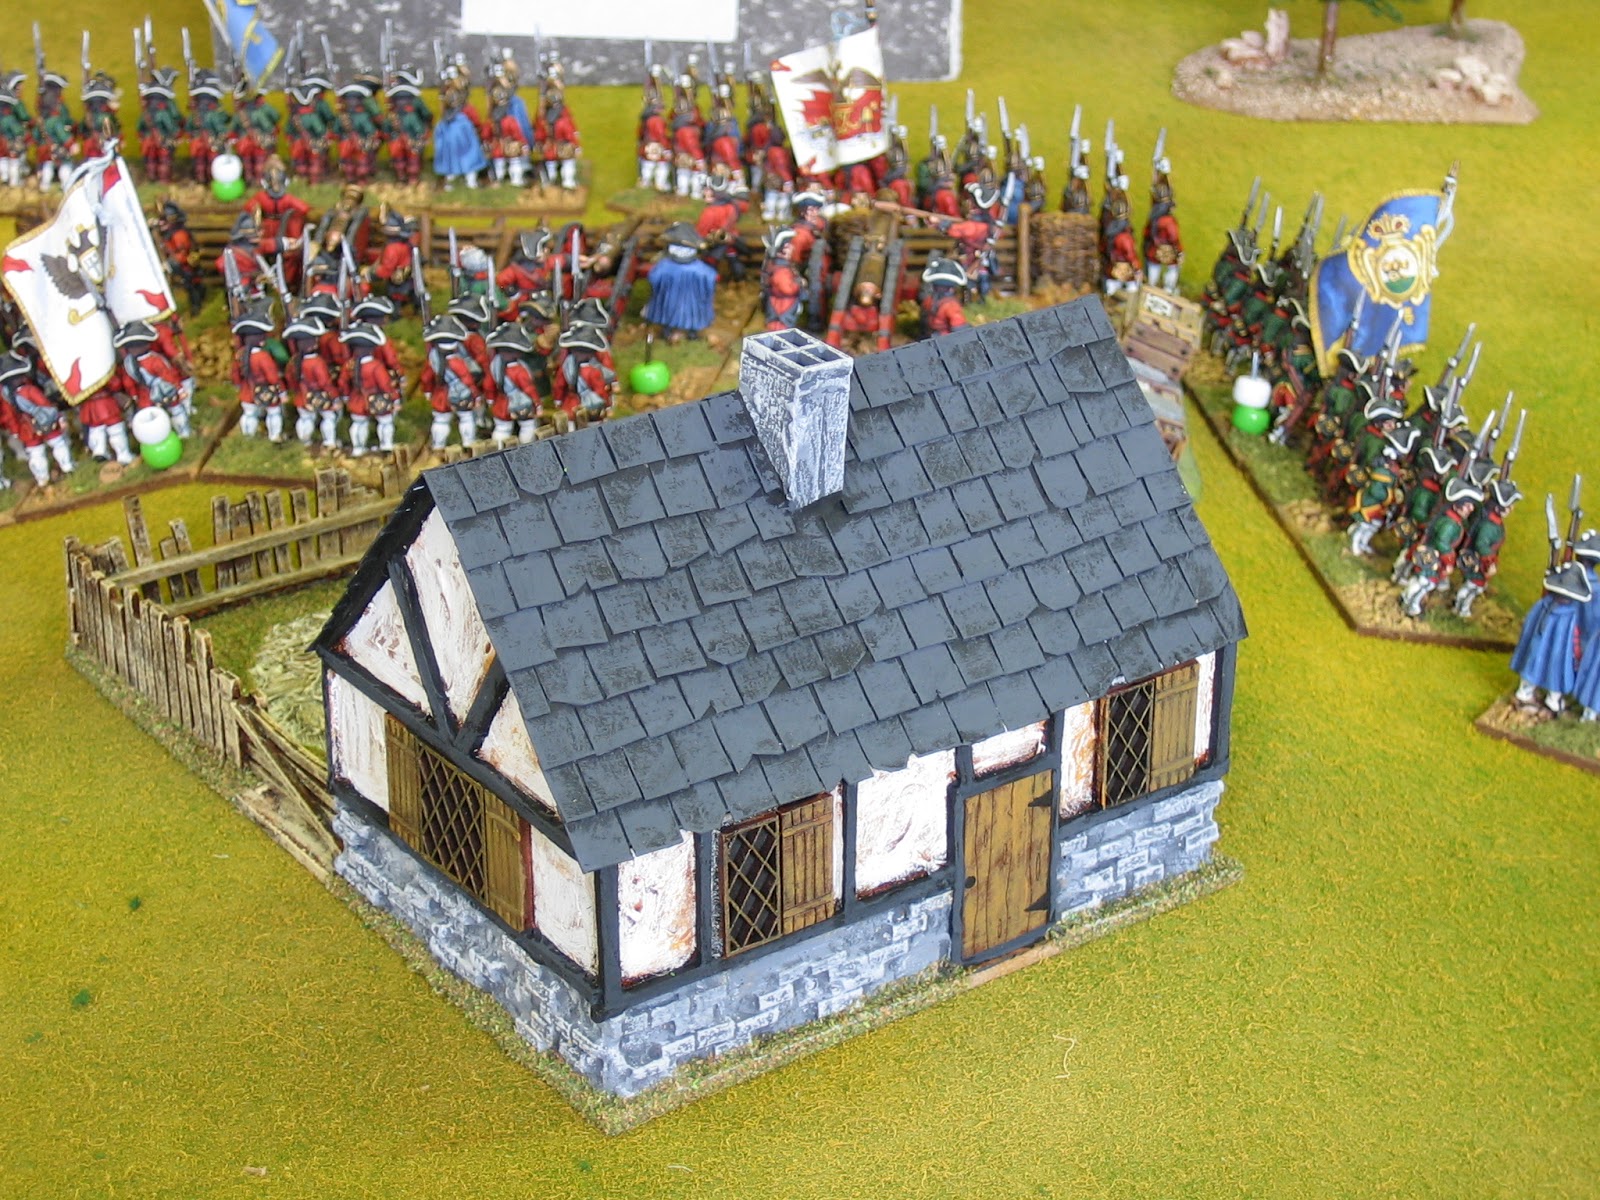
| The southern end (right flank) of the Russian infantry line with the 1st Grenadiers 'en crochet' before the line becomes 'a potence'. Behind them, emplaced artillery on the southern hillock. |
Returning to camp at 10 a.m. 23 July, after ineffectually reconnoitring the stationary Russian army in front of him, Wedel was rather shocked at 11 a.m. to see the Russian army he thought was in front of him marching behind him. Fearing that inactivity might lead to a similar fate to that of Dohna [he was ignominiously sacked by Frederick for timidity] Wedel, outnumbered 2:1 and facing an enemy behind a formidable natural obstacle, did what Dohna would never do - he ordered a full scale attack.
 |
| Manteuffel's command has passed Kay and begun its advances along the southern spur towards the Russian position. |
The first problem facing Wedel was how he would get his troops over the Eichemühlen-Fliess. Due to the marshy nature of the banks the only practical crossing point was at the narrow bridge at the mill at Kay. Getting troops through this narrow defile would force any attack to become staggered. The crossing was briefly contested by Cossacks, but the vanguard under Manteuffel soon pushed these back and then formed up ready for an attack on the southern end of the Russian position. It was now 3 p.m. Over the next few hours the Prussians threw themselves at the Russians in three separate attacks.
 |
| Manteuffel's vanguard, infantry and cavalry. Schorlemer's cuirassier hold the southern valley. |
The first attack, was carried out by Manteuffel's vanguard comprising fifteen battalions supported by fifteen squadrons of dragoons and five of hussars of Schorlemer's division. These troops attacked along the top of the spur pointing out from the Russian position towards Kay. The attack was carried out with such ferocity that they managed to throw the Russian right flank into disorder and force it back towards Paltzig.
 |
| The Russian centre with the village of Paltzig behind it. |
However, the Russians were not idle and were adroitly filtering fresh troops and artillery from their left wing into the fight. They had soon established a new line south of Paltzig, including a seventy gun battery at Palzig's church, and their position was skillfully stabilised. Manteuffel's force was now spent and Manteuffel was badly wounded: He was forced to withdraw.
 |
| Off table reserves - Kanitz (left) and Krasnochekov (right). |
The second attack was carried out by Kanitz's second line which had now negotiated the bridge at Kay. The attack comprised Flemming's brigade of six battalions supported by sixteen squadrons of hussars of Puttkamer's brigade. These directly followed up on the attack made by Manteuffel. As this attack went in Wobersnow was also ordered forward in support with his six battalions and seven squadrons of hussars. By now the attack had become a hopeless frontal assault into the teeth of Russian muskets and massed artillery fire. Weight of numbers was all with the Russians and both attacks were bloodily repulsed. Wobersnow was killed.
 |
| The Prussian guns and Wobersnow's reserve. |
It finally fell Schorlemer's previously uncommitted twenty squadrons of cuirassier to try to save the day. They launched their attack from the open valley to the south onto the flank and rear of the Russian line. The attack suffered interference from Russian hussars and Cossacks that had been waiting farther up the valley for just such an eventuality. The Prussian cuirassier soon got the better of the Russian horse but the cohesion of their attack had been spoilt and it was now too late to change the course of events elsewhere.
 |
| Schorlemer's 20 squadrons of cuirasier. |
At 8 p.m., with the sun setting behind the Russian line, Wedel ordered a general withdrawal and under cover of the fading light regrouped east of Kay. The Russians did not pursue.
The Prussians lost nearly 8,000 men; men that they could ill afford to lose. The Russians lost 4700. 23 July 1759 had been a bloody day for the Prussians. Three weeks later it would be Frederick's turn to top-score a butchers bill at Kunnersdorf. On 12 August 1759 he would lead 50,000 men into battle against this foe. At the day's end 20,000 of them were casualties and he had less than 3000 men under command.
 |
| Demiku's cavalry south of Paltzig. |
I believe this battle was the turning point for the Russian army. After over two years of campaigning the Russian army had found its edge. It was no longer a ramshackle force only capable of a brave and static defence. On 23 July 1759, as one observer recorded
"All those who were present at this action have testified that no battle had so far proceeded in such an orderly fashion. Nowhere was there the slightest disorder on either side during the whole of the combat, and so victory may be attributed above all to the superiority of our force, to the advantage of a well-chosen position, and to the good effect of our unicorns and Shulavov howitzers."
Order of Battle
For this battle I have chosen to use the simple expedient of representing each regiment or with a unit of 24 infantry (36 infantry for the three Observation Corp regiments). This gives the Russians twenty six units of infantry to thirteen Prussian units.
For the cavalry I have roughly divided squadrons by five and represented each five with a unit of cavalry. I have had to make a rough stab at the number of cossacks present in the southern valley. I have made this force four units strong, which might be slightly over stating their numbers, but you can never have to many of the useless bleeders in my opinion and Saltykov is the only Russian commander who ever thought something might be made of them. I have omitted all of the Russian cavalry that was deployed north of the infantry at right angles to the infantry line as it took no part in the battle.
I have chosen to represent the artillery with eight batteries each of two guns. Six for the Russians and two for the Prussians. Russian artillery on the hillocks can claim superior position and can fire 'overhead'.
I have divided the Prussian army into four command groups as this is more than sufficient for a war game force of this size. Manteuffel's infantry, Schorlemer's cavalry, Kanitz and Wobersnow.
The Russian army is divided into six command groups. The infantry are in three groups: Fermor in the south and Villbois in the north, the third comprises the Observation Corps mobile reserve. There are three cavalry commands: Two, behind the infantry line are commanded by Demiku (south) and Jeropkin (north). The third should also be commanded by Demiku but, as he is elsewhere engaged, I have shifted the hussars to the Cossack commander Krasnochekov.
To keep things simple, I'm going to call all Russian infantry, artillery and regular cavalry 'average on the day'. The Cossacks, as is their want, will all be 'battle weary'.
I'm going to classify the Prussian musketerr regiments as 'eager', as it seems to have performed quite well given the circumstances. Similarly, the cavalry was also a cut above anyway so I will classify that as 'eager' too. The fusiliers (IR 40 was notorious for ill luck) and artillery will be 'average'.
Scenario Notes
This is a game scenario not an absolute reconstruction. I have deployed the Russians and Prussians in there positions at 3 in the afternoon. From this point on both sides can manoeuvre as they choose except:
- Kanitz can be activated after the start of turn three on a 'stratagem' card. He can enter at the eastern edge of the table south of the Eichemühlen-Fliess. He need not follow Manteuffel's attack.
- Wobersnow cannot be ordered forward until after the arrival of Kanitz.
- Schorlemer's cuirassier can be ordered forward at any time.
- The Russian hussars and cossacks can be activated on a 'stratagem' card, or if Schorlemer's cuirassier advance beyond the centre point of the table. They enter the table, from the west, in the southern valley.
- The Russian mobile reserve and the other cavalry can move at any time.
- The troops of Villbois' command cannot carry out significant movement south until after Wobersnow attacks - they must stand as a covering force in 'expectation' of his move forward.
I hope the movement restrictions will help the scenario flow - we will see.
The Battle
Manteuffel's infantry advance up the spur and along the southern valley under sporadic and largely ineffective artillery fire.
They make a fine sight as they advance, and the swing of initiative pips is with them; they win high doubles back to back.
The Russians are unabashed and stand comfortably in the knowledge that numbers and position are with them.
At the end of turn 1 the Prussians are in position to press home their attack
Meanwhile, the Russian mobile reserve is speeding its way from the north, and well they might because in the south everything is going the way of Prussia.
A fierce musketry duel has gone the way of the Prussians. Grenadier Regiment 1, en crochet to the first line is under severe pressure. Dragoons of DR6 have moved to finish them and only a last minute intervention by the guns has saved the grenadiers from almost certain destruction. The respite is short lived. Several volleys of musketry reduce the grenadiers to ruin and the Prussians sweep into to Russian position
The Prussians do not let up. They press home along the entire southern end of the Russian line.
The Prussians are winning hands down. The Russians are in trouble.
At Paltzig, the Russians are hastily forming a new front to oppose the Prussian onslaught.
The Russian right wing buys suffiicient time for their compatriots farther north to form a very strong looking line, four regiments deep in places.
At the end of turn two the task facing the Prussians looks even more daunting.
The Prussian grenadiers of CG 35/36 (actually 8/46 pictured) attempt to storm the Russian artillery emplacement but after a tight struggle are beaten back.
The Russians infantry are also doing well and soon a IR 49 (Fusiliers) are sent packing.
At Kay, Kanitz has managed to negotiate the bridge and the second wave is on it's way.
Back at the southern end of the Russian line it is nip and tuck.
An isolated unit of Russians, despite having incurred severe losses, launches a fierce bayonet charge at Prussian infantry that has exposed its flank south of the emplacement. The surprised Prussians take to their heels.
Now the Russians and Prussians are trading deadly blows in equal measure, routing unit for unit. It is the Russians who finally crack.
At the end of turn three, Manteuffel has achieved his first objective; the southern hillock is all but taken, though at heavy loss.
Turn four sees the long build up towards the attack of Kanitz and Wobersnow.
Turn five sees the battle become general and a result.
Whilst the Prussians build up their strength the Russians, much to the annoyance of the Prussian cavalry (until their position is covered by Kanitz), respond with artillery fire.
Wobersnow descends into the marsh bottomed valley. The attack, as it did historically, has become a frontal assault.
Schorlemer's cuirassier advance down the southern valley.
Wobersnow finally crosses the marshy ground but is assaulted by artillery from all directions.
The enfilading artillery fire from the northern hillock, coming from a superior position, is devastating. It will, over the course of the next turn, rip Wobersnow's attack to shreds.
The Prussians get a huge slice of luck at the beginning of turn five - they get a swing of 21 initiative points. They use it to make a concerted lunge at the Russian's newly formed line.
The assault goes in and the Prussians bring everything they can to bear.
The Russians hang on grimly then counter attack. The Prussian attack crumbles. Wobersnow's attack has been destroyed, Kanitz is dead, and Manteuffel's infantry are in tatters.
I could have prolonged the game by allowing the cuirassier attack to get to grips but it seemed a little far fetched for them to rescue the situation. It seemed as good a point as any to end the battle, so I called it a day at this point.
I played this game through as a solo affair over a few evenings and quite enjoyed myself doing so.
You can see that I largely went with the way you voted for terrain (22 votes to 12) and only did the hillocks. I had initially put some extra pieces of high ground in the gap between them but it just looked odd, so I removed them and settled on just representing the hillocks.
Much of the battle, as you can see from the photos in the previous post took place on a low flat plateau and spur that rose above the marshy stream and southern valley. When I came to set out the terrain the plateau was so obviously delineated by the marshy valley bottom and stream, and the road following at the bottom of the northern slope of the southern valley, that I decided further embellishment wasn't required. The tree strewn slopes of the spur pointing out towards Kay also helped give the terrain is topographical shapes without recourse to elevating the ground. Although not perfect, it worked surprisingly well.
I wasn't at all sure about this scenario having any merit as a game because the odds are stacked so much against the Prussians. I have to say that I was surprised at just how well they did, and at one fleeting point I thought they might just turn history on it's head. The Prussians have the advantage of being concentrated against the under-supported southern end of the Russian line and the initial deployment means they can be on it before the Russians can readily act to stop them. Manteuffel's attack is the key. If it works the Prussians stand a small chance of actually winning. My biggest mistake with the Prussians was in not using the 15 squadrons of dragoons behind Manteufel's infantry - I did little with them and they just suffered the attention of the Russian guns to no purpose. They might, with some well timed charges, swing the battle a little more towards the Prussians - if they are going to die, they might as well die gloriously!
With lessons learned in the first re-fight I have slightly changed the field. I have reduced the depth of the Prussian ridge and pulled the Eichemühlen-Fliess back several inches towards it. This has allowed the Russian deployment to come forward and increase the the depth of the Russian deployment area. I think the Russians will always form their new line south of Paltzig and the extra 6" of rearward depth will help that deployment. I have also widened the spur slightly; it is now four inches wider than it was and should give the Prussians a little more wriggle-room during their first couple of moves.
So now I'm all set to do it again. Who fights it depends on what the 'Lads' are doing in a couple of weeks. We haven't got together in over three weeks now due to illnesses, prior engagements and equine necessities. I'm hoping we play this Wednesday, round at Grahams (?), then perhaps we can play this battle over the two Wednesdays after.
On the 19th / 20th March I'm going up to Scotland to play in a (League of Gentleman Wargamers) French Indian War bash. I'm looking forward to that one as it's the only time I get to play as part of a large group. The Friday night before should be good too. Steve has planned a visit to the Black Watch Museum and a FPW game in Perth using 'Bloody Big Battles'. That trip should get the juices going and inspire me to get some things done around here.
Tonight I'm sneaking in a cheaky game of X-Wing with Ewan. It'll have to be set up on the lower ground floor though, because there is no room for it in war games room. I'd better go get the wood-burner stoked up...........