Friday 28 February 2014

The Battle of Pisae and the march to Heraclea

And so the battle was resumed in earnest. And Earnest had his skates on.
 As fast as lightening, the Romans managed to shore up their left flank and press their own attack in the centre. The Carthaginians began to lose their impetus (a lack of useful cards) and the Romans began to make ground. The battle that followed was all too bloody. In a matter of half a dozen cards and some incredible dice rolling by both sides the issue had been decided. The Romans managed to make up for the earlier losses, but the objective points held by Carthage (C&C 'flags' given to key terrain features) kept Carthage in the game just long enough to gain a very marginal victory.


 There wasn't much left in the centre when it was over!
 The position following the battle. Hannibal had lost 1 CU. Paulus lost 4 CU and retreated to Cosa. Rome lost political control of one area.

I decided, BTW, that in campaign game terms, Paulus should roll on the retreat table with a minus 1 modifier.

End of Campaign Turn 3

(C = Carthage, R = Rome, # = Strategy card ID number played)

R47 Political control of three areas in Corsica and Sardinia. Rome regains control of the islands.

C28 Political control of Pisae and Heraclea. 

R17 Political control of one area in the region of Massilia.

C13 Event: Bruttian Recruits. 2 CU are added to Hanno's army in Lucania. Obviously the Bruttians have not forgiven Rome for subjugating them earlier in the campaign!

End of turn consequences: Rome loses 2 political control markers. In the senate Flaminius remains pro-consul. Paulus, due to his recent efforts no doubt, is re-elected as consul for a second term. His fellow consul is Marcellus.

Campaign Turn 4

R33 Major Campaign card. Marcellus, in Mutinae (Cisalpinia) moves south over the passes taking heavy losses (3CU) due to late snowfalls, marches via Cosa where he picks up replacements (3 CU) from Paulus, and tries to bring Hannibal to battle. Hannibal deftly withdraws back to Boii in Cisalpinia. Paulus retreats on Rome. Flaminius marches around Sardinia picking up the garrisons he used to regain political control of the island.

C29 Event: Carthaginian Naval Victory. It will be a good year to take a Mediterranean cruise!

R38 Minor Campaign. Flaminius manages to evade the victorious Carthaginian fleet - he makes landfall at Saldae in Eastern Numidia but not everything goes his way. Heav seas take their toll (loses 1 CU to Storms - C60).

Paulus marches from rome to engage Hanno at Heraclea in Lucania. 

 The Campaign map at the Battle of Heraclea. Paulus is fighting with 5 CUs plus 2 CUs for his Italian allies. Hanno will be fighting with 5 CUs plus 1 CU for Cisalpinia. Both commanders are class 2 battle commanders and will get 5 Commands and Colors cards each.

I have changed the way that armies are proportionally determined. In the first battle I worked this out using a simple number of units sum. But this wasn't quite fair on Carthage as she tends to have more cavalry and less capable javelinmen in her armies. So, I have done the following to get a fairer way of balancing strengths by assigning points. Points are, with a bit of fiddling here and there, roughly equal to Commands and Colors hit points plus combat dice:


Unit
Normal strength
Double strength
Spanish caetrati
6
-
African javelinmen
5
-
Balearic slingers
6
-
Gallic skirmishers
6
-
Spanish scutarii
8
10
Gallic warriors
7
9
Italian Infantry
8
-
Libyan spearmen
9
-
Numdian cavalry
6
-
Spanish cavalry
6
-
Gallic cavalry
6
-
Elephants
6
-


Unit
Normal strength
Double strength
Triplex acies
30
-
Roman velites
6
-
Roman hastati
8
-
Roman principes
8
-
Roman triarii
8
-
Spanish caetrati
6
-
Cretan archers
6
-
Gallic skirmishers
6
-
Spanish scutarii
8
10
Gallic warriors
7
9
Roman cavalry
6
-
Allied cavalry
6
-
Numdian cavalry
6
-
Spanish cavalry
6
-
Gallic cavalry
6
-


Battle rating 1
Battle rating 2
Battle rating 3
Battle rating 4
C&C Cards
4
5
6
7
Table-top Generals
2
2
3
3

I have also knocked up some troop type combat tables that suit me better than the standard ones in C&C:


 So onto Heraclea. Having taken a look at the region on Google Earth I decided to do a battlefield that represents the region as a whole rather than a specific part of it. At the coast there is a broad flat fertile plain (probably marshy in ancient times) that extends several miles inland before it rises steeply into hill country. I have split the table into sectors using yellow headed map pins again. This worked like a charm in the last battle. The table is 10.5' x 6' split into three 3.5' sectors.

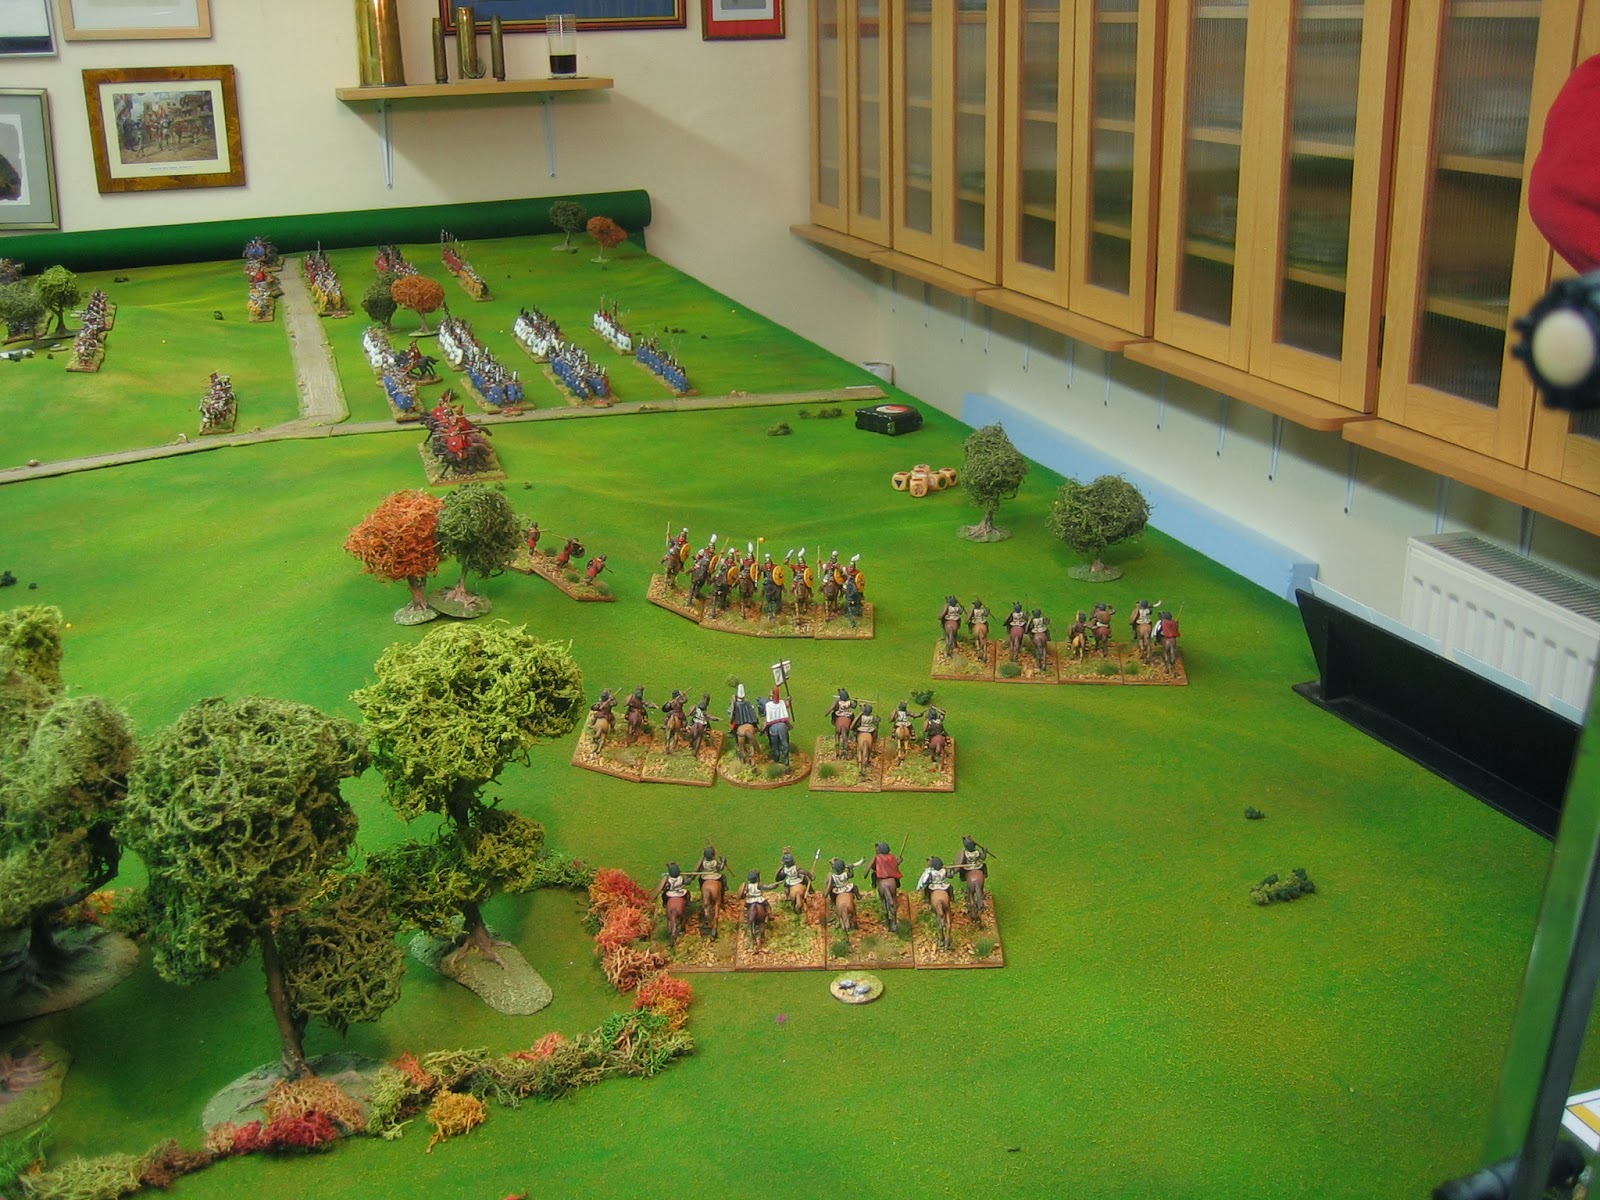
I have put out the armies, but they are not deployed. Paulus gets a Consular army. Hanno gets a mix of troops decided on by me (umpire).

Note the objective points and 'victory flags' marked with small playing cards in place setting holders: 2 for each side's entry road (centre) and the settlement (flank), and 1 for each hill (flank). 


 The army of Carthage, proportionally it has the same 'value' as the Romans. it is worth 123 points. It includes Africans, Spanish, and in the distance Bruttians.

Below, Rome's consular army. Worth 144 points.
Finally, here the notes we are using for hexless Commands and Colors. Everything else is done using the basic game rules and a bit of common sense.

GENERAL CONVENTIONS AND ORDERS
Measurement for the purpose of ‘adjacent hexes’ is 8” measured from the middle of one unit to the nearest point of the next. The traced line may not pass through any part of another intervening unit.

Units may only have one facing and may only initiate combat to their front.

Roman infantry may not form a triplex acies formation after battle has begun. Troops leaving a triplex acies formation, by turning out of ‘line astern’ or becoming separated by more than 8” (see above), may not re-join. For the purposes of ordering, whilst in triplex acies formation all troops count as medium troops. On a ‘general’ order one unit in the formation may engage in close combat or shoot. On a ‘medium troops’ order one unit may engage in close combat.

MOVEMENT

All ordered movement must precede combat rolls.

All units may turn once, through 90 degrees or about turn, before moving.

All troops may side step four stands width instead of moving but they may not do so to effect a contact.

All light units may oblique (45 degree) move.

All light infantry may interpenetrate freely. Other troops require a gap of 8”.

Evades can be in any direction (not necessarily towards the unit's own basline) but must be made in an arc of 45 degrees to either side of the direction of the attacking unit.

A triplex acies formation may move 8” on a single order. All units within a triplex acies formation may interpenetrate front to back (or vice versa), by advancing one place, without penalty.

Units with an attached leader require only one order to move.

SHOOTING

Shooting ranges are measured from the middle of the shooting unit to the nearest point of the target unit.

Shooting arc is 45 degrees to either side of the shooting unit’s front. At least one full stand of the target must fall within arc to qualify as a target.

When shooting from behind the flank of a target the shooting unit adds one dice.

CLOSE COMBAT

Flanking units count flag symbols as hits. Flanked units do not retreat. When flanked units battle back they do not count sword or flag symbols. After the initial round of combat the outflanked unit may turn to face.

Units attacking an enemy’s rear count flag symbols as hits. Units attacked in their rear do not retreat. Units attacked in the rear do not battle back. After the initial round of combat the outflanked unit may turn to face.

Units engaged frontally in triplex acies formation may retreat through the ranks of the formation counting each rank interpenetrated as a retreat. The following unit in the formation always has the option to advance to take the place of a retreating, or destroyed, unit and fight if battling back. Note, all units in a triplex acies formation count as a single supporting unit.

LARGE & SMALL UNITS

Large units add 2 hits to their initial strength. Combat die are unaffected.
Small units deduct 1 hit from their initial strength. Combat die are unaffected.

Tuesday 25 February 2014

February draws to a close - Zorndorf stuff

February is a short month. Somehow, I've managed to get through the painting schedule with a couple of days to spare (or to get ahead of the game, depending on your view). Here is this month's output. Three units each of dragoons, fusiliers and artillery.

 First up. DR6 Schorlemer (a ten squadron regiment). From Kronoskaf, "In May 1716, Friedrich Wilhelm I acquired this regiment from August II of Saxony. Maybe, part of the value of the regiment was paid with valuable porcelain and, thereafter the regiment retained the nickname Porzellan Dragoons. Another simpler explanation for this nickname was that their uniform was white and blue..."

Now, before I go on, I have a problem with these Wargames Foundry figures - more especially the command packs. As far as I can see, the drummer is all wrong. He does not wear a Dragoon coat with musician's distinctions, as he should. He is wearing a cuirassier musician's coat. I can find no references for this uniform - IMHO, it is very wrong. Secondly, the officer has been sculpted with hat lace that they did not have - not a big problem, just one more with the command pack. If I want more Prussian dragoons I will not use Foundry in future unless this pack is improved. This is very sad, as Foundry produce some of the best dragoon trooper figures on the market.
 Five squadrons of DR8 Alt Platen. 

All dragoon cornets have had the upper part of their 'flag pole' removed. The butt will be drilled for a wire flag pole (with flag) later.
 IR37 Kursell. A nice 'classically coloured' little Fusilier regiment. 

I like the design of Foundry's Prussian infantry very much. They are very quick and simple to paint as they are largely equipment (knapsacks, etc.) free. 
 IR46 Bulow with black facings.

Somehow (ebay) I've managed to acquire an awful lot of casualty figures. Each of these regiments has used up one or two.
 IR49 Diericke. This is a lovely little regiment with bright orange under clothes. It was raised as a pioneer regiment but converted to fusiliers by Frederick in 1758. It fought at Zorndorf and Kunnersdorf. 

As a war game unit, especially in campaigns and scenarios,  it will be very useful. It can be used to represent engineers or a fighting unit.

These Foundry figures are a mix of ebay purchases. Quite a few have had collars and lapels filed off before painting - can you tell?
Artillery. A mix of Foundry and Front Rank figures and guns. 

The mounted officer has been painted as an officer of miners - I only had six FR crew for this battery and it's a nice way of slipping in a pretty uniform that might not be seen otherwise (Osprey, Fred's Army 3, plate C2). The officer is Foundry on a Front Rank horse (more ebay bits). I do like FR horses.

I have filed the cockade from the hats of several Foundry gunners and added a pompom. I don't know if I should have done this, but my sources show no cockade, only pompoms on the hats of Prussian gunners.

Next month: Prussian grenadiers, cuirassier and hussars.

Friday 21 February 2014

Campaign turn 2 / 3 and the Battle of Pisae

Following the Battle of Trebbia there is a lull in the fighting as both sides seek to improve and consolidate their positions. It turns out that Rome has few cards on which it can activate its generals and Carthage fails to take advantage. 

(C = Carthage, R = Rome, # = Strategy card ID number played)

C4: Carthage places three political control (PC) markers in Corsica Sardinia and gains majority control of the islands.

R46: Event "Recruit Auxiliaries". Scipio is reinforced with 2 CU.

C42: Rome lost control of Croton in Lucania due to the political repercussions of  Battle of Trebbia - Carthage takes control of the port.

R61: PC marker placed in Alena (Corsica).

C50: Event "Adriatic Pirates". Hanno hires fast pirate ships to transport him to Croton. (The cards and circumstances are falling nicely for Carthage).

R58: PC marker in Arni in Apulia (lost due to the political repercussions of  Battle of Trebbia).

C5: Hanno marches to Panormus in Sicily.

R15: PC marker in Nice (Massilia).

C55: PC marker flipped in Panormus in Sicily and a PC marker is put in Nuoro in Idubeda (Spain).

R31: PC marker in Druentia (Gaul).

C63: PC markers in Narbo, Emporae and Nemausus (Massilia).

R7: PC marker in Rhone.


Turn 3.

Political Consequences of Turn 2: Rome loses 2 PC markers (Druentia and Rhone).

Roman Elections: Flaminius is made Proconsul in Rome. Paulus and Fabius are elected as Consuls. Fabius takes over the army in the north, Paulus controls the army in Rome.

R37: Rome plays first with a "Minor Campaign" card. Flaminius sails from Rome to Sassar on Sardinia. Paulus marches north to Pisae dropping a CU at Cosa as he goes.

C52: Event "Pestilence". Fabius loses 2 CU.

R44: Event "Recruit Auxiliaries". Fabius reinforced with 2 CU.

C3: Hanno atempts to march back into southern Italy but Rome counters with a bad weather card and he is halted at Messana.

R30: PC markers in Cosa and Pisa (Etruria) and Sassar (Sardinia).

C26: Event "Syracuse Allies with Carthage". Wow!!!

R21: Flaminius tours Sardinia (Sassar to Sassar) dropping a CU at Garales and Nuoro.

C34: Major Campaign card. Hanno marches to Heraclea. Mago leaves Hannibal and moves onto Nice. Hannibal marches south and attacks Paulus at Pisae.


THE BATTLE OF PISAE

Paulus 8 CU plus 2 CU for allies.
Hannibal 7 CU plus 1 CU for allies.

Hannibal plays Ally Deserts and takes a CU off Paulus. They will have 9 CU each.

Hannibal will have a hand of 7 Commands and Colors cards. Paulus will have a hand of 5 cards.


 Both sides deploy. The deployment is not balanced. Note the lines of small yellow pin heads which mark the Commands and Colors table sectors (left right centre) - they are small enough to be unobtrusive but large enough not to go unnoticed.


 Rome goes for an unbalanced deployment with weight in the centre and on their right.
 Carthage opens hostilities with a rapid attack against the lightly held Roman left.
 Rome presses an attack on their right.
 The centres advance upon each other and the skirmishers do their worst.
 Carthage commands the summit of the hill in their centre left...
 ....and makes a strong flanking attack from the direction of the hill in their centre right. Here the Romans are hard pressed. 

The Romans swing onto the opposite wing of Carthage - the battle is slowly turning anti-clockwise.
 Carthage is winning on their right.
 The centre is yet to come fully to grips.
 Rome holds a marginal advantage on their own right.
The battle will be continued next Wednesday evening.