Monday 29 March 2021

Huerta de Pablo - Battle Report, Turn 2


Yours Truly, caught by Alex, with measuring stick in hand, towards the end of turn 2.
Hit me with your rhythm stick. Hit me! Hit me! Das ist gut! C'est fantastique! Hit me! Hit me! Hit me!
All but two of the following shots was taken at the end of turn 2. This turn saw the continuing build up for the action with all but French 2nd Division making an appearance - and even 2nd Division is now active and about to enter via the NE road [point D].

I'll start with the initial deployment photo (turn 0) - so you don't get lost.

British 3rd Division makes its entry late in the turn. Its delayed entry isn't a bad thing as things are getting congested further up the SW road.
The Highlanders and Guards, with divisional artillery and cavalry support, approach San Pablo over Black Briar Stream. On the northern road, the French column of 4th Division is just visible.
At the northern outskirts of San Pablo, French 4th Division has made its entry via the northern road [E]. The fight for San Pablo may well come down to who can get a secure foothold first, and the French are leading with two battalions of veteran 4th Legere.

I think I've made a mistake with the French here. In retrospect, it might have been worth advancing the French cavalry (5th Division) to hold up the advance of the Highlanders and Guards. Only time will tell if holding them in reserve will prove a better option. The terrain is not cavalry country.
In the SE sector, British 2nd Division is now largely deployed and moving in to attack the southern outskirts of Huerta de Pablo. This might be a tough fight, two battalions of 4th Vistula are holding this sector of the town. 
The British have had much of the initiative in turn two. Before French 3rd Division can move to intervene, the British have attacked Huerta de Pablo from the highground (Cresta de Pablo) west of the town.

Consequently, they are beginning to deploy just short of the town, forming a line around High Farm Hill.
From Cresta de Pablo, the British (1st Division part) has swept down onto the western edge of Huerta de Pablo. Having got the better of the firefight, on the very last card in their deck - Melee Resolution - they charge home and fierce hand to hand fighting ensues in the houses and streets of the town.....
Neither side gets much advantage from the initial melee rolls (I roll until a conclusion is reached rather than have ongoing melee) but, after three rolls each, 71st Highland Light Infantry and 2nd Btn. KGL wrest the western side of the town from Legion du Midi (routed with very heavy loss) and Regt. Irlandais (falls back shaken with heavy casualties).

It was a tight fight, largely won by the British getting 22 initiative points to cycle through the last third of their deck, and being able to soften up the French defenders with several volleys of musketry to which the French could not equally respond. Drawing a melee card as their last card was simply icing on the cake - which they had, and ate.
It already feels as though the French in Huerta de Pablo are holding on by their fingernails. They are outnumbered 2:1. Can they hold on long enough for other French Divisions to get organised for a counter stoke: Will the French actually launch one even if they do? 

Part 3, coming soon....


Saturday 27 March 2021

The Battle of Huerta de Pablo - Battle report, turn 1.

As I mentioned yesterday, I'm going to play this game over the next few days and do short reports as I go. I played for about half an hour last night, and about the same today. Turn one has been concluded and the build up for both sides seems to be taking shape nicely. All of the following shots, except the initial deployment shot (first pic), were taken at the end of the turn.


Episode 1: The Build Up

The British stormed the early part of the turn with a first initiative of 16 points. Before the French commander's girlfriend could say "Oh là là!", both 1st and 2nd divisions (8,000 & 5,000 men) were arriving in the vicinity of Huerta de Pablo, the 2nd on the south eastern road [C].
By the end of turn 1, both had begun to deploy, and the artillery of 2nd division was playing on 2nd Btn 4th Vistula who had deployed in front of the French camp.
Meanwhile, French 1st Division was using what time it had to deploy in readiness for the upcoming British assault. They occupied all of the 'building sections' of Pablo de Huerta (including the orchard, which I'm using as a two section town piece - after all, it's walls look pretty formidable).

I have to confess, at this point, that I didn't have a clue what to do with French 1st Hussars which were retreating ahead of the British advance by 2nd Division. Initially I thought to concentrate them with the rest of their division in the NE sector of the table and moved them through Huerta de Pablo to get the road bonus but, then I had second thoughts (gave them fresh orders) and, having passed through Huerta' I had them circuit back round to take position on the eastern flank of 1st Division. A long, circuitous about face: it all looked rather graceful.
French reinforcements also began to arrive via the NE road [D]. This was French 3rd Division (5000 men). They headed south to reinforce Huerta de Pablo, taking the direct route via High Farm Hill.
The only moment of high drama in the turn, came when 13th Light Dragoons tried to take out the French battery on Pine Hill. It had been trained on Cresta de Pablo and the 13th thought to take it in the flank. They came so close to doing so. In the nick of time it redeployed to engage the oncoming cavalry with a blast of cannister. In the morale challenge that followed the 13th were halted, shaken (that's the broken wheel marker - because their wheels just came off).

Note that I'm testing some new rules regarding what constitutes a charge. Nothing gets to go straight in, everything has to stop at 2" before it charges home on a melee resolution, or vs flank, shaken or artillery on a fresh move card. It's all working rather nicely. Also note that I'm not allowing shaken units to charge - which puts the 13th in a bit of a tight spot. It's all part of a broader attempt to get the line Vs column thing to work at it's best. 
And that was that. Turn one, done and dusted. 

As for the wider British plan, with a lot of troops coming up from the south, I've decided to send half of 1st Division (Highlanders, Guards and the divisional horse artillery) to seize San Pablo, or at least contest it. If the rest of the army can throw the French out of Huerta de Pablo quickly.... 

Also, I'm trying this new font - Spectral - tell me if you like it. 


Friday 26 March 2021

The Battle of Huerta de Pablo (A solo scenario)

 I've set this solo game up to test out my classic Piquet style rules (though they get less 'classic' by the day) for largish Peninsular battles.


The Table-top:
Above, a picture of the table-top (12 x 6) and the initial disposition of troops. Unfortunately my camera doesn't pick up 'depth' as well as the naked eye, so I have roughly drawn some contour lines around the high ground so that it is much easier for you to see: The first contour is drawn around the base of the hill; the second contour shows the upper shape of the hill; hills are 2" high overall.

This battle is (fictionally) set in the hills at the western end of the Pyrenees Mountains. A few days ago I spent an hour driving 'virtually' around these 'hills' using google earth street view. It's somewhere I've never been and it wasn't what I expected, being a lot less rugged and far greener than I had imagined. Indeed, a lot of it reminded me very much of the Yorkshire Dales, or the central belt of Scotland. I can see it being a favoured local for my Peninsular scenarios.

Scenario:
The British are attacking the villages of Huerta de Pablo, currently occupied by French 1st Div. (6,000 strong), and San Pablo because of their command of several strategically vital road junctions. The attack has been planned in haste and the consequent confusion means that the British divisional columns, each advancing on a different road, will arrive somewhat piecemeal. The plan has been further frustrated by the British cavalry arriving too early and far too 'loudly', and patrolling French hussars which spotted the two British columns approaching from the south. Consequently, the French are already on the move to counter the British threat and French reinforcements are speeding their way to the battle area from the north and northeast. Indeed, the French cavalry of 5th Div. (1,500 strong overall, including hussars) has already arrived.

Unit Scale: 
Units each represent about a 1000 infantry or 500 cavalry. The standard command (battle group) is the division - typically, for infantry, 4000 - 8000 men.
  • The British army comprises 18,000 infantry, 1000 cavalry and three batteries of guns in four 'divisions'. It comprises some of the best troops in the Peninsular.
  • The French army comprises 21,000 infantry, 1,500 cavalry and four batteries of guns in five 'divisions'. It comprises a 'mixed bag' of troops ranging from veterans to newly raised conscripts with little battle experience.
Arrivals: 
The arrival of British 1st Division, 8000 strong and comprising Guards, Highlanders and KGL, is imminent - it is 'activated', just off table, and can begin to move on table as soon as a move card allows. It is in column on the western road (marked A). 

The two other, more typical, British divisions (each 5000 strong), and three French divisions (4000, 5000 and 6000 strong respectively) get the chance to arrive as follows: 
  • I have blind placed two playing cards (British), or three playing cards (French) at each appropriate entry point (marked B-E on the photo above). One card at each of the British entry points is a dud. At the French entry points, one has one dud and one has two duds. The other cards at each entry point relate to a particular division. 
  • Each side has two Stratagem cards in its sequence deck. When one is turned the side can turn one of the playing cards at one of its entry points. If the card is a dud, it indicates extra delay. If the card turned relates to a division, that division becomes active and may begin to march on table on the side's next move card. All arriving divisions are assumed to be marching in column along the road - as this is a solo game, I don't need to worry about the other side 'access point blocking'.
Victory conditions:
To win, the British must seize and hold Huerta San Pablo and San Pablo. To count as holding, no enemy can be present in any of the town sections. Holding one will be a draw.
I have to say, I'm actually rather pleased with the look of this terrain. It's even allowed me to get my pine trees and tents out, and that newly made granary looks quite good too. 

In fact, there are four newish buildings on the table - the granary in Huerta de Pablo, the L shaped single storey cottage in San Pablo (with the broken wall), a two one storey 'tithe cottage complex', barely visible, just behind that, and High Hill farm. I've been a little short of one storey rural buildings for the Peninsular but, I'm slowly putting that right.

Grandest of the new terrain additions is something I knocked up last year but never used. It's the walled orchard in Huerta San Pablo (2nd photo). This was made with Snap Dragon Studio wall sections (including a large T junction) that I've had kicking about in my bits box for over twenty years: I picked them up out of an 'odds and sods' box at a show but Snap Dragon went defunct before I could buy the corner pieces to make them into anything. On a whim, I decided to use them to make a high walled orchard, using Milliput to manufacture the corner pieces and fill some holes after using a hammer as a 'wall cutting' tool - considering I cut the walls to length with a hammer, not too shabby a job, I think. 

So that's it. Next up, when I have time to play and type, I'll start doing the battle report: This may come as a series rather than one extended post. This is because I find myself playing solo games in fits and starts - a hour here, an hour there - and this might be an easier way to report the goings on. 

Thursday 18 March 2021

Do you remember these 18th Century limbers?

In the summer of 2019 I made up some limbers, using converted Gribeauval limbers by Warbases, for my SYW collection. I painted them natural wood: They didn't look right, so I didn't post anything. 

I decided to buy some more and paint them up in national colours - Prussian blue; Austrian ochre; Russian red. Then, once done, I posted about them in March 2020.

A picture from the March 2020 post.
Four for each nation, with interchangeable teams of horses.

In the interim, I had taken one of the converted limbers to Fiasco, to show Martin  at the Warbases stand. He was interested enough to take a couple of pics. I picked up some more Gribeauval limbers, plus some windows and doors from him, and that was that. 

Then, last year (mid-summer?), I received a packet from Warbases with this addition to the Warbases catalogue. 

Unfortunately, after it arrived, I put it away and promptly forgot where. I came across it yesterday and thought I'd better do this much belated post.

I'm not sure it appears in the WB catalogue, at least I can't find it. But, for those who might wish to skip the conversion stage, Martin does have the pattern for some simple 18C limbers. He's always very approachable, so drop him an email if you want some. I'm sure he'll come back with a reasonable price to cut them for you - he's already done the donkey work.

EDIT: Martin has been in touch to say that the "c.18th Limber", as pictured above, will be listed on the Warbases web site soon. They will be priced at £1.20 each.

Saturday 13 March 2021

New building - Spanish Granary

Whilst googling for images of Spanish buildings I happened to type in 'barn'. Amongst the pictures was an image of an old Spanish granary. I googled Spanish granary, and found that this style of buildings was not a one off. There are several still in existence and, I presume, they were even more common in times gone by. Rodent proof storage facilities. What a find! 


These granaries come in several varieties. All seem to be built on stone stilts - though these might just be the 'surviving' examples of the basic design, perhaps others were built on wood stilts, though I suspect even these would have capstones between stilt and beam to prevent the entry of rodents (rodents can't hang upside down from stone). 

Some granaries are quite small (like this one) and some are much longer. Although some are square, most are long and thin. Some of the upper structures are stone built and some are made of wood. The larger stone built ones seem to be associated with churches - perhaps, they are Spanish tithe barns. Some are accessed by stone steps that don't quite join the building, others, especially the smaller ones, by ladder.

This model is made from a gabled MDF box clad in balsa wood planks. These were hand cut for thickness so that they look like 'hand sawn planks', with the edges lightly bashed in with the handle of a scalpel to make them look 'rustic'.

The main beams at the base are 4 mm plywood, for strength. The base and cap stones (all of the granaries seem to have flat capstones) are MDF, the ones at the base appliqued with Milliput for that rustic stone slab look.

The pillars are dowel (actually a wooden arrow from a child's bow and arrow set that I've had in my bits box for about six or seven years). I made it look like 'standing stone' pillars with a layer of Milliput - larger dowel could be cut down / shaved with a craft knife for the same effect. Some of the stone pillars I've seen were obviously shaped by a stone mason (some are tall pyramids) but I wanted a continuation of the ragged, rustic look.

The stone steps are 5 mm foam board, as are the enclosure walls. These were 'bricked and plastered' with thick emulsion paint; also used for the basic groundwork. The gate is made from ice lolly stick cut into planks (lollypop sticks are generally made from Baltic Birch; much less fragile than balsa wood - how do I know this crap?). 

Pantiles are Will's plastic sheets for HO railway buildings.

Top tip: Don't stick the walls on before the granary and groundwork (except flocking) are finished and painted. I actually had the forethought to do it this way and it made painting in between the stilts very easy. Before sticking on the surrounding wall I finished it's interior surfaces. The last thing I did was the flocking, which went all round the lower edge of the wall, tied everything together, and hid the join.

Mira Señor, Gabacho. Miles de ellos! Battle Report.

This battle report will be quite short. 

I played the game in fits and starts over a period of several days. It all went well and threw up a few surprises along the way. I was never quite sure how the game would turn out until mid way through turn four, when....

Turn one started well for the British. They turned their Brilliant Leader card quite early and won most of the initiative to boot. 

They had soon occupied Los Muerte....
...The Farm, and positioned a reserve line behind the northern end of Windmill Hill. This latter deployment would actually prove to be a mistake.

The French didn't get to move until the very end of their deck, turning their Brilliant Leader sixth card from last (26 card deck). Costly?
However, in turn two the initiative switched over to the French and soon Windmill Hill was under heavy attack. 

At first the British came out on top, routing two of the attacking French units, but then.....
....The French took the windmill. The Portuguese defenders were thrown out, they rallied, counter attacked, and re-took it.

This was the crucial part of the battlefield at this point and both sides concentrated their initiative spending here, the rest of the field going quiet. 
Finally, the Paris Municiple Guard secured the windmill. 

The cost had been heavy for both sides in both troops and divisional morale points. 

This was when I realised that the British had deployed their reserve badly - they should have deployed directly behind the Windmill - and they had the time to do it! The roughness of the terrain meant they were too far away to make an immediate counter attack. It would cost the British dear,
From the windmill the French began to roll up the British line of 5th division which was now out of divisional morale points.
Meanwhile, the French had advanced into the valley (The Gap) between the two steep rocky hills. 

However, British artillery and volley fire had depleted the French to such an extent that their threat was largely nullified.

Dethley-White's HA battery had done much to blunt the French attack. Fighting until his battery was silenced by counter battery fire, before being forced to withdraw by French columns. Dethley-White would be mentioned in dispatches.
On Muscle Hill, things had gone even worse for the French. The Scots and artillery had simple mown them down as they ascended the slopes. 

Turn four: The British were about to lose Los Muerte. The French were assaulting it from the north and west. The British infantry were surrounded. The French were bringing up artillery to blast their remnants out of the town. 

However, midway through turn four, time pressure was telling on the French: If they could get most of the initiative, they had a chance to pull off a victory. Night would fall at the end of turn six.

The British ordered their cavalry to attack the French infantry coming down the slopes of Windmill Hill. This was a desperate last throw of the dice for the British at the southern end of the line. This move actually looked quite promising. The French infantry were numerous but largely spent. Most of the 'prime' French units had been destroyed in the continuous French assaults to clear Windmill Hill and Los Muerte and 'morale points' were in very short supply: the three infantry divisions had only 7 between them, mostly with the raw troops of 2nd division.
Unfortunately, for the British, the French C-in-C had also changed his plan and ordered their cavalry forward. At this point the French had a tremendous run of initiative and, before the British cavalry could intervene the French cavalry was upon them. The British fought hard, holding their own, but it gave the French time to secure the town.

It was now turn five. One last push by the remaining French against the northern end of the British position might just succeed. It was still too close to call. 

Alas, the turn ended almost before it had begun. Duplicate initiative dominoes ending the turn abruptly. The French had run out of time. The British on Muscle hill were too strong to be dislodged by the French in its immediate vicinity. 

The French had given the British a very bloody nose. The British had lost Windmill Hill and could not launch a counter attack for fear of losing Muscle Hill too. But, the French, even with superior numbers had failed to totally dislodge the British from their position. I award a marginal victory to the British who have done enough to withdraw under cover of night to fight again.

EDIT: DAF has commented that it looks like a decisive French victory. In some ways it does but, having played both sides, it didn't feel like it. My reply to his comment is here. I hope it explains why I awarded a marginal victory to the British:

I know what you are saying Jim. The battle was 'won' by the French, and I'm sure the Marshal will say that in his report to Napoleon. However, because they outnumbered the British by such a margin, I set a very high bar for them to achieve a game victory. The result, you might say, was something like Dunkirk - it rather depends on how you look at it: Wellington will convey to Horse Guards a report expressing his satisfaction at bringing the army away to safety.

Playing both sides, it didn't feel like a French victory because they were so spent at the end that I was finding it hard to pick which units could lead the assault on Muscle Hill if time were available. Nearly all of their good troops, the few that were left, had taken a lot of 'hits' and were shadows of how they had started the battle, or they were at the far southern end of the field in Los Muerte and would take time to sort themselves out. Divisional morale points were also in short supply - a few reverses could see whole divisions withdrawing as they failed army level morale checks.

If time were available, I think the French could have won the battle with their abundant artillery, which now outnumbered the British artillery by seven to two - they could simply blast the British off their hill, but this would take time, perhaps two or three turns after reaching position (another turn or so?), time they didn't have.

Consequently, like Dunkirk, this was a British victory. It's just a pity they couldn't achieve the victory by actually winning!


Tuesday 2 March 2021

Mira Señor, Gabacho. Miles de ellos!

Another 'simple scenario' solo game. I set this up for two reasons. The first was to continue my efforts to get my version of 'classic Piquet for large battles' to work for Napoleonic actions. The second was to get most of my French onto the table so that I could blood my new units. 

The scenario is basically a hold against superior numbers game - hence the post title which, I believe (google), translates as "Look Sir, Frogs, Thousands of 'em!". The raw numbers are 3:2 in infantry, 6:4 in cavalry, and 7:6 in guns.

To balance the numbers, I have given the British a very strong defensive position centred on two steep boulder strewn hills. I also allowed the British to dice again for any 'red bead' units they rolled up. I'll get onto what all the beads mean before the battle report proper so you can follow what's going on in the photographs more easily.

Because it is a solo game, to mix it up, I will stagger the time that each side can start moving: Neither side will be able to act on cards, other than those for firepower and melee, until it has turned a Brilliant Leader card - the British have two, the French have one - which counts only as 'Activation'. Will the British get into position before the French get their attacks underway, or will the French steal a march on them? Again, this in theory gives the British a slight edge but, this is Piquet, we will see.

To win, the British must hold for six turns. Obviously, if the  French turn their Brilliant Leader card late in turn one this might be reduced nearer to five turns. 
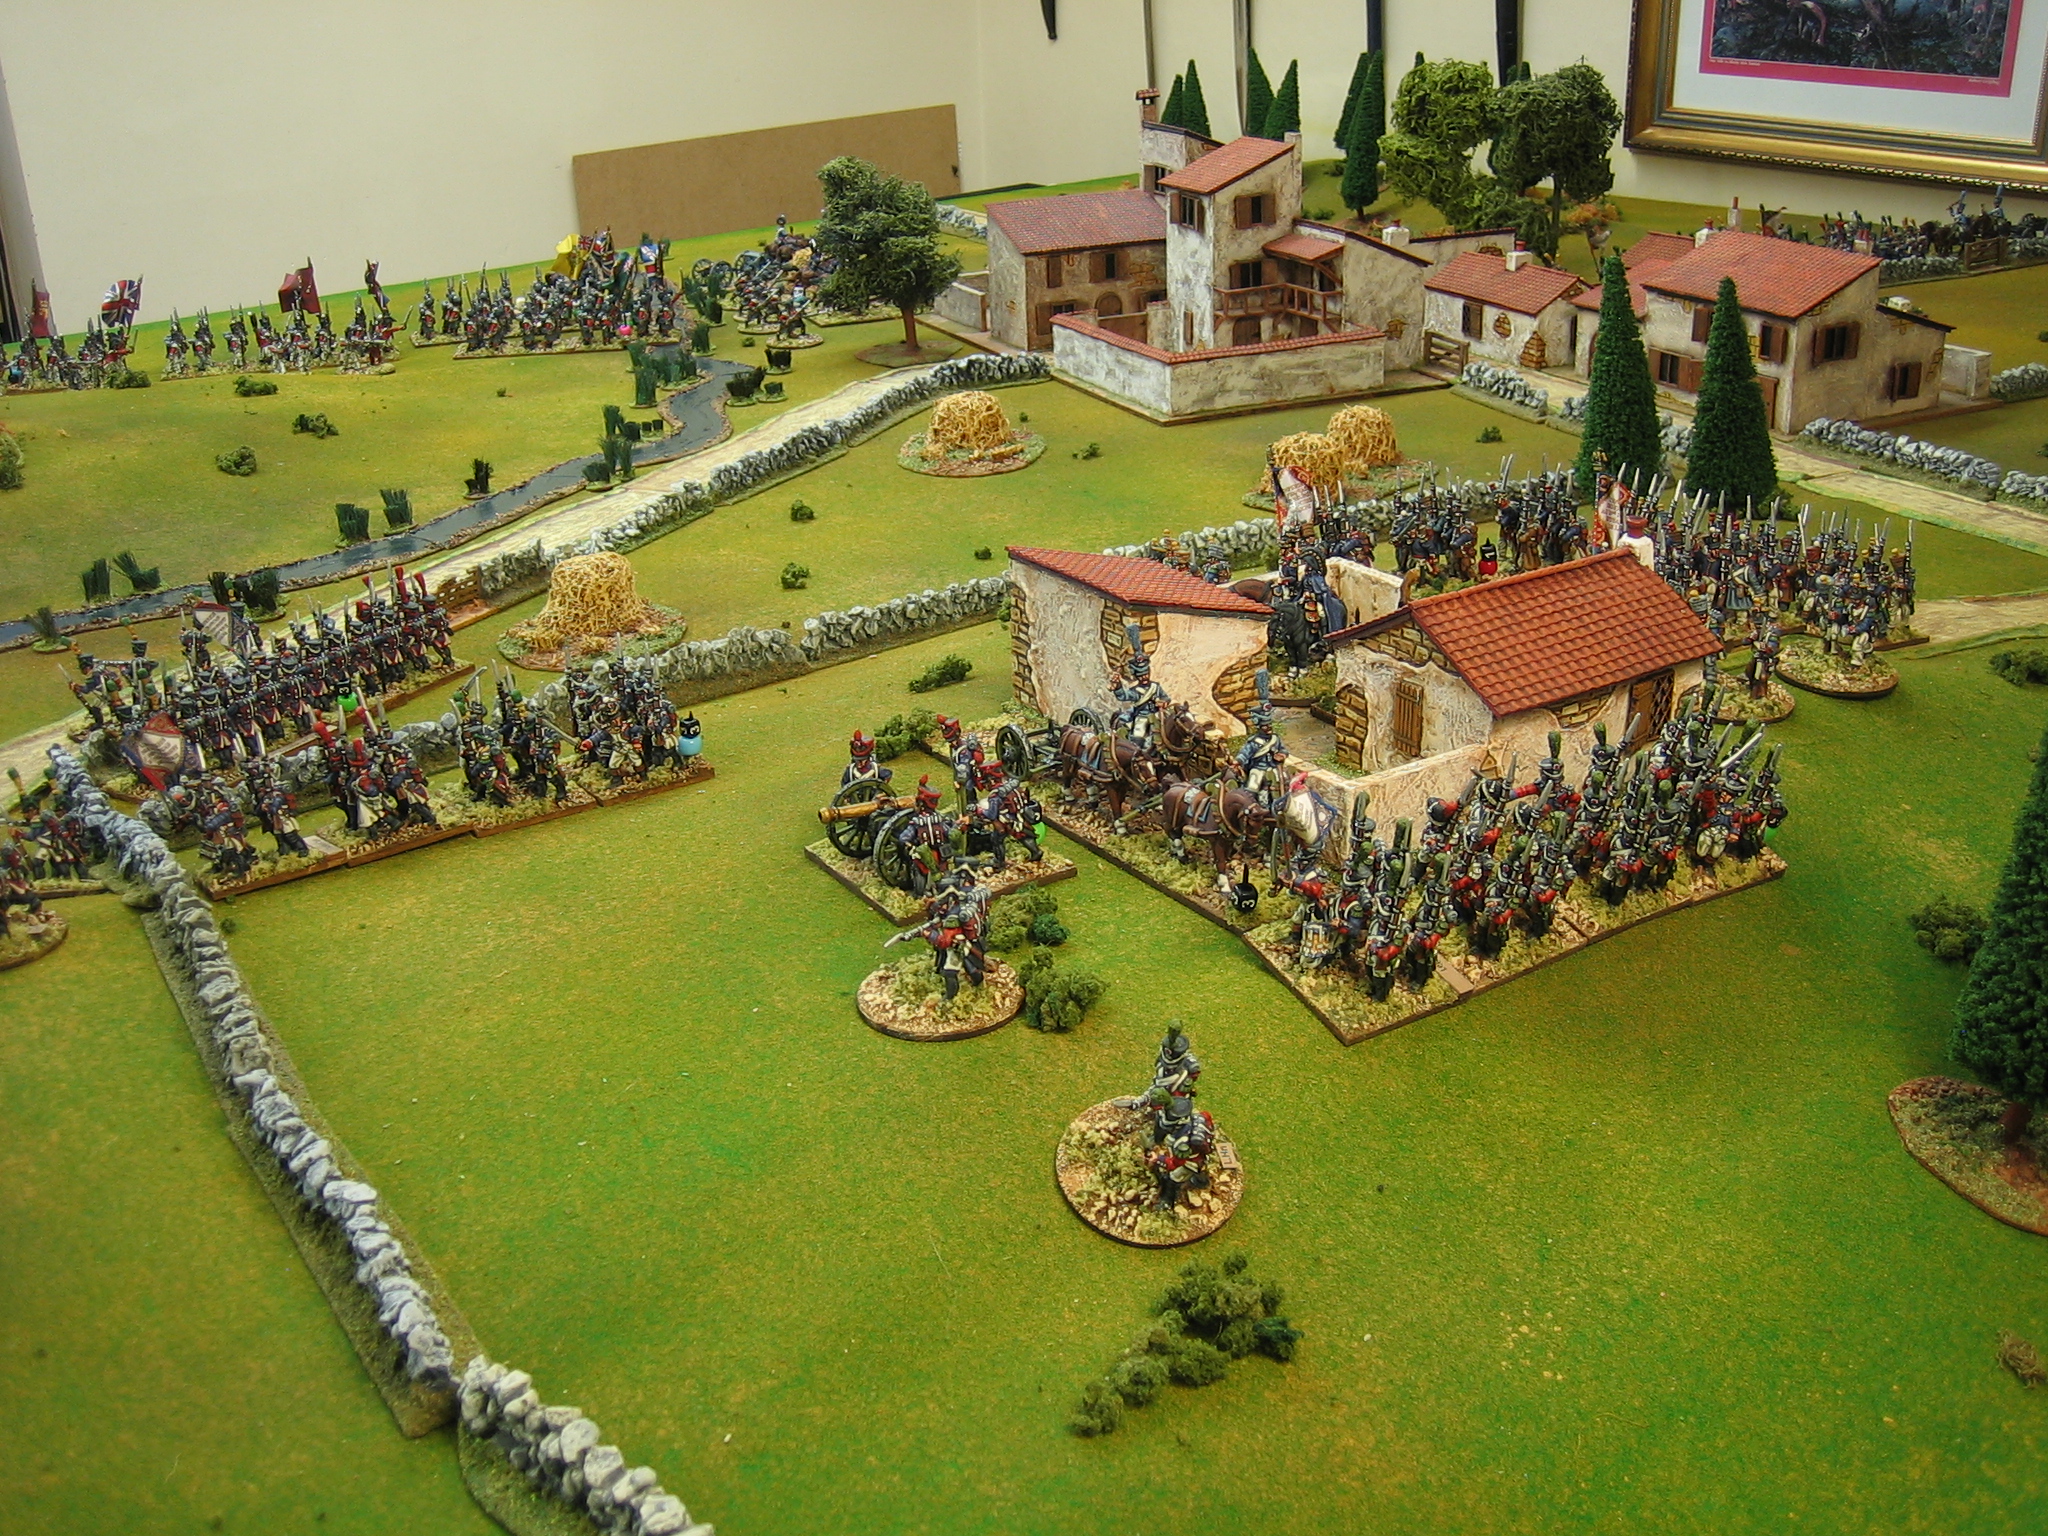
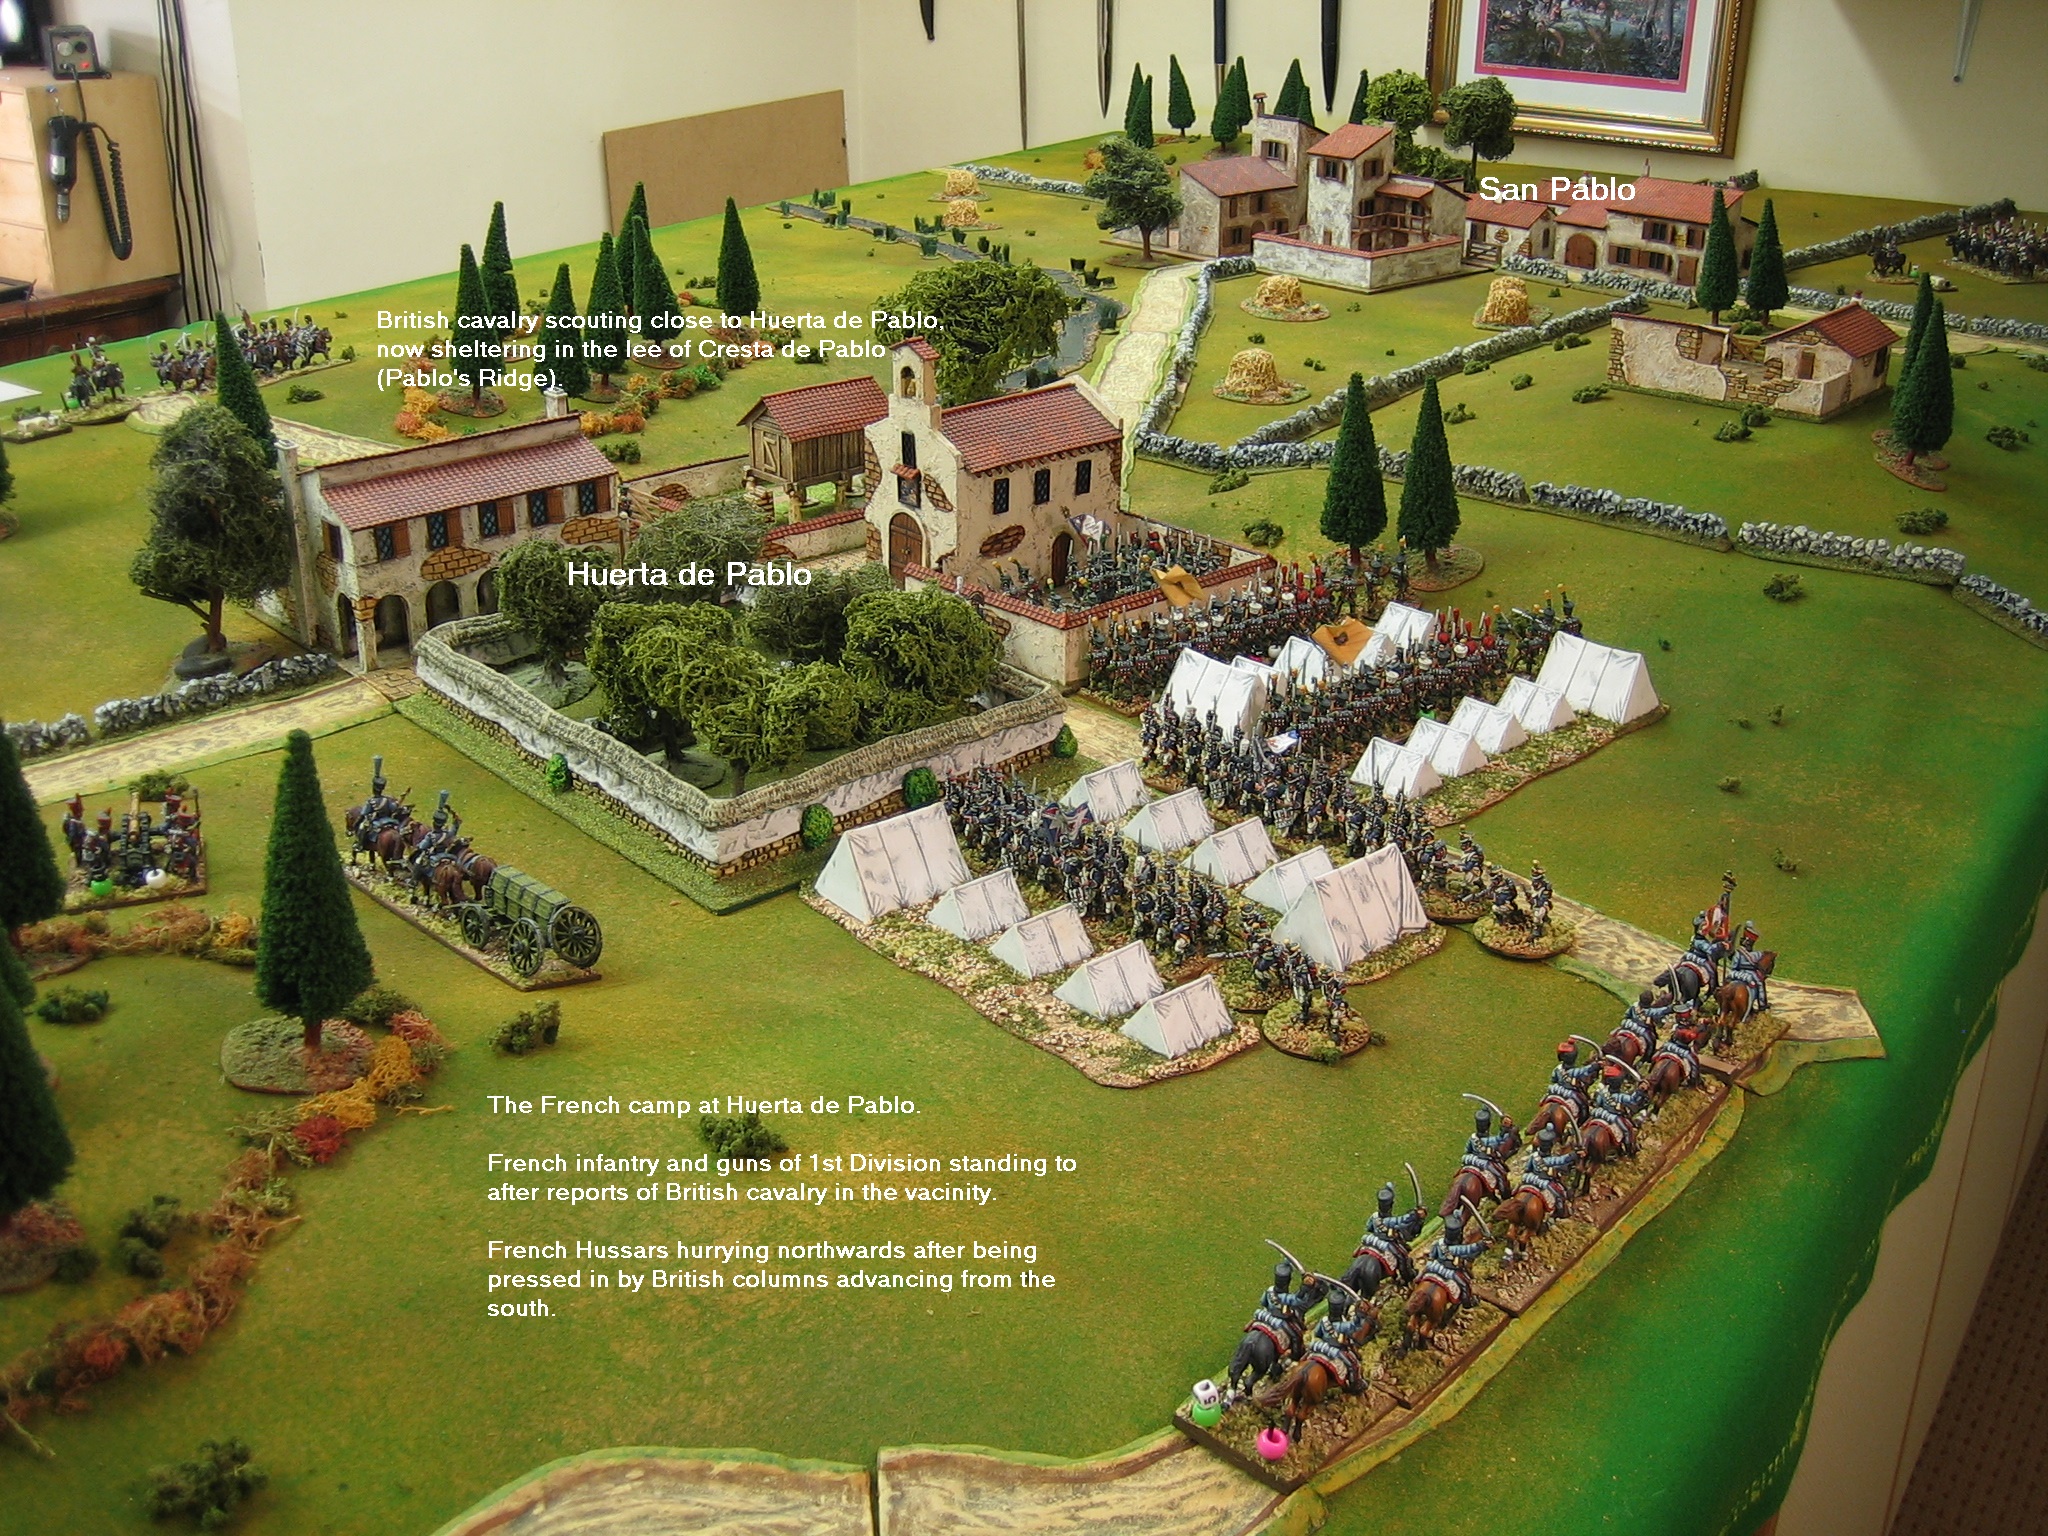
The Battlefield.
This photo is captioned with the names I'm going to use to navigate through the battle report. It shows almost of the set up except for the cavalry on the southern wings - which I couldn't get into shot.


This photo shows the French cavalry  of 6th division (1500 strong) on the southern flank with the infantry of 5th division (5000), to their left, about to make their way into the streets and buildings of Los Muerte. From here, 5th Division will seek to assault up the southern slopes of Windmill Hill. 

Because the British are badly outnumbered, I'm taking the decision to hold all of the French cavalry in reserve - to await events.

Just to the northwest of of Los Muerte stand the infantry of 4th division (7000) and 2nd divisions (4000), with 4th division, including two units of 'reserve grenadiers', leading. 

The artillery of both divisions (front right) is massed, on their right, to support the main attack on Windmill Hill. 

On a small knoll (centre left) the French C-in-C oversees the final preparations for the main assault.
Immediately to the north of 2nd and 4th divisions is another numerically strong division, the 1st (7000). This stands in reserve ready to support either the thrust on Windmill Hill or Muscle Hill. 

1st division will advance, but will not attack either hill immediately - they will by advance to a striking position in the valley and await further orders.

Behind them, are the Chasseurs of the Corps Cavalry under the direct control of the C-in-C.
Finally on the northern flank, facing Muscle hill are the infantry of 3rd division (5000) and the cavalry of 7th division (1000). The artillery of 3rd division is hidden from view - it is on the road (centre right) in front of the building.

3rd division will lead the assault on Muscle Hill in mixed order. The cavalry will act in support if required.

Holding the southern flank of the British line are the cavalry of 4th division (1500). Their orders are not to get into trouble.
In the foreground the Guards and KGL of 2nd division (4000) are marching quickly towards Los Muerte in order to secure the southern approaches to Windmill Hill.

Above them, on its summit, the infantry of 5th division (5000) stand ready to repel any assault up its treacherous slopes.
To the north, on Muscle Hill, the infantry of 1st division (4000), including two units of Highlanders, are set in depth to defend it in strength. Below them, a detachment of 4th division cavalry (500) lie in the dead ground ready to support their left flank.

On the road, heading south, are the infantry of 3rd division (5000). Their orders are to occupy the valley, using The Farm as a strongpoint, and forcefully prevent incursion by the French.
Lastly, in the valley between the hills, just west of The Farm, stands an independent HA battery under the command of Major Dethley-White. At present, living up to his name, his is the sole unit defending the valley.


So you might better understand the upcoming photographs, here is a list of the beads and markers you will see.

Each unit has two or three beads. On the left pin, there are two beads, one on top of the other. 

The top bead (in this game white for French, black for British) is easy enough, it's a number bead and notes the divisional command group. 

The coloured bead below is the basic quality bead. This affects the two main unit factors, combat and morale. All units start with the same factors, their base dice for combat is D8 and their base dice for morale is D6. The bead colour adjusts this. A red bead takes the dice values down a level (one dice smaller) to D6 and D4 respectively, a green bead applies no change, a blue bead takes the dice up one level to D10 and D8, and a purple bead takes the dice up two levels to D12 and D10. 

These dice are adjusted for tactical situation during the game in the usual kind of way - for cover, full strength, etc. - but the bead gives you base start point of the unit. As said, all units start at D8 for combat so the beads denote unit type (weight of cavalry, for example) and unit effectiveness (militia, or battle weary) combined.

Some units have a second coloured bead (on the right). This denotes 'Elite' status. There are three kinds of elite status. A white bead denotes guard status and takes the unit up a extra dice for morale, up a dice for melee, and allows it to use the Elite Firepower card. A pink bead denotes a 'fierce' unit and takes it unit up a dice for morale and for melee only. A yellow bead denotes elite light troops and takes a unit up a dice for morale and allows it to use both the Elite Firepower card and the Native Mobility card. Black beads denote the troops are steadfast and up a dice for morale only. In the picture above there are elite legere and fierce grenadiers. Note, dice in Piquet never go above D12; after that it's D12+1, etc. to a maximum roll score of 12. Dice never go below D4, you always have a chance.

Commanders have the same set up, but the dice only affects the command rating, based on a D8, of the division (which I take to be the aggregate of all the senior officers from colonel to division commander, rather than just the divisional commander himself). In the shot above, the command stand for 2nd division has a blue bead (D10, a well commanded division). At present, there are no second coloured beads for officers.

Next to the officer is a tray containing two D6: this is the morale point total for the division. This is an experiment I've already tried and liked (hence me bothering to make dice trays). The one above shows that of 2nd division, which rolled particularly well. The points were, for the true blood Piquers out there, worked out as follows. Divisions get 1 morale point per unit (banked), plus 1D6 per unit, plus 1 D6 per elite unit - the dice are rolled and the number of 5s and 6s are added to the morale point total, simple as that. When it reaches zero (spending them for being broken, shaken, eliminated, rallies and morale challenges) the division is subject to divisional morale checks on Major Morale cards.

I came up with the coloured bead thing after playing Commands and Colors for the first time. It's simply amazing how well the brain responds to colour coding. Honestly, the above might sound complicated, but after a turn or two, you simply don't forget - ever. Indeed, you should be careful how you colour code, because once done it's very hard to change it. What's more, everything is immediately visible, you don't forget unit type factors, and you don't get them wrong: roster sheets are a thing of the past here.

Lastly, there are in game markers. The pompom is a 'has fired marker'; the tuft means a unit is disordered; the broken wheel means the unit is shaken; stone markers (1 - 4 stones, here 2) are for marking unit integrity losses / casualties; the barrel is a general 'do not forget / where I'm up to / counting beans' marker (most often used to track what has used a card over two separate initiative phases).

So, that's part one. Everything is set for the off. Part 2, The Battle, coming soon.