Showing posts with label A look at Kolin 1757. Show all posts

Tuesday, 15 May 2018

Kolin 1757 - Victory conditions and terrain


VICTORY CONDITIONS

In my last scenario (Liegnitz) I used a system of victory conditions that I haven't used before. They worked extremely well at focusing the action whilst giving more than one objective to determine the level of victory or loss, so I'm going to use something very similar for Kolin. 

Using victory conditions which direct the action should work well for this battle. In my opinion this battle will work best if Krzeczor Hill and Przerovsky Hill are made the main objectives, with Krzeczor Hill being primary. 


Hulsen's command in front of Krzeczor village, beyond lies the key to the battle Krzeczor Hill.

The game will end when the side not holding Krzeczor Hill throws in the towel at zero army morale points. At that point, if the resigning side holds Przerovsky Hill the game will be a losing draw -because the resigning side gave up - but, a defeat with honour, bands playing, and everyone gets medals. Otherwise the victory goes to the holder of Krzeczor Hill. If the winning side holds both hills the victory is a major one. If the winning side holds all three hills, Pobortz Hill being the third, the victory is truly historic. 

To aid the determination of who holds hills, the summit of each hill has been marked with a red headed drawing pin. To hold a hill, a player must have the closest unit to the pin with no enemy unit within eight inches of it.


Looking south west. In the foreground is Chotzemitz with its defending Grenzers, A depression runs south of Chotzemitz towards the saddle between Krzeczor Hill and Przerovsky Hill. In the distance stands Przeserovsky Hill, bristling with guns and muskets.

TERRAIN

The hills are gentle and cause no hindrance to movement. They do not provide a superior position to fire from. Przerovsky Hill and Pobortz Hill provide a superior position when defending, up hill, in melee; Krzeczor hill does not.
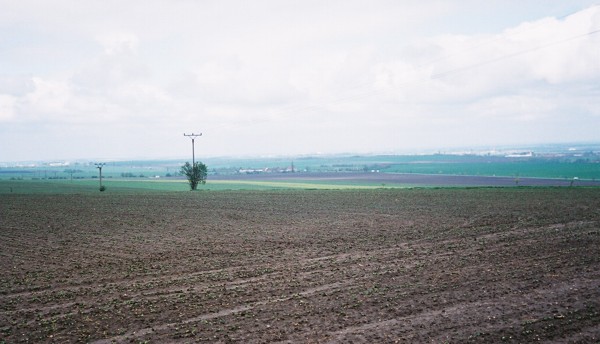

I took this shot of the slope running down to the Kaiserstrasse from just west of Krzeczor some years ago.
The slope is about 6%.
The reverse slope of Kreczor Hill looking south west. In a previous post I've mislabelled this shot.
All villages count as Type III town sections for movement and cover. Krzeczor is two adjoining sections, one north one south. The other villages are one section only.
Looking south east across Bristvi towards the Oak Wood. The church, a two section built up area with the forward section manned by Grenzers, is Krzeczor. 
The woods, including Oak Wood, are Type III for movement and cover. 


This is the Thrty Years War Swedish earthwork running west from Krzeczor. It looks big, but the ground scale I'm working at means that it is just part of my village of Krzeczor. One thing is for sure, until you get past it, you can't see the top of the Kreczor Hill. In the mid distance on the extreme right of the photo, and sticking up from the low tree line, stands the Kolin Memorial.
The depressions, at Chotzemitz and Bristwi, are Type III for movement and cover.


Bristvi, a small hamlet in one of the two deep depressions that cut up the battlefield. Down the road is Chotzemitz and the second depression.
The roads are tracks and do not provide movement rate bonuses.

All other terrain has no effect and has been placed for purely scenic reasons.  


Krzecor church. Mark Dudley is on the right, looking for a Prussian bakery.

Kolin 1757 - OOB for my scenario


Following on from my post concerning the set up of my scenario, with a start time of around 2.00 pm and Hulsen closing in on Krzeczor village, I will now detail the OOB I'm going to use. The forces, as mentioned in the first post I did, are scaled at a reduced ratio to my normal practice. For this scenario, the units represent approximately three battalions of infantry or one and a half regiments of cavalry (counting regiments as 5 - 6 squadrons). I have taken the liberty of slightly reducing the numbers of brigades so that there are not so many one and two unit commands.

We will use classic Piquet rules with our house amendments for large 18th Century battles. The OOB is set out accordingly.


PRUSSIA

Commander-in-Chief: King Frederick II. Rated skilled.
Army morale points: 32
Extra sequence and army characterisation cards: Melee Resolution; Cavalry Move in the Open; Stratagem - off table reinforcements, centre.*

* This card applies to Pennavaire with three unis of cuirassier (see below). On any appearance of the Stratagem card the player may declare that the command will arrive on the next appearance of a Cavalry Move in the Open card - the Austrians see them coming a long way off. They arrive on the Prussian base line anywhere west of Bristvi. They arrive in a column of regiments.


Hulsen. Rated skilled.
  • Two units of converged grenadiers. Rated eager.
  • One unit of line infantry (musketeers). Rated eager.
  • One unit of dragoons. Rated ready.

Tresckow. Rated average.
  • One unit of line infantry (musketeers). Rated eager.
  • Two units of line infantry (musketeers). Rated ready.

Bevern. Rated skilled.
  • One unit of line infantry (musketeers). Rated eager.
  • Two units of line infantry (musketeers). Rated ready.

Puttkamer. Rated average.
  • One unit of line infantry (fusiliers). Rated ready.
  • One unit of line infantry (The Garde). Rated ready.

Krosigk. Rated skilled.
  • One unit of cuirassier. Rated determined.
  • One unit of dragoons. Rated eager.
  • One unit of dragoons. Rated ready.
  • One unit of hussars. Rated ready.

Schonaich. Rated average.
  • One units of guard cuirassier (Garde du Corps). Rated ready.
  • One units of cuirassier. Rated ready.
  • One unit of dragoons. Rated ready.

Pennavaire. Rated skilled. (Off table reinforcements, see Stratagem card above.*)
  • One unit of cuirassier. Rated eager.
  • Two units of cuirassier. Rated ready.

Independent units.
  • One battery of heavy guns. Rated ready.
  • One battery of howitzers. Rated ready.
  • One unit of hussars. Rated ready.

AUSTRIA

Commander-in-Chief: Count Leopold Daun. Rated Average.
Army morale points: 38
Extra sequence and army characterisation cards: Musket Reload; Stratagem - three stands of snipers.* Stratagem - off table reinforcements, left.**

* Snipers move up to twelve inches, in any direction, for free, on Native Mobiltity cards. They can shoot as other infantry but only reload on Elite Reload cards. They have a range of twelve inches and an all round arc of fire. They always roll D4 Vs D6 when firing. If a pip hit is scored the enemy unit is disordered. If the defending die is doubled the army also loses one morale point. Snipers cannot be shot at. They are temporarily eliminated (go to ground) if contacted, returning to the fray (placed anywhere the player wishes) on the next Native Mobility card.

** This card applies to Puebla. Historically, Puebla took no effective action in the battle but remained in place, effectively under 'hold' orders, for it's entire duration. But the military possibility of him becoming actively involved was a real one. Consequently, I have decided, Puebla's units must remain stationary until he receives new orders. These orders will be issued, on the appearance of the Stratagem card, if any of the following conditions are met. 
  • The Prussians have advanced to within 24" of any unit in Puebla's command.
  • Krzeczor Hill is under Prussian control  (see victory conditions).
  • Przerovsky Hill is under Prussian control (see victory conditions).

Wied: Rated average.
  • Three units of line infantry. Rated ready.
  • Two units of line infantry. Rated battle weary.
  This command group includes Sincere's units. I have amalgamated them because they were issued with the same orders - 'form the first line on Krzeczor Hill'.
  I have downgraded two units of Wied's infantry in the lead column because they were largely made up of 'single battalion regiments', and they performed badly.

Starhemberg. Rated average.
  • One unit of line infantry. Rated eager.
  • One unit of line infantry. Rated ready.
Andlau. Rated skilled.
  • One unit of line infantry. Rated eager.
  • Two units of line infantry. Rated ready.
Puebla. Rated Average.
  • Four units of line infantry. Rated ready.
  • One unit of Grenzer. Rated ready. (In Pobortz).
Serbelloni. Rated skilled.
  • One unit of cuirassier. Rated eager.
  • Two units of cuirassier. Rated ready.
  • One unit of dragoons. Rated eager.
  • One unit of dragoons. Rated ready.
Stampach. Rated Average.
  • One unit of cuirassier. Rated eager.
  • One units of cuirassier. Rated ready.
  • One unit of dragoons. Rated eager.
  • One unit of dragoons. Rated ready.
Morocz. Rated Average.
  • One units of cuirassier. Rated ready.
  • One unit of hussars. Rated ready.
Gossnitz. Rated Average.

  • One unit of dragoons. Rated eager.
  • One unit of dragoons. Rated ready.

Indepenent units.
  • Three batteries of heavy guns. Rated ready.
  • One battery of medium guns. Rated ready.
  • Two units of Grenzer. Rated eager. (One in Krzeczor, one in Chotzemitz).
  • One unit of Grenzer. Rated battle weary. (In Kutlire).
  • Three stands of snipers. (See Stratagem card above*).


Next up will be the terrain notes and victory conditions.

Monday, 14 May 2018

Kolin 1757 - Start times are important

After reading one or two comments and private emails about my post on Friday, I've been reviewing my set up for the battle of Kolin. Although I will re-fight the battle on the terrain I have set up, from Pobortz Hill to Kutlire, I have decided to set up the battle from a different start point.

A shot showing all of the set up except for Puebla's command at Pobortz (out of picture to the lower right). Another command, in shot but out of sight behind Oak Wood, is that of Morocz. I have put the Saxon cavalry under the command of Gossnitz, who was present and later became a Lieutenant General.
On Friday I set the forces as they are generally mapped out, using Duffy's The Army of Frederick the Great, Simon Millar's Kolin 1757, and Kershner and Wood's scenario book Campaigns And Battles From the Age Of Reason. This was a mistake, but I don't think I've wasted any time by doing it. I now know, that if the game were to follow the historical narrative, the table distances match the footprints of my units and I have enough room to deploy everything.

For some reason, on Friday, when I worked out the number of units required, I double counted some of the Prussian cavalry and I gave them three more units than they should have had. I also partly miscounted the Austrians, largely for the same reason, and gave them an infantry unit and a cavalry unit too many. The new numbers actually work out rather nicely for the initial set up - to be sure, the Prussian left looks far less cramped.

Hulsen and Krosigk in position for their assault on Krezczor and Krzeczor Hill. The stands of Grenzers with the pink beads can be ignored for now - they need to be deployed by the Austrian players - but will used to represent snipers.
When I looked at the advice I received, and having read the accounts of the battle once more, I knew I must look again the scenario start time. In the particular case of Kolin, I think there are three plausible start times and here is a general run down of my thoughts on them: 

Option 1:
The first is to start before the Prussians begin marching down the Kaiserstrasse at dawn. This would make for an interesting battle but I'm not sure it would look anything like the Battle of Kolin as it was fought in 1757. I'll quickly pass on this option and move on.

Option 2:
The second time to start the battle is after Frederick's march down the Kaiserstrasse has gotten underway, but before the attack to outflank the Austrian right (by attacking the supposedly unoccupied Krzeczor and Krzeczor Hill) has begun. This would be sometime between 10.30 am and noon, when Frederick got his first real look at the Austrian position from the Novi Mesto Inn. From here, whilst his army rested on the Kaiserstrasse, he made his plan and issued his orders. 

This would be the ideal place to start the scenario. However, in 28mm the depth of field is too restrictive to include the Kaiserstrasse; the road would need to be off table making off table map movement a necessary requirement. I'm not a big fan of map moves linking in with table moves, so for me this approach would be a tricky proposition. If I had another table running parallel to the one I have, on which I could set up the Kaiserstrasse this start time would be my preferred option - a dream way to do Kolin - but I don't. I will pass on this option, sadly. Sometimes 15mm looks awfully attractive!
Looking from Bristwi to Pobortz Hill. I'm with Der Alte Fritz - every table needs a windmill!

Option 3:
The third time to start the scenario is at around 2.00 pm. and I think this one will work best for what I have in mind because it fits in well with the terrain as I have set it up and there is virtually no off table element to the set up and no map movement is required. 

At 2.00 pm, Hulsen's attack is about to be made on Krzeczor village. Frederick has become aware that the village is defended (by Grenzers) and he has seen the dust kicked up by Serbelloni's and Wied's columns making for Krzeczor hill beyond.

At this point, Frederick changed his plan. Frederick realised that Hulsen would have a fight on his hands and by the time he arrived on Krzeczor Hill it would no longer be unoccupied. To save the situation, the attack on Krzeczor hill using his embryonic 'oblique order' attack would need to be abandoned. A full scale frontal assault on Krzeczor Hill had to be made immediately, and before the Austrians could substantially reinforce the position. And historically, they wouldn't get there in time.

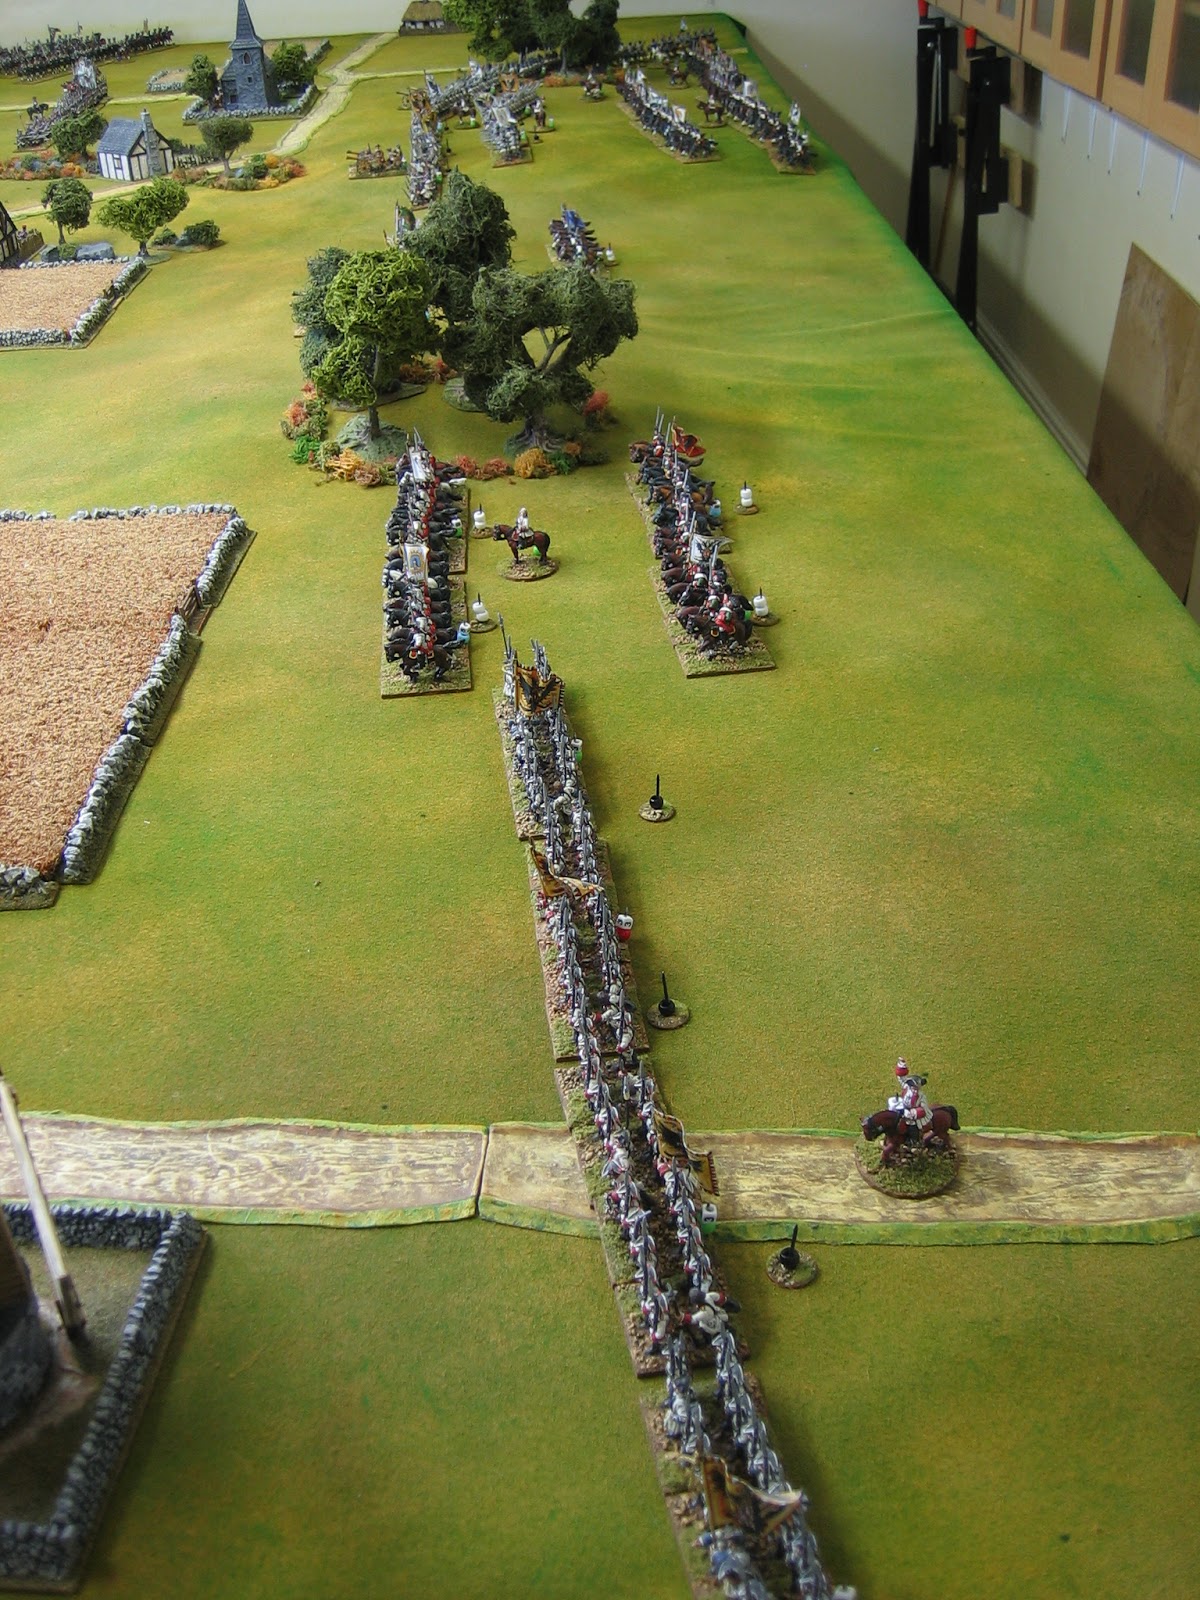
Frederick now ordered Tresckow not to follow Hulsen up directly, but to immediately come into line to his right and follow up as best he could. 

Bevern, in command of what should have been a refused  right wing, also formed line and advanced southward off the Kaiserstrasse. From here, he would be drawn into a premature attack on Chotzemitz and Przerovsky Hill by the incessant sniping of Grenzers from the tall crops to his front. 

Bevern's starting point having marched off the Kaiserstrasse. To his front lies Chotzemitz which swarms with Grenzers, and beyond that Przerovsky Hill. Here the Austrian front line is under the command of Andlau (Daun is also present here but not tagged). Behind Andlau, Starhemberg's units form the second line. Beyond Starhemberg, the rear half of Wieds command (historically under Sincere) is marching to Krzeczor Hill. On Krzeczor hill the first half of Wied's command is in the process of arriving under the watchful eye of Serbelloni.
Frederick's 'oblique order' was not yet perfected - the wheels had come off before the juggernaut had got out of the garage. Kolin, like the battle of Prague, was part of the learning curve. It taught Frederick that an oblique order attack should only be made if the initial manoeuvres could be made out of sight and, at Kolin, Field Marshal Daun (watching from the high ground) could see and counter every move Frederick made. 

Although the game begins before the Austrians have fully manned Krzeczor Hill, some troops have arrived. The usually tardy Serbelloni has arrived in force with his cavalry to join Wied's cavalry (which now form part of his command) and independent grenadiers occupying Oak Wood. 

The guns, having outpaced the infantry, are also in position. They are just coming into action. 

Wied and Sincere (who will be in Wied's command) are marching their infantry into positions to form the first infantry line on Krzeczor Hill

Starhemberg has yet to be ordered to form the second infantry line on Krzeczor Hill and starts the game as the second line on Przerovsky Hill. 

Another shot of the Austrian position at Przerovsky Hill and Krzeczor Hill. Oak Wood is guarded by a single unit of Grenadiers. Behind Oak Wood is Gossnitz's command of Saxon cavalry.
The race between the Prussian and Austrian infantry to reach Krzeczor Hill in force will be an interesting one. Anyone familiar with Piquet's lack of a fixed move sequence will know how tense these kind of affairs can be (because you never really know how often your troops will get to move, or when).

Only one command will start off table. This is a command of heavy cavalry under Pennavaire. This will arrive as off table reinforcements, east of Brzesau and within 24" of it, on a Stratagem sequence card.

So that's the set up. There is plenty going on, so it's not just a case of the Austrians sitting on the hills and defending. True, some decisions have been predetermined for the players by the scenario, but this means the battle will, initially at least, have the look and feel of Kolin. Where the players, cards and dice take the narrative later will only be known as the game progresses.

Next up, the order of battle, victory conditions and special scenario notes for the snipers and such.


Friday, 11 May 2018

The Battle of Kolin 1757 - A battle by the yard.

Many years ago, when my Seven Years War collection was nowhere near as populous as it is today, I remember re-fighting Kolin using the reduced scale order of battle given in Campaigns And Battles From the Age Of Reason by Kershner and Wood. That scenario involves about fifteen units a side and even back then I could do Kolin with those kind of numbers. Since then my collection has more than doubled in size, as has my table, and more battles using many more units have become manageable but, some battles are still too awkward to do at my preferred scaling, none more so than Kolin.


The 12 feet long Austrian line, just about all in shot. The Austrian left, which extends further than the Prussian left, abuts the table edge. The Austrian right is a little over 2' from the table edge because it was prone to being flanked.  
However, over the past couple of weeks, I've been looking at Kolin again. As SYW battles between the Prussians and Austrians go, Kolin is one of the classics. However, for wargamers, Kolin has the draw back of unusually high levels of cavalry in proportions of type that don't (I think) appear anywhere else. For instance, there are ten Austrian / Saxon dragoon / chevauxleger regiments present, and overall there are ninety seven squadrons of hussars. This makes Kolin almost too silly to collect for. 


The Prussian line. As with the Austrian line one end abuts the table edge (in the distance) and this is where I'd like to have a further 18" of table so the Prussian cavalry could deploy in a long line.
But, then again silly is as silly does and, it would be nice to fight Kolin at my preferred unit scale of one wargame unit to represent an infantry regiment (of two battalions) or a  cavalry regiment (of five squadrons), hmmm.

So it was that the idea of actually getting my moth laden wallet out, for a shot to nothing, actually began to become a real possibility. If I forgot about the wing where most of the hussars faced off against each other, as most reconstructions of the battle do, I'd only need to buy three units of Saxon chevauxleger and two units of cuirassiers (one for each side).


Prussian cavalry on their left wing. They should be in a single line side by side. However, historically this cavalry attacked into the flank of the Austrian line and, because the frontage of the attack was quite small, it was forced to attack in waves. This deployment merely starts them in 'waves'.
Although I already had enough infantry, just to make life very simple, I thought I'd buy about a hundred Austrian infantry figures to upgrade eight units of Austrian line infantry from twenty four to thirty six men strong (to represent regiments of three battalions). The sixteen stands of infantry would include eight stands of grenadiers so I could build two extra units of converged grenadiers when required (Liegnitz?) - two birds, one stone, put the oven on I'm cooking! 


The Prussian start position for their oblique attack. I have omitted the Swedish earthworks next to Kreczor because of how town fighting and occupation work in my rules. It works better as a long built up area with two sections (one at front one at the back) the forward area defended by a single battalion of Grenzers.
With this plan in mind, but before placing an order, I began to lay out on paper what the battle would look like. It's a very good job that I did. It soon became apparent that Kolin has a startlingly long battle line. Even with the wing of hussars omitted, the Austrian line is over four miles long and you can't really compress it (as you can with some battlefields, like Zorndorf, which is just over three miles long and compressible to a little over two and a half miles without much game effect). For Kolin, even with my table's drop leaf extension up, I was five feet short - I'd need a table twenty feet long to do the battle at my preferred scale! Short of another quarter of a million pounds to upgrade to a house with a room for such a table, that plan must, for the time being at least, be put on hold.


Prussian artillery is rarely featured in Kolin games because they don't generally feature in the battle maps. I'm indebted to Jeff Berry of Obscure Battles (link in sidebar) for placing them.
I'm not sure if I was more disappointed as a wargamer, or more happy as a Yorkshireman, that the moths in my wallet would be left undisturbed. Certainly, buying the extra troops (except the grenadiers) would now serve little purpose; though the Saxon Chevauxleger would be a nice to have; hmmm?

So back to the drawing board. Next, I worked out what the battle would look like with some reduction in scale. I counted the infantry battalions and divided them by three to get a number of infantry units, and I divided the number of cavalry regiments by one point five. With a dollop of fudge here and there I had the figures in hand and painted to do it, and I had a table that was just big enough to do it. 


Chotzemitz garrisoned by more Grenzers. The rough ground behind the built up area represents a depression and woodland. Having visited the battlefield several years ago, I think it was the depressions at Chotzemitz and Bristvi which made the lasting impression (well them, and the earthworks at Kreczor). The cornfields are merely scenic.
As it happened, with the reduction in scale, I also had easily enough hussars to do the hussar wing but, again, table length defeated this ambition - the table feet I gained by reducing the number of units for the main battle was almost exactly what I would need for the hussars to be included so, still several feet short, the possibility of a huge hussar battle going on at one end of the table can only exist in the ether.


Kreczor and the Oak Wood. These mark the extreme right of the Austrian main battle line. Although the hussar wing extended for some distance beyond the hussars had no impact on the battle in this area. 
Significantly reducing the number of units in an army is problematical. Apart from the fudge one has to use filling the spaces left by fractions, the number of 'brigades' with just one or two units suddenly becomes burdensome. In wargame terms, there are so many senior officers kicking about the place that they have too little to do and look more like company sergeants than 'generals' (some would say, twas ever thus); furthermore, having a Johnny-on-the-spot everywhere spoils the sense of decision and tension in a game. Like the cavalry, I decided to divide the number of 'brigadiers' by roughly one point five and apply some more fudge. I think what I came up with, as a command structure, fits the outline of the battle quite well and should give the senior command figures more to do.


The Austrians on Kreczor Hill. In reality there were three infantry commands here: Wied, Sincere and Starhemberg. I have reduced it to two. I have Wied in command of the first line and Starhemberg in command of the second. I did think about putting the front rank under Colloredo but that would deny the players the chance to do their best 'Flower Pot Men' impressions - non-Brits see 'Andy Pandy'.
So, I set up my reduced version of Kolin on my table and the shots that accompany this post show what it currently looks like (it might change slightly). You can see that barely an inch of table length is spare, indeed I do wish I had eighteen inches more for the Prussian left to extend into. 

I still have to do the name plates for terrain features and commanders for this battle so, for now, more details of the scenario will have to wait. When the name plates are done I'll try to post a full scenario with OOB, bibliography, etc.

There isn't that much actual information about Kolin in this post, so I've filed it under 'blog news'. I wrote it more as an aide-memoire for the future. When I'm old and stupid, this post will remind me that I was once younger and just as stupid - I did so very nearly lash out the cash for figures I wouldn't actually be able to use at home to any great effect.