Firstly, let me say that I'm glad to be able to post again. I've been quite ill with Covid, even having been jabbed twice. Now I'm able to post again, and work for the first time in nearly a month, I'm feeling much better about things.
 |
| Looking towards the Galgenberg. |
The table I have set up is not a true representation of the terrain: The terrain features have been squeezed together to give an impression of the terrain.
 |
| The Austrian main force. |
The hills are a simple representation of the high ground without the 'summit knolls'. Having taken a virtual drive around the battlefield on google earth, keeping a watchful eye on the altitude gauge, I'm fairly sure that apart from the Jackalsberg, none of the hills have steep slopes and are, for the most part, flat topped.
The double ridge which held the first and second Prussian positions has been amalgamated into a single ridge: The former ridge is superfluous to the action and objectives - what's one more hill to a Yorkshireman?
 |
| Prince Carl Bevern takes command of the Jackalsberg as Arenberg's grenadiers advance. |
 |
| Moys. |
The position of the Birkenbusche (Birchwood) is different on all of the maps, as is its size. I've added it to stop the third Austrian battery from moving: apart from this it should bear very little on the action.
The area was littered with several small lakes or ponds. I've added some of these purely for visual effect. Except for the one that prevents the third battery moving, they can be ignored and moved about as required.
The banks of the Rothwasser (running past Moys) and the brook (running through Leopoldshayn and Hermsdorf) were both heavily foliated by trees (pussy willows) and numerous small holdings. Consequently, they limit line of sight like woods (to 4") and provide cover to troops on their banks.
In short, my table is a deceit designed to help the combat run as a scenario.
 |
| Petazzi's Light troops advance on Leopoldshayn. |
I have scaled down the troops to my big battle scale. In this I use one unit to represent two battalions of infantry, ten cavalry squadrons, or a battery of heavy guns. Odd numbers are represented by either increasing or decreasing the units battle quality by one level as required / thought best.
This scale makes most SYW battles manageable but still provides enough units to make up the proper command groups (divisions) and their correct general deployments.
To get the battle going quickly, I have rated the quality of all units and commanders by 'Umpires Decree' - the players will not roll to randomly determine these.
 |
| The third battery, overlooking the Rothwasser and towards Moys. |
 |
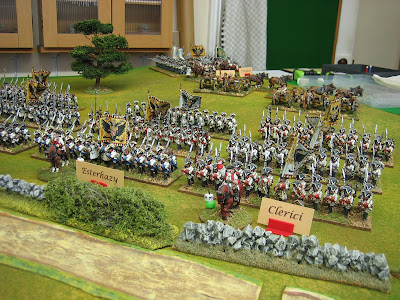
| The serried ranks of Austrian infantry - an impressive sight. |
We will use my Men are Like Lemons SYW rules. Three special rules will be in operation:
Austrian Reserves: This command can be activated at any time. If the Austrians activate Forgach's command group the best result they can achieve is a draw.
Palffy's Command: On the appearance of the Stratagem card, Palffy's command may be activated to arrive on table behind the Rothwasser. After activation it will arrive on the appearance of the player's next Major Morale card.
Prussian Reserves: If the Austrians take the Jackalsberg or any part of Moys the grenadiers can be activated. If the Austrians take the Jackalsberg and any part of Moys, or put troops on the Langeberg the musketeers can be activated. These are the troops dispatched by the Duke of Bevern from Gorlitz as he slowly grasped the scale of the Austrian attack.


14 comments:
Looks like it will be a great battle and glad you are feeling better
A splendid table there! Sorry to hear you have been poorly with Covid, but glad you are well enough now to resume gaming.
The table looks superb, and glad you are on the mend. Covid cannot have been anything other than unpleasant.
Kind Regards,
Stokes
Looks fantastic :)
That's a lovely looking table for sure and a nice battle is in the offing too. Sorry to hear you've been poorly with Covid but good to hear you feel almost back to normal now.
Super looking table and that is a horde of Austrians descending on Prussians ! Glad to hear you are recovered from CV19
The news that you have experienced COVID (even after getting the injections) was disheartening. The latest news that you've recovered and are back to almost your usual wargaming self was a relief. As usual, the pictures and post about your latest project are of the highest standard, a level of aesthetic excellence to which many historical wargamers aspire.
Cheers and continued good health and spirits,
Chris
That's a mighty looking game!
Magnifique ! Superbe table.
That is a lovely looking table, and well worth the wait. So glad to hear you are recovering; we've lost a few friends to Covid, so I'm glad you weathered the storm.
Very sorry to hear about your nasty experience of Covid. The game looks great; one of my favourite smaller battles of the SYW. Look forward to seeing how it plays out.
Cheers,
David.
Thank you, everyone.
Class James as ever.
Jaw droppingly excellent figure collection and table.
I hope you have a blast!
Post a Comment