My Middle Eastern building collection has grown over the years. Originally designed as generic buildings for use with my Crusades collection it will now also serve for my colonial adventures in the Sudan.
Funnily enough, I have little idea of what buildings looked like in the Holy Land in the 12th century and I've only seen a few images of Victorian era buildings in the Sudan. However, these buildings somehow look right for both, even if they are probably not: I put this down to most Middle Eastern wargame buildings looking like this (flat roof with parapet) and this familiarity has, as is often the case, bred a contempt for anything more 'historically accurate'.


Unlike most of my buildings this one has moving parts - the drawbridge works!
 A very simple town section is the market. This is simply a textured base with movable stalls and fountain. Effectively, it is also a very useful 'crossroads' connector piece.
 To look after the spiritual side of town life there is a small mosque and minaret.


The dome and stepped platform on the mosque roof can be removed for the deployment of troops. It has a central locator pin to keep it in position.
At some point I'm going to make a bigger mosque.
 Another simple town section, with a bit of difference about it, is this ornamental garden. The shrubbery is made out of Woodland Scenic clumps - the low hedging has been flocked, the flowers are painted clumps. Everything is at more or less the same low level so that troops can be placed on top.
 Some sections are usable in more than one way. This one, with a central road 'T' junction, has a moveable wall to enclose the piece when on the outside of the town...
 When on the inside the central road can lead to a compounds centrally located gate.
 Most of the buildings are simple one or two story affairs and often mixed on a base to make the whole look a bit 'jumbled'.
 The amount of broken plaster, showing underlying brick work, came about after reading of the decrepit state of the villages in the 12th century Holy Land following steady depopulation over the previous four centuries: it seems that there simply wasn't enough manpower to repair anything!


The palm trees are not fixed but, they add to the hot dry feel of the place.
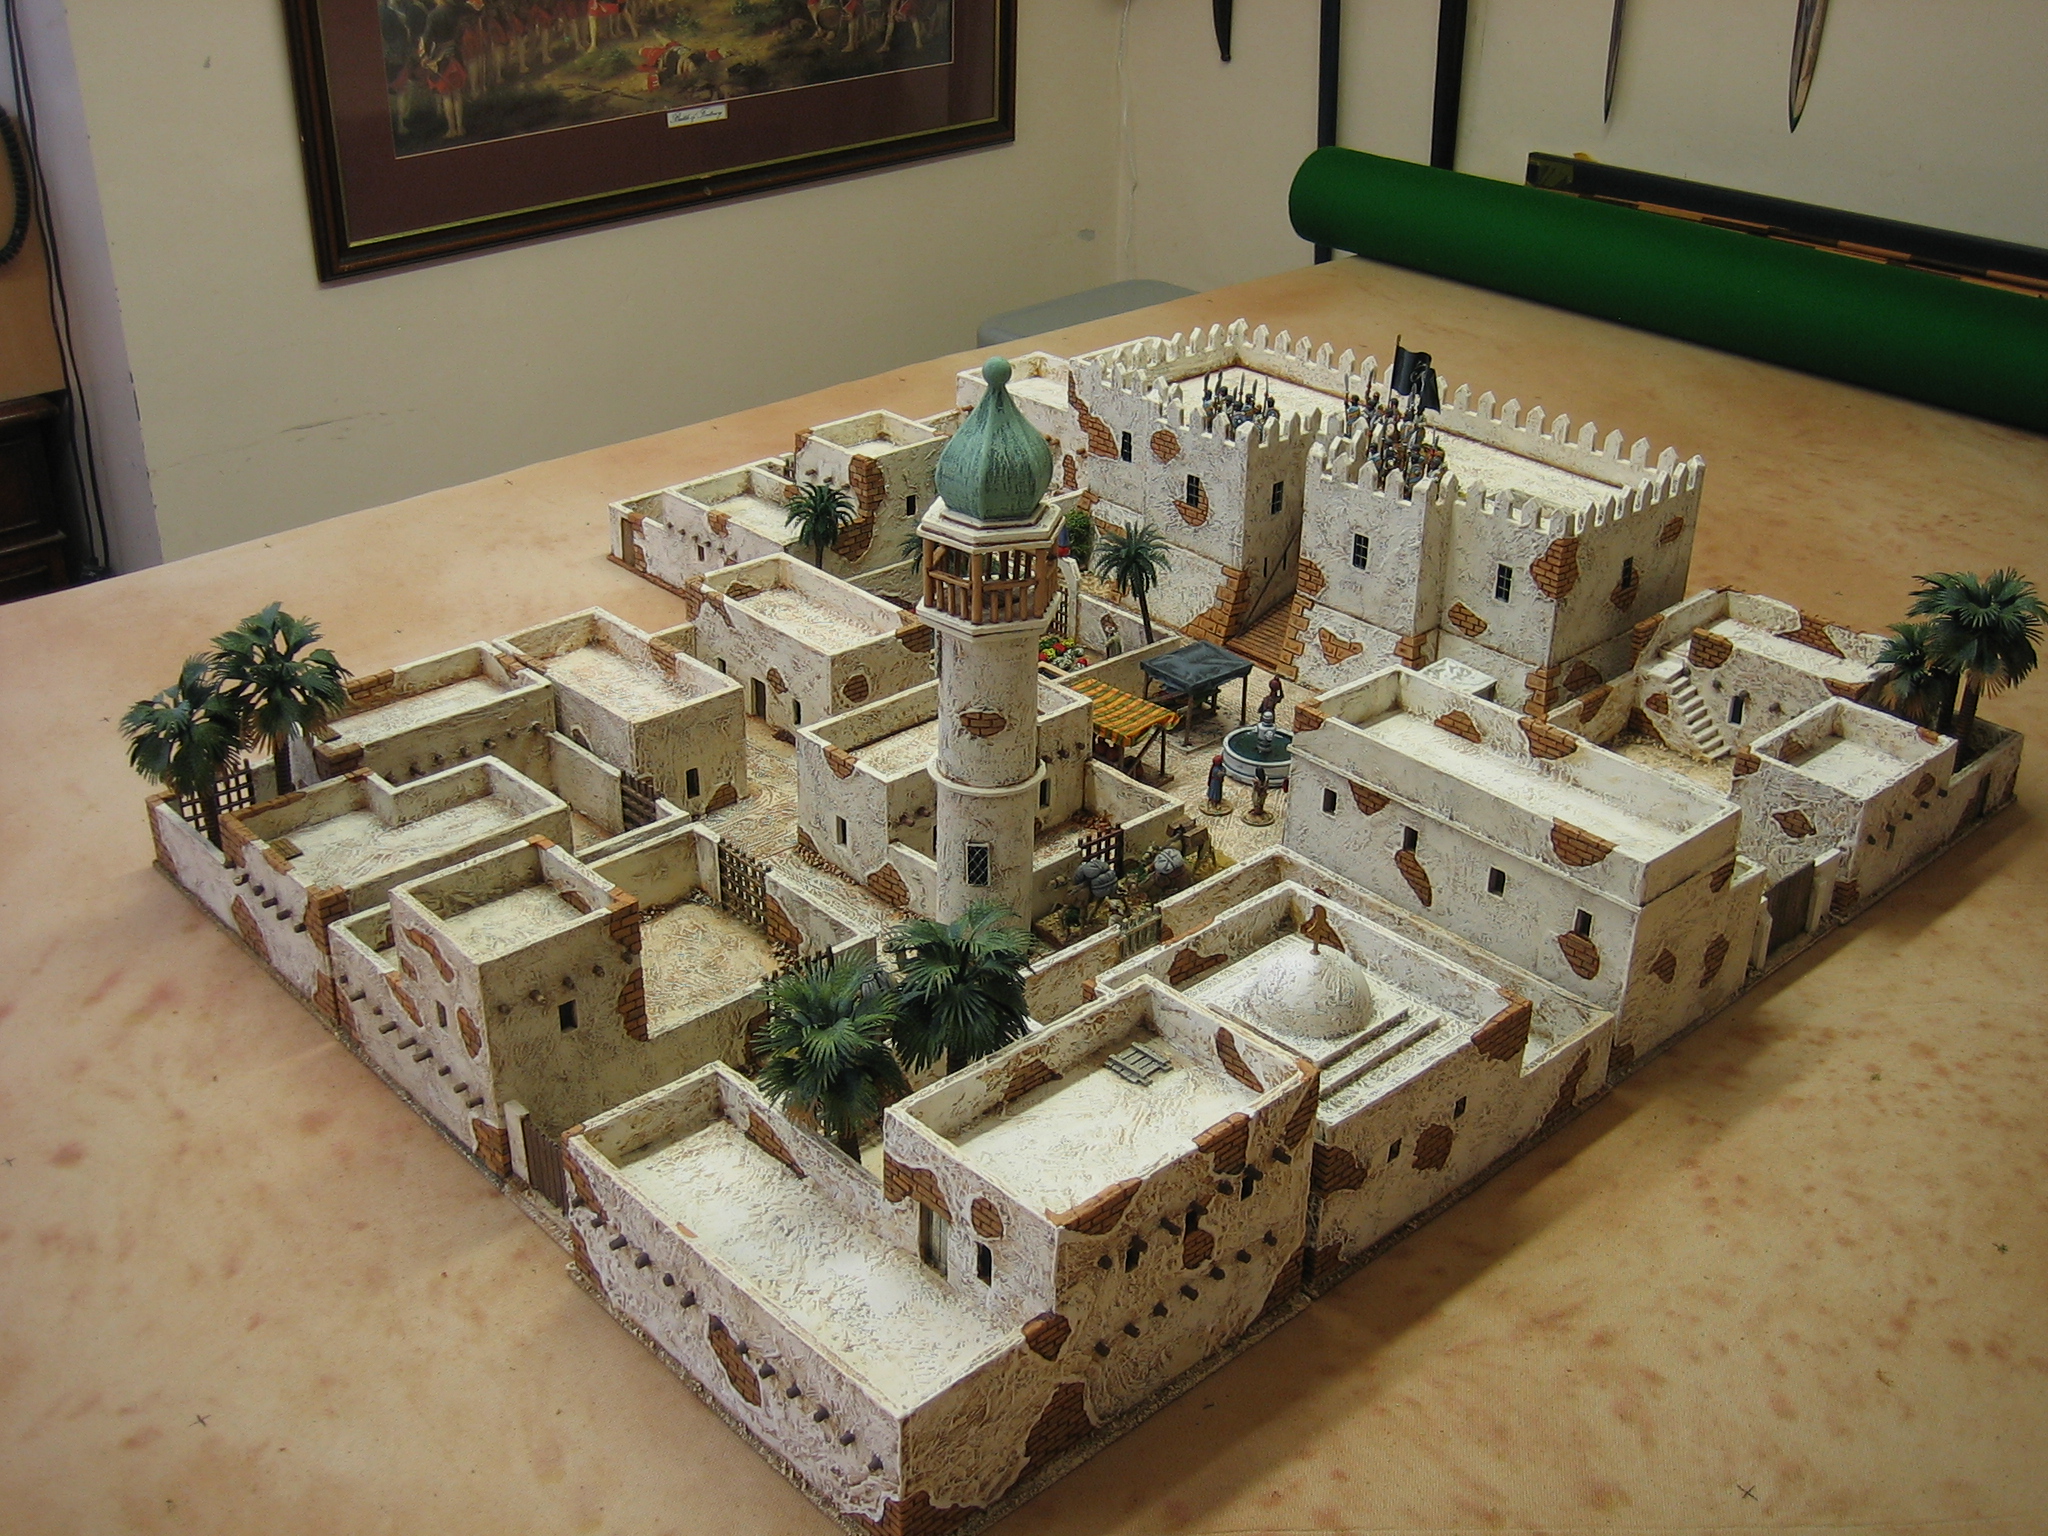
 Another shot. The town is 84cm wide and 84cm deep at it's widest points.


All of the buildings were scratch made using 5mm foam board, 2mm MDF (especially the bases), and card (mounting and old postcards, the latter used to make the brickwork). Doors, trapdoors and main gates are balsa. Grilled gates are plastic (cut up plastic bases by Perry).
Plasterwork is mostly artist's (tubed) heavy body acrylic.
Any framed windows, and a couple of the doors, are by Warbases.


I'm quite happy with the town but, it needs two more sections so that the whole thing can be made square (16 sections), plus another two or three sections for outlying farm / village compounds.
20 comments:
That’s all very nice!
Superb work!
That is such a nice little town - looks like a great place to live!
That is a fantastic collection of beautifully scratch built buildings - outstanding!
Really looks the business, quite superb.
Ingenious design, practical outcome and a great look. Thanks for sharing.
Stephen
That is a splendid sight! I especially like the walled garden.
Look great and functional at the same time, can they be aranged in perimeter around a central square?
Splendid review, sounds like a plan for the next project.
Thank you all for your kind words.
The less sections used the more diverse the street plan can be. When all the sections are being used the design becomes more limited because there are no 'spare' parts. As described, only half of the town sections have a street on the base. There are 6 bases with a street (of which the minaret has two streets and the T junction has 1.5 streets) plus the square (which is, in effect, four streets on one base).
Next up, there will be one base with a street (possibly a wide street with more shops?) plus a large mosque (whole base) without a street but might be surrounded by four edge of base narrow alleys - or it might be sighted on a rocky outcrop (e.g. raised on a 1" high flat topped prominence with cliffs, accessed by steps).
As I have enough basic sections now, the thing is thinking up interesting / different town features.
I'll also need two or three more basic whole base buildings in compounds (or similar) for outlying villages / farms with well positioned access points / gates, swappable with what I have already, for a more variable town build.
I'll defintely need to stop at 20- 21 sections due to storage restrictions.
Splendid, spectacular, superb . . . Setting the standard as always.
Ah yes, storage restrictions . . .
Question: Have you considered staging a scenario wherein the town features prominently?
Here I am thinking of that scene in KINGDOM OF HEAVEN when the wall section is taken down and attackers and defenders rush into the rubble to fight . . .
Anyway, thanks for posting pictures of your preternatural ability/work.
Cheers,
Chris
Question on TMP on minaret dome construction answered (cut and pasted to here):
"The onion dome construction itself is a fin and skin affair. It's built on a hexagon.
First, make a good base hex (I did mine using hex paper on 5mm foam board). Rule a line, across flats, from one corner to the opposite to find centre and get 6 radials: these are your fin lines.
Next draw a fin on stiff card (I used picture frame mounting / border card): this needs a right angle corner that will glue into the centre of the hex and a free hand drawn recurve on the hypotenuse side to give 'half' of the onion shape. Cut this out: Use it as a template to make five more.
Glue the fins into position; remember to leave a small gap / 'hole' at the hex centre to take account of the card thickness when the radial fins are all in position [and butted up to each other].
Next take a sheet of thick paper (I used fine artist's sketch pad paper) and cut it into 6 strips a bit wider than the widest distance between the fins and including the fins. Paint the back of each strip with good PVA.
When dry, bend a strip into a recurve shape. Use it to make a panel between two fins: PVA glue into position. When stuck but not completely dry / hard, trim the panel at the fins.
Apply the second panel in the same way then PVA down the join [between panels] and rub with the side of a brush or pencil to blend the two pieces of card together (make a smooth join): Repeat with the other panels [the last panel will need to be blended on both sides].
When all done and dry, paint with two coats of good PVA [for strength].
At the top of the dome you will have a hole (where the fins butt up against each other) going down between the fins to the centre of the base hex, and consequently the top will be slightly flat – I took a plastic ball (I it had lying around in a bits box) and melted a nail into it; I snipped of the nail head and glued it into position at the top of the dome – hiding both the hole and flat top.
At the bottom of the dome (mine didn't look very neat) I cut six mitred stiff card strips and glued them around the base of the dome to tidy it up.
Then I painted it dark green and added white to get the shades of dry brush until it looked like oxidised copper. It could have been painted gold I suppose but, that felt a bit flamboyant for a small 'impoverished' town.
I hope that makes sense. Note: You will need very sharp / new blades for the whole process."
A wonderful looking Middle Eastern village, James. Great job!
Excellent work! I love it.
Nice work! I support the idea of a battle using this terrain as main feature.
On another subject, what about your peninsular campaign? have you been able to play the next battle? (very excited following this campaign).
Wellington has fought two battles since the last report. I will get around to posting in the near future.
Absolutely stunning work as usual, James.
Wow, spectacular and gorgeous!!!
Your journey with the campaign map board sounds like quite the adventure! Opting for a magnetic whiteboard over a pin board was a great choice for flexibility and ease of use. It's fascinating how you navigated the challenge of its placement—finding the perfect spot and height for optimal viewing can indeed be tricky. It’s always about trial and error until you find what works best.
After all that hard work and problem-solving, you deserve a bit of fun and relaxation. I highly recommend playing Toca Boca Mod Apk. It's a fantastic game that offers endless creativity and an ad-free experience, perfect for unwinding after a day of strategic planning and organizing. Give it a try and let your imagination run wild!
Post a Comment