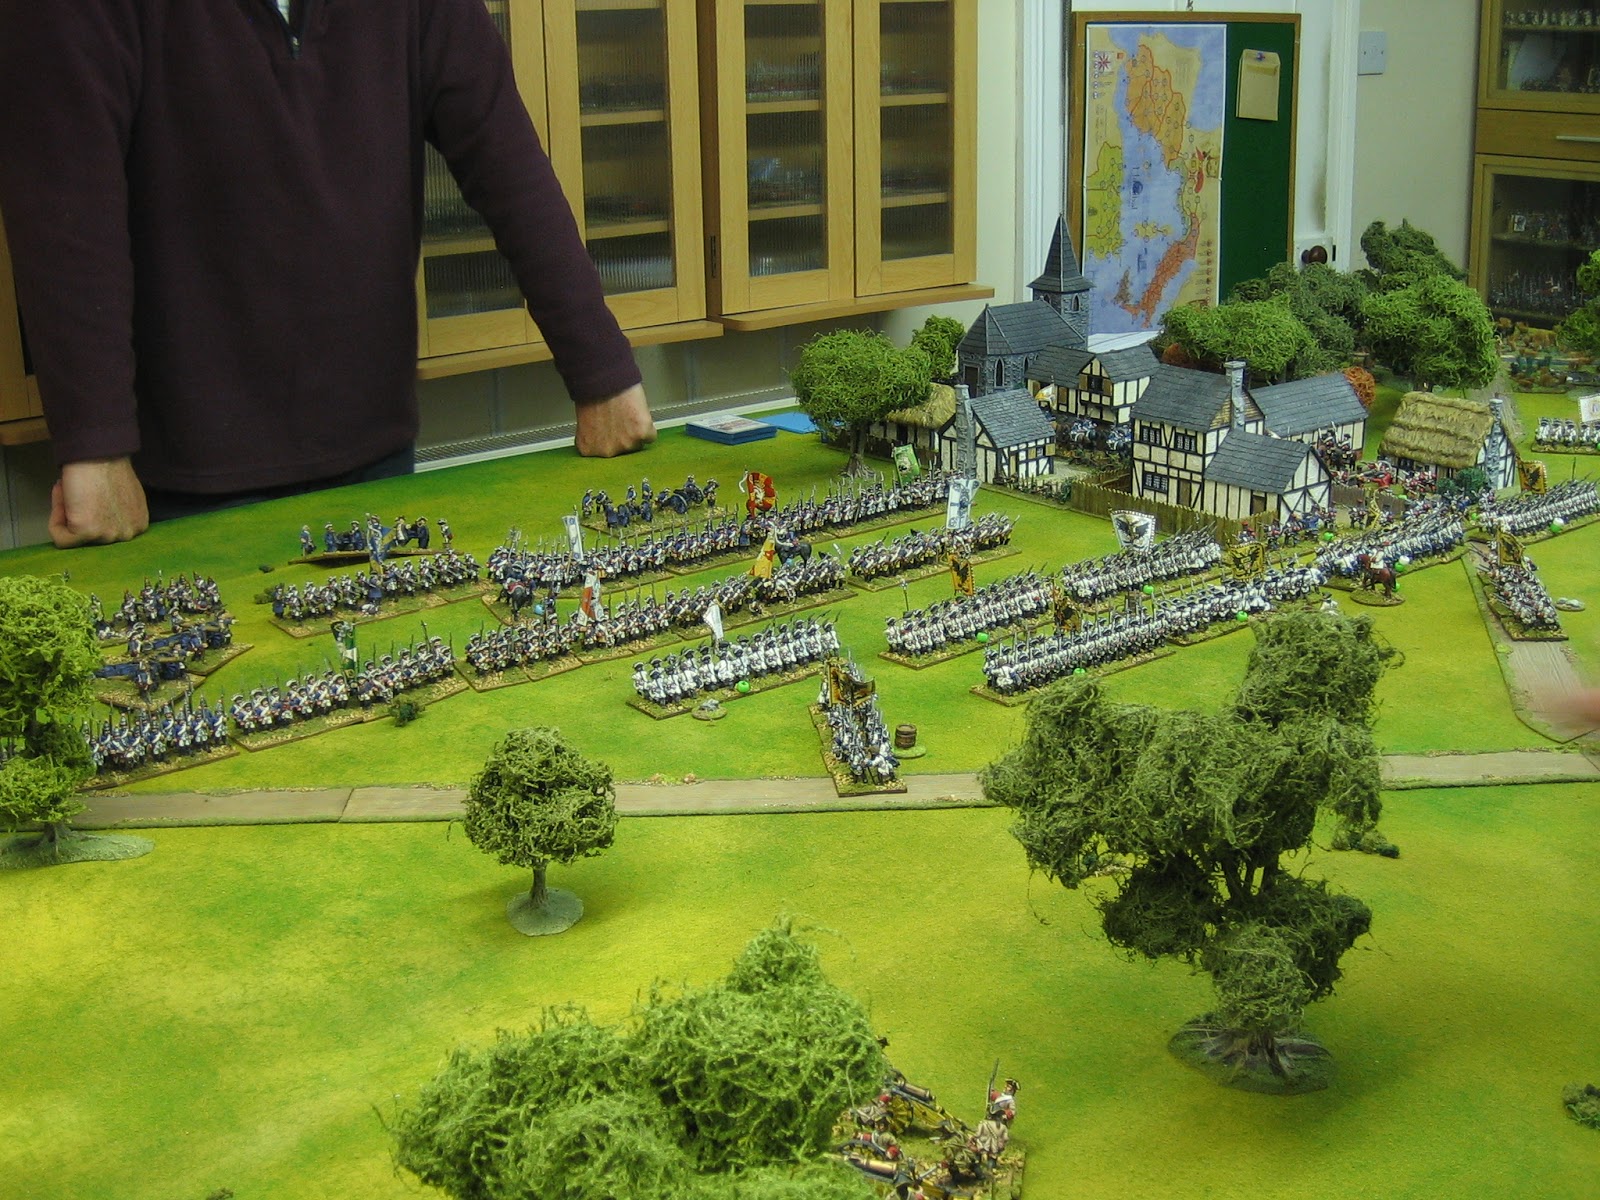
Last Sunday we went to Leeds to do a demo game of Chotusitz 1742.
The show was excellent. Fiasco had a real buzz about it this year and I enjoyed it very much. If you dropped by to say hello, thanks. It is always good to meet people (old and new) face to face.
The Leeds club members were very welcoming and helpful, thank you. I still have my gripe over having to pay for parking but, hopefully if the number of punters and gate takings goes up, perhaps this is something the club might be willing to consider contributing to again in the future. I bit my tongue (again) on Sunday.
I've heard a few complaints about the lighting at the show but it was fine where we were - much better than some venues I've put games on at - and there are definite shadows in the photos below. The black 'star lit' walls were slightly unusual and this might have made things feel darker at the edges of the hall but, I wonder if the effect of this was physical or psychological.
This set up of the battle worked extremely well and I will use it again here at home at some point.
Same time next year? Quite possibly.
Showing posts sorted by date for query Chotusitz. Sort by relevance Show all posts
Thursday, 3 November 2016
Wednesday, 26 October 2016
On the road again - this time to Chotusitz
Well the Ilkley Lads are out and about again this weekend. This time we don't have very far to travel. We are going to Fiasco in Leeds.
My intention was to re-run the Lobositz game that won joint first for best demo at Derby earlier this year. Unfortunately the big car has chosen to go on holiday this week so I've had to come up with something less hilly - with less sticky-uppy terrain all round - so that it will fit into smaller transport.
I've chosen to do an old favourite, the Battle of Chotusitz 1742. We are advertised (at Fiasco), as doing a Seven Years War (1756 -1763) battle, and Chotusitz is, of course, a battle from the Austrian War of Succession: However, most of the characters are the same; the tactics didn't change much in the intervening decade or so; I've always thought of the two Silesian Wars and the Seven Years War as a single war with a couple of intermissions anyway.
I hope everyone will be forgiving.
So this is how the game has been set up. I've largely used overall numbers and overall frontages rather than counting regiments. The Prussians fielded 17,000 line infantry and the Austrians fielded 16,000. Cavalry was equal in numbers at about 7,000 a piece. For general deployments I am again indebted to Jeff Berry of Obscure Battles (The Battle of Chotusitz) for another piece of outstanding work. I have also used Duffy (of course) and Reed Browning's The War of the Austrian Succession.
The game starts with all of the Austrians fully fielded and ready to attack. Leoplold is deployed in readiness, as is Buddenbrock. Note that the fields are 'virtual', they are for aesthetics only and have no impact on the game. Also, I'm not sure if all of the trees will make it to the show it depends how many will fit in the box.
Waldow starts the game in the process of arriving in and around Chotusitz.
The main feature of the early game, as previous games have shown, is the attack on Chotusitz by the centre and right wing of the Austrian army. The Austrian hopes of victory generally rely on defeating Leopold and Waldow before the bulk of the Prussian infantry arrives.
On the Austrian left, another large encounter generally beckons.
Here the numbers (in heavy cavalry) are almost equal, and because the Austrians generally see Battyanyi's role as supporting the infantry, by holding their flank, it is generally (as historically happened) Buddenbrock who attacks.
With all the open ground on which to fight, it tends to be a real ding-dong of a cavalry clash.
A point of interest: The Duffy map shows the grenzers in this sector as looking rather insignificant; Jeff's map shows them as I have them here. If Buddenbrock doesn't attack, the Grenzers will pick his troopers off in short order fashion. I much prefer Jeff's interpretation - it forces Buddenbrock to do something.
The key to victory for the Prussians is the timely arrival of Frederick. If the Austrians can swamp the Prussians around Chotusitz before Frederick arrives they have a chance of winning.
Frederick's command will be deployed as shown, but he can't activate until the start of turn three. Then its a race against time - an early turn end will suit the Prussians down to the ground.
Chotusitz is a very simple, large scale, 'rescue' scenario and Frederick has the role of 7th Cavalry. I've fought this battle on many occasions and I've never been disappointed by it.
So that is what Graham and I are doing this Sunday. Fiasco is at New Dock Hall, The Royal Armouries, Leeds. Doors open at 10 am.
It's worth a trip out, and you can combine the show with a visit to one of the finest military museums in the world (and the museum is free entry, of course). Ask your missus, if she would like to visit the sparklingly new John Lewis Centre (which opened with much fanfare in central Leeds a week or two ago) that should get you a pass out - the Armouries is just 15 minutes walk down the road.
If you do drop in, be sure to drop by and say hello.
My intention was to re-run the Lobositz game that won joint first for best demo at Derby earlier this year. Unfortunately the big car has chosen to go on holiday this week so I've had to come up with something less hilly - with less sticky-uppy terrain all round - so that it will fit into smaller transport.
I've chosen to do an old favourite, the Battle of Chotusitz 1742. We are advertised (at Fiasco), as doing a Seven Years War (1756 -1763) battle, and Chotusitz is, of course, a battle from the Austrian War of Succession: However, most of the characters are the same; the tactics didn't change much in the intervening decade or so; I've always thought of the two Silesian Wars and the Seven Years War as a single war with a couple of intermissions anyway.
I hope everyone will be forgiving.
The game starts with all of the Austrians fully fielded and ready to attack. Leoplold is deployed in readiness, as is Buddenbrock. Note that the fields are 'virtual', they are for aesthetics only and have no impact on the game. Also, I'm not sure if all of the trees will make it to the show it depends how many will fit in the box.
Waldow starts the game in the process of arriving in and around Chotusitz.
The main feature of the early game, as previous games have shown, is the attack on Chotusitz by the centre and right wing of the Austrian army. The Austrian hopes of victory generally rely on defeating Leopold and Waldow before the bulk of the Prussian infantry arrives.
On the Austrian left, another large encounter generally beckons.
Here the numbers (in heavy cavalry) are almost equal, and because the Austrians generally see Battyanyi's role as supporting the infantry, by holding their flank, it is generally (as historically happened) Buddenbrock who attacks.
With all the open ground on which to fight, it tends to be a real ding-dong of a cavalry clash.
A point of interest: The Duffy map shows the grenzers in this sector as looking rather insignificant; Jeff's map shows them as I have them here. If Buddenbrock doesn't attack, the Grenzers will pick his troopers off in short order fashion. I much prefer Jeff's interpretation - it forces Buddenbrock to do something.
The key to victory for the Prussians is the timely arrival of Frederick. If the Austrians can swamp the Prussians around Chotusitz before Frederick arrives they have a chance of winning.
Frederick's command will be deployed as shown, but he can't activate until the start of turn three. Then its a race against time - an early turn end will suit the Prussians down to the ground.
Chotusitz is a very simple, large scale, 'rescue' scenario and Frederick has the role of 7th Cavalry. I've fought this battle on many occasions and I've never been disappointed by it.
So that is what Graham and I are doing this Sunday. Fiasco is at New Dock Hall, The Royal Armouries, Leeds. Doors open at 10 am.
It's worth a trip out, and you can combine the show with a visit to one of the finest military museums in the world (and the museum is free entry, of course). Ask your missus, if she would like to visit the sparklingly new John Lewis Centre (which opened with much fanfare in central Leeds a week or two ago) that should get you a pass out - the Armouries is just 15 minutes walk down the road.
If you do drop in, be sure to drop by and say hello.
Tuesday, 7 July 2015
Those funny looking Prussians - Update
Except for a flag and basing I've finished painting up those funny looking grenadiers for IR 15 Garde Bataillon. It's quite amazing what you can do with paint. If you remember the coat had no collar and no buttons.
I've painted these up to be the grenadiers of third battalion of 15th Regiment. I added the lapels by simply painting them on, along with a collar, the simple lace and buttons. Funny looking they might have been - now they are fit for action.
The second and third battalion were paired and did most of the fighting in the AWS and SYW.
First battalion only fought at Mollwitz (AWS), Lobositz, Kolin and the defence of Breslau (SYW).
Second and third battalions fought at Chotusitz, Hohenfriedberg and Soor (AWS), and Rossbach, Leuthen, capture of Breslau, Hochkirch, siege of Dresden, Liegnitz, Combat at Hochgiersdorf, Torgau, Burkersdorf, Reichenbach, and finally took part in the siege of Sweidnitz (SYW).
This was the last of the infantry units for the Prussian project. I've just got two cuirassier to do - the 5th Cuirassier Regiment and the 13th Garde du Corps. The latter I'm painting up at the same strength as the other units even though it was only three squadrons strong rather than five - it will be a more versatile unit that way. I hope to have them done by the end of the week. I'm hoping to do a roll call post sometime next week with everything flagged up and based - 50 units of Prussians done and dusted! At last the end is nigh.
Thursday, 28 May 2015
Chotusitz, AAR, part 2
Yesterday Peter and Graham went at it again in the Chotusitz game.
It wasn't long before Frederick's Prussian infantry arrived.
The Austrians had brought their reserve line through their front line in expectation but the Prussians. But from their arrival they extended beyond their flank.
This was the historic position. The Austrians were committed before Frederick made his move.
The cavalry battle had spent both forces so this wing was desperately exposed.
Out of over two dozen cavalry regiments deployed, only three were still effectively in the field.
The Prussians came on in grand style and a fierce exchange of musketry resulted.
But, that exposed flank.
It wasn't a surprise when Frederick's troops turned onto it.
The Austrians rushed Grenzers from the western flank to interdict the Prussian manoeuvre but the Prussians ignored the sniping and came on.
The Grenzers were rolling big dice but kept rolling low - the situation was similar for the Grenzers shooting from Chotusitz on the other wing.
The position was looking desperate for the Austrians.
The Austrians, outflanked, began to collapse.
The Austrian line crumbled without pause until a failure of major morale resulted in an undisputed Prussian victory.
The Austrians had done quite well (historically speaking). They had routed Leopold and were within reach of occupying Chotustiz and reforming a defensive line with which to hold Frederick. However, the Prussian reserves arrived on time, in the right place, and with a following wind (the cards in the Prussian sequence deck fell very kindly). A battlefield victory to the Prussians.
Next up, a battle using Simon's To the Strongest rules. Rome and Carthage will take the field again.
Sunday, 24 May 2015
Chotusitz - Peter J as Prussia, Graham H as Austria
This is a short report on Wednesday's night's play.
I have reset the table since the solo play test by advancing Chotusitz almost to mid table and sliding it towards Chirkwitz pond; Chirkwitz pond has been shortened to keep the gap between it and Chotusitz constant; The Brslenka stream has been removed from the flank edge of the table making even more room for the cavalry to operate here.
Bitthyanyi, commanding the Austrian cavalry on the west wing ordered his men forward.
Down the hill they went, all full of hubris.
It's normally Peter who is King of the Ones but on this occasion he defied the dice.
Back up the hill the Austrians came, all full of holes.
The only way Graham was going to get these Prussians from the field was to let them chase him.
It was a disaster.
As they advanced Leopold's Prussian's slowly back stepped to buy time. Leopold's troops had force marched to Chotusitz and had been downgraded accordingly - outnumbered and tired, not a great combination.
A unit of Austrain hussars fancied their chances against Leopold's isolated guns (top left).
"Boom!" went the guns. "Ouch!" went the hussars. Graham began inspecting the dice he was using.
The Grenzers began shooting at demoralised Prussian cavalry that was milling in the streets and preventing further advances.
In the actual battle Chotusitz caught fire. Every time a unit fires a volley from inside Chotusitz I roll a d20. On a result of 1 a fire will start. It will spread, on major morale cards, on a 1 on d6.
Graham had stopped rolling ones.
That was a good point to end the session. We are part way through turn two and Frederick and his reinforcements are about to arrive. This is going to get very bloody.
Sunday, 10 May 2015
More SYW cavalry with dodgy flags
According to my Oxford dictionary, the definition of DODGY is "1 dishonest. 2 risky. 3 not good or reliable." Of these, I would choose 'risky' and 'unreliable' for these flags.
The flag for the Kolowrat-Krakowski Dragoons is very 'risky' and wholly unreliable. Kronoskaf has no description of Ordinair-standarten other than they had a red field. Following the general Ordinair-standarten 'formula', I have chosen to put an imperial eagle on the obverse and the Kolowrat coat of arms on the reverse. I got the coat of arms from the internet so I can't be sure if it is right for this period. I particularly like this coat of arms because it follows the uniform of the dragoons very closely and consequently it ties in very well. I have also taken a risk with the fringe, tassles and spear point. I have chosen to do these as 'silver' rather than the usual 'gold' for no other reason than this regiment is one of the few regiments that used steel hilted swords.
The flag for the Wurtemberg Dragoons is loosely based on the description given by the entry on Kronoskaf. The description, like most of the complex flag descriptions on Kronoskaf, is a little hard to visualise and this one makes no sense at all (to me); still, this version is pretty enough.
Some pictures of the figures. All are Front Rank Miniatures painted by yours truly in enamels. They will join another four recently painted units on the 'to-base' list.
So there we have it: Two more units for the Austrians. Next up, with the Chotusitz scenario in mind, I will do a unit of Austrian cuirassiers and a few units of (the last four units I plan to do of) Prussian infantry, including IR 15 The Garde. I've chosen to do the latter as III battalion in mitres, so it will stand out on the table - grenadiers with a flag!
EDIT: From the last photo I noticed all of the right cuff buttons I missed - now done yellow metal like the others. It's a funny thing that when you start missing a detail you miss it quite often - a blind spot so to speak. I must have worked sword hilt, then front of figure, and having seen the sword hilt done (because it sticks up) stopped turning the figure and missed the cuff buttons.
The flag for the Kolowrat-Krakowski Dragoons is very 'risky' and wholly unreliable. Kronoskaf has no description of Ordinair-standarten other than they had a red field. Following the general Ordinair-standarten 'formula', I have chosen to put an imperial eagle on the obverse and the Kolowrat coat of arms on the reverse. I got the coat of arms from the internet so I can't be sure if it is right for this period. I particularly like this coat of arms because it follows the uniform of the dragoons very closely and consequently it ties in very well. I have also taken a risk with the fringe, tassles and spear point. I have chosen to do these as 'silver' rather than the usual 'gold' for no other reason than this regiment is one of the few regiments that used steel hilted swords.
The flag for the Wurtemberg Dragoons is loosely based on the description given by the entry on Kronoskaf. The description, like most of the complex flag descriptions on Kronoskaf, is a little hard to visualise and this one makes no sense at all (to me); still, this version is pretty enough.
Some pictures of the figures. All are Front Rank Miniatures painted by yours truly in enamels. They will join another four recently painted units on the 'to-base' list.
| The 'Kolowrat' coat of arms is rather pretty, isn't it? |
| The Wurtemberg Dragoons in fetching red and black coats and straw waistcoat. I particularly like the casualty on the falling horse. |
So there we have it: Two more units for the Austrians. Next up, with the Chotusitz scenario in mind, I will do a unit of Austrian cuirassiers and a few units of (the last four units I plan to do of) Prussian infantry, including IR 15 The Garde. I've chosen to do the latter as III battalion in mitres, so it will stand out on the table - grenadiers with a flag!
EDIT: From the last photo I noticed all of the right cuff buttons I missed - now done yellow metal like the others. It's a funny thing that when you start missing a detail you miss it quite often - a blind spot so to speak. I must have worked sword hilt, then front of figure, and having seen the sword hilt done (because it sticks up) stopped turning the figure and missed the cuff buttons.
Saturday, 9 May 2015
CHOTUSITZ - A short report on the first two moves of the solo game
The Austrians pushed forward with their infantry. The gun line caused some confusion as the infantry moved to keep the fire lanes open.
After the I'd played this through I suddenly realised the Austrians were over egged in the artillery department so the problem will be less of an issue in subsequent re-fights.
The Grenz on the Austrian left pushed forward to taunt the Prussian cavalry with a desultory fire.
On the Prussian left Waldow's cavalry began to deploy....
....and with the aid of a Brilliant leader card, accomplished the feat with alacrity.
On the Prussian right, as Buddenbrock came forward, the Austrian cavaly under Bitthyanyi descended the ridge to meet them and support the Grenz which were looking decidedly overexposed.
On the Austrian right Liechtenstein's cavalry took the initiative.
It wasn't long before the cavalry action on both wings became a swirling melee of charge and counter charge.
Things didn't progress very historically - the Prussians came off worst on both wings - but there is no accounting for some dice rolls!
Turn two saw the Austrian infantry beginning to engage. It was at this moment that I began to see a problem with the set up.
I realised that I had set up the battle with Chotusitz and Leopold's command too close to the Prussian base line. Although I had left the timing of Frederick's arrival vague, it soon became apparent that he would have no room to manoeuvre when he did arrive.
Leopold's infantry began to scramble into Chotusitz.....
......before overwhelming numbers of Austrian white coats, admittedly with some casualties, smashed all before them.
As turn 2 came to a close the cavalry battle on the right was finally resolved and the Austrians, much dispersed, had total control of this wing.
The infantry assault on Chotusitz was about to begin.
You can clearly see, in this picture, the restricted space into which Frederick can deploy (between the road exit on the Prussian baseline and Chotusitz). When he arrives it will be immediately into the teeth of Austrian musketry.
On the extreme right the Austrians prepared their cavalry to redeploy towards the left.
This picture shows another error in the set up. I chose to feature the Brslenka stream and boggy ground along the whole length of this end of the table. It took up too much room and made the deployment area between it and Chotusitz too narrow.
I could see that the game, due to the set up, would not work as planned so I called a halt to it. I will reset the table before attempting the battle again. Solo games have more uses than just to have fun.
I've decided to play it at almost one unit to one regiment next time. I've just got one more unit of Austrian cavalry to paint ( I painted two more last week), two or three units of Prussian infantry in tricornes (so I don't have to use fusiliers) and a unit of the Guard (3rd battalion in mitres).
After the I'd played this through I suddenly realised the Austrians were over egged in the artillery department so the problem will be less of an issue in subsequent re-fights.
The Grenz on the Austrian left pushed forward to taunt the Prussian cavalry with a desultory fire.
On the Prussian left Waldow's cavalry began to deploy....
....and with the aid of a Brilliant leader card, accomplished the feat with alacrity.
On the Prussian right, as Buddenbrock came forward, the Austrian cavaly under Bitthyanyi descended the ridge to meet them and support the Grenz which were looking decidedly overexposed.
On the Austrian right Liechtenstein's cavalry took the initiative.
It wasn't long before the cavalry action on both wings became a swirling melee of charge and counter charge.
Things didn't progress very historically - the Prussians came off worst on both wings - but there is no accounting for some dice rolls!
Turn two saw the Austrian infantry beginning to engage. It was at this moment that I began to see a problem with the set up.
I realised that I had set up the battle with Chotusitz and Leopold's command too close to the Prussian base line. Although I had left the timing of Frederick's arrival vague, it soon became apparent that he would have no room to manoeuvre when he did arrive.
Leopold's infantry began to scramble into Chotusitz.....
......before overwhelming numbers of Austrian white coats, admittedly with some casualties, smashed all before them.
As turn 2 came to a close the cavalry battle on the right was finally resolved and the Austrians, much dispersed, had total control of this wing.
The infantry assault on Chotusitz was about to begin.
You can clearly see, in this picture, the restricted space into which Frederick can deploy (between the road exit on the Prussian baseline and Chotusitz). When he arrives it will be immediately into the teeth of Austrian musketry.
On the extreme right the Austrians prepared their cavalry to redeploy towards the left.
This picture shows another error in the set up. I chose to feature the Brslenka stream and boggy ground along the whole length of this end of the table. It took up too much room and made the deployment area between it and Chotusitz too narrow.
I've decided to play it at almost one unit to one regiment next time. I've just got one more unit of Austrian cavalry to paint ( I painted two more last week), two or three units of Prussian infantry in tricornes (so I don't have to use fusiliers) and a unit of the Guard (3rd battalion in mitres).
Sunday, 3 May 2015
A bit more painting in the last days of April
At the start of the month I thought I was doing quite well with my painting effort: By mid month I had painted forty eight Austrian infantry and quite a nice looking unit of Esterhazy Hussars. Then everything stopped. The plans I had for painting my own stuff, numbers wise, looked like they were taking another nose dive.
Fortunately, I've managed to drag things back in the last days of the month. I've added another unit of Austrian infantry, and with plans for the Chotusitz scenario in mind, three units of Austrian Grenzers. Back on track; 96 infantry, 8 cavalry and four flags done this month.
I have finally decided how to paint my Grenzers. I like these uniforms so much I'm going to go for maximum uniform variation over 'order of battle' accuracy. I will paint only one 'battalion sized' unit from each regiment and field very mixed looking forces of them.
First up, a unit painted as Infantry Regiment 42 Gaisruck.
I find anything purple / violet hard to paint as the enamel choice is extremely limited. Consequently, this unit has 'sun-faded' facings.
This is the fifth unit I've painted in this 'marching' pose. If you have to paint lots of Austrians (by Front Rank) it is definitely the pose to paint - the arm position covers up almost all of the frontal straps and lapel detail.
I've given this unit a white Colonel's Liebfahne based on the Greenwood and Ball illustration. This standard is different on each side.
I prefer the yellow regimentsfahne, because it has more contrast with what are basically white uniformed troops, but as Austrian infantry standards have no 'unit distinction' it is the only variation possible. So far I've painted at a ratio of 5 liebfahne to 8 regimentsfahne.
Three units of Grenzers.
Front Rank only make Grenzer in one uniform so some minor alterations will be required for the types I want; I've already painted three units from the Karlstadter military district wearing the Front Rank uniform. The Banal military district has a similar uniform, but the colours are very similar to the Karlstadter, so I've chosen not to do the 'Banal Grenzers'.
The first two units represent units from the Warisdiner military district.
Warisdiner-Creutzer with dark green dolman and cuffs, and Warisdiner-Sankt Georger in light green dolman and cuffs.
The cuffs are plain square cut for these regiments so their was some work required removing the pointed, braid edged cuffs before painting.
The first of three units from the Slavonisch military district.
A unit of Slavonisch-Gradiskiner in a very fetching uniform of red and two shades of blue edged with yellow braid.
The other two regiments from this region will require quite a lot of minor uniform alteration before painting.
Subscribe to:
Posts (Atom)