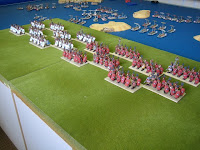

These 96 figures are all painted as Romans (black over red feathers) and form the Roman hastati of two legions. They are all Renegade figures. Although they should, in all likelihood, be equipped in a similar manner to Principes I have chosen to use figures with pectorals (chest plates) to distinguish the two troops types at a glance.


Putting the hastati and principes together in their manipular formation (the business end of a Roman army) gives me the first real impression of what this two legion consular army is going to look like (without the velites or triarii of course). Once flanked by a similar number of allies (with yellow and blue shields) I think it is going to look pretty good - in all, 576 infantry with a frontage of about 80 inches.


Putting the hastati and principes together in their manipular formation (the business end of a Roman army) gives me the first real impression of what this two legion consular army is going to look like (without the velites or triarii of course). Once flanked by a similar number of allies (with yellow and blue shields) I think it is going to look pretty good - in all, 576 infantry with a frontage of about 80 inches.


14 comments:
Phew; very impressive painting! I am astonished how fast you manage to get your armies on the table.
Hi BRB,
You must remember that I paint these things for a living - consequently, I'm faster than most.
James
Hi James; didn't know that! Lovely work.
Great stuff!!
You certainly have an incredible gift for painting!
Consul.
p.s. I wont be able to make the Fiasco show as i'm not in Leeds this weekend (I'm off home to see my 'rents!)
So how do you do the shields? I need to do some shields on some Renegade Velites.
Simon
Hi BRB,
The shields. O.K. I'll describe red ones, but it's the same principle for all. I use enamels so I'll give colours not Humbrol numbers. It's a three colur highligt job.
Dark red (black + red) base colour pained over all.
Paint pure red over the bulk of the shield leaving the dark red showing where you want the 'cracks / marbeling' to be and the shading around the boss, spine and top/ bottom rims. I like this to generally radiate out from the boss pine. Think of the shield as quilted and paint the raised bits of the imaginary quilt; Paint boss / spine outwards.
Paint dark orange (pure red + yellow) over the pure red leaving a good line of the pure red between orange and dark red.
Paint boss black. Then paint the steel colour (I use dull aluminium) leaving some black showing around the rivets, etc. Highlight steel colour with some shiny silver.
- Jobs a good'n!
There are some reasonably large pics of the shields to that and this should help.
James
Enamels; that's surprising!
I have a legion of part-painted Renegades; I'm tempted to tart them up, now, with jazzy new shields.
Hi BRB,
Enamels - surprising? You can't beat enamels for speed painting.
Advantages:
No need to double layer colours like red, etc., to get a strong first colour. One touch painting!
Easy to mix.
No need to varnish.
V. good flat matt finish.
Disadvantages:
Brush wear.
Smell (but you get over it).
A lack of purple (which bothers me).
I used to use Enamels, myself, in the old days. You are getting nice results with them!
I see if I can replicate your shields with with acrylics.
Okay now you have caught my eye. Just what are all those ships in the background? Xystons? Looks to be about 50 or so. Any better pictures?
VR
James Mattes
Oh disregard my last I found the blog entry on these and seems I posted already about them as well.
VR
James Mattes
Impressive collection of Romans that you have built up in such a short time. How long does it take a layer of enamel paint to dry before you can go onto the next step?
I'm probably confusing enamels with oils.
Hi Fritz,
I paint in big batches (48 typically) so by the time I finish one colour I can usually go straight onto the next.
Enamels - e.g. Humbrol
Post a Comment