Before I start, and to prevent a pointless waste of peoples time posting corrective comments, I wish to explain the organisation of this formation. As most of you will know I have chosen to recreate my formations at a figure scale of approximately 1:5, and this being the case I will have to fudge and change some organisational details; none more so than for this formation. Instead of the usual company level unit organisation I have chosen to field the armoured car company in small 'battle groups' combining other battalion assets. There should be 4 armoured car groups based around the four A/C platoons in the battalion, each with attached motorcyclists, but this would be hard to scale into three stands per 'battle group' without making the overall battalion too powerful - so I have done only three. There should also be less SdKfz 231 armoured cars but I wanted a distinguishable 'heavy' unit. The battalion's support company weapons (a 7.5cm infantry gun and a PaK36) will be split up and added to a battle group for a 'combat adjustment'. Purists will want to hang me, but they will have to find me first.
Except for some gun crew, this is what the battalion will look like.


Step 1: Preparation.
i]. Build the models using super glue.
ii]. Add radio antenna where appropriate using a fine drill, plastic brush bristles and super glue.
iii]. Stick vehicles to painting bases using small amounts of UHU and vehicles to ice lolly sticks with a glue gun.

Step 2: Undercoat
Normally I would undercoat using black spray paint, but to get a better variation in 'base' colour I'm undercoating manually using 2 coats of Humbrol enamel, in this case number 225.

Step 3: Ink wash
All vehicles are given a good coating of acrylic ink. This is Liquitex transparent burnt umber.

Step 4: Dry brush
Everything gets dry brushed with enamel. This is Humbrol number 93. This gives the basic 'used' look by varying the shade of what is, to all intents and purposes, the base colour.
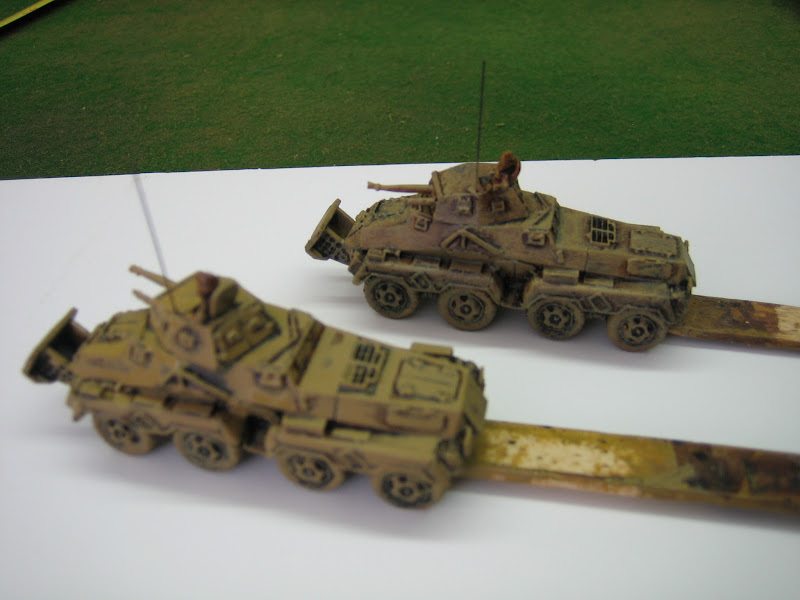

Step 5: First highlight
Using the dry brush colour (H 93) the first highlight is applied by over painting most of the dry brushed areas, but obviously staying away from darkly shaded areas. The first picture shows two SdKfz 231s, the one in the foreground has been highlighted.

Step 6: Ink detail
My next step is to go back over very deep shadow and around model detail, such as hatches, by painting with burnt umber ink. Ink flows extremely well so this job is easily accomplished with a fine brush.

Step 7: Second highlight
This is simply a case of going over most of the first highlight with a lighter shade (I used H 94). It is the time to tidy the edges and lessen the thickness of the ink lines - painting to a line is easier than pianting one.

Step 8 & 9: Last highlight and black
i]. The last highlight is applied with a brush, paying special attention to the 'corners' where two plates meet. I used H 94 mixed with H 34 (white) for this.
ii]. I paint everything that needs to be black with H33 then highlight with a grey colour.


Step 10: Bits and pieces
This is part of the finishing touches and includes adding metal tones to MGs and tracks, and painting luggage, tilts and the like using a basic three tone highlight technique.
Stage 11: Vehicle crew
Lastly I paint any human beings using various shades, and generally using a three tone highlight.
Some close ups of it all finished


11 comments:
Great techniques and clearly very effective. They look great. I think I'm going to have to borrow some of your ideas!
Very nice looking, thanks for the tutorial...
I use Devlan Mud for all my stuff, but since it's now OOP and my hoard is slowly shrinking I need to find a replacement.
Looks great as usual James and a very nice tutorial! Always enjoy your posts!
@Mr. Harold
Army Painter now has a washes available in addition to their normal product. Use strong tone wash which is virtually the same as Devlan Mud.
Christopher
Very useful information! I really got to try the ink thing!
Great walkthrough. Thanks for posting!
James,
Thanks for taking the time to explain your technique. I look forward to trying it on my Russo-German Ostfront. Very effective!
Respectfully,
Gunny
James, may I ask which base sizes do you use for each troop type, and why (that is, the reasons for that basing)?
Great work!!
Hi Emilio,
All bases are 60mm frontage. Depth has never been an issue for me as, whilst gaming, it hardly ever makes a difference. However, for your information:
Vehicles = 75mm
Light / medium AT, AA, Infantry guns = 60mm
Other guns = 75mm unless they require more space, in which case they = 90mm.
Infantry = 40mm
HQs are round in the following diameters:
observers and such = 60mm
Battalion = 75mm 1 vehicle
Brigade = 90mm 2 vehicles
Brigade group / Division = 105mm 3 vehicles or 2 and other stuff.
The reason for base sizes is down to game-ability.
In play, there is nothing visually worse (IMHO) than vehicles bogey to bogey. It becomes an inevitability with most rules, and the basing enforces a gap.
In the desert theatre the size of the base does not matter because there are so few built up areas or other defiles (such as hedged roads!). My choices might have been different if I was doing NW Europe.
I had planned on using bases with a frontage of 75mm, but because I have a friend who has Italians we had to agree a mutual basing standard - he wanted 50mm, so we compromised on 60mm. As it happens, this turned out well. The extra base size would have proved hard to store - on a whim I had purchased enough men and vehicles to field the bulk of two armoured divisions and I still have the Italians to collect. My earliest desert post has a shot of the first part of the FoW order shortly after arrival - they didn't have enough stock to send everything straight away, but I guess that happens when you want 30+ of the same tank.
James, many thanks for your answer. It is very clear, and your reasons are logic. I asked because I am working on 10mm british for Normandy, and I want to do a basing that allows for playing more than one system. Your explanation is very helpful.
Hi. I am thinking about build a small DAK force. Could you please list the exact models for each in this group? I like the composition and I think I may start with a force like this.
Thanks!
Mike
Hi Mike,
The organisation for 22nd Armoured Brigade group is here with the Ariete list for Bir el Gubi, somewhere it is listed seperately:
http://olicanalad.blogspot.co.uk/2011/01/ilkley-lads-present-bir-el-gubi-1941.html
I have done the organisation for 15th Panzer in a similar manner, but I have not posted it yet. I will soon. I'll also do one for Battle Group Cramer.
I plan on filing them all up for easy reference. I like diagram lists because you can see the radio net and command chains.
Post a Comment