Friday 30 January 2015

Take The High Ground - A Seven Years War Scenario

This scenario is a fictional major clash between Russian and Prussian forces set during the campaign season of 1760 when, historically, the Russians raided Berlin. If they had been more ambitious the Russians might have won the war for the Allies with a single bold stroke but they didn't, and the war in Europe continued for another three years.


Fictional Background

Following the disastrous encounters of 1759 Prussia is on the back foot and the strategic initiative has passed to the Russians. The Russians have decided to end the war by capturing Berlin, advancing on it from the south east. Progress has been steady and the Prussians have fallen back before the Russian's without risking an engagement. 

Now, the only natural barrier between the Russians and their prize is the River Spree. The Russians have decided to force a crossing at Rasmandorf where the crossing points are dominated by the heights on the east bank. The Prussians, having traded ground for time to reinforce themselves, have taken up positions on the heights; it is here the Prussians will make their stand. 

If the Russians can take the heights any attempted defence of the far bank will be rendered futile, they will be able to cross without further resistance, and Berlin, along with the House of Hohenzollern, will fall.


The Fictional Battlefield


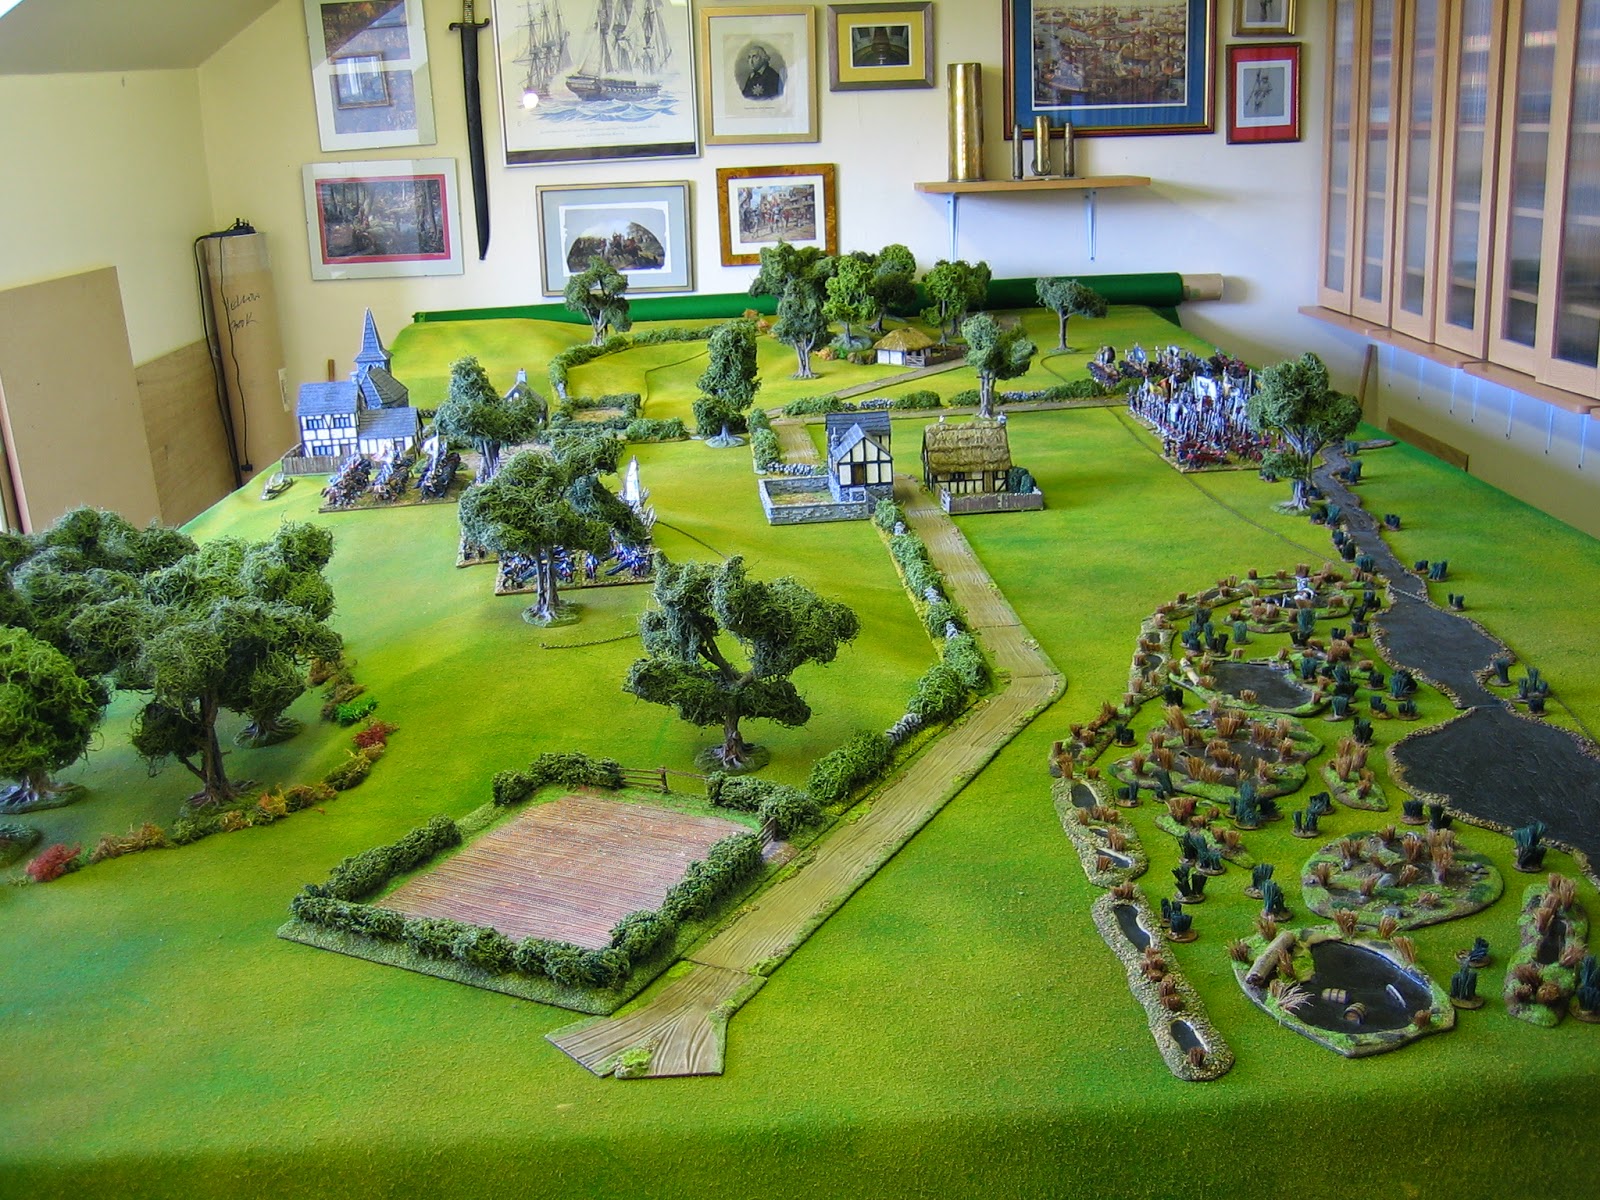
All terrain, except isolated trees (added for aesthetic reasons), is representative terrain.
  • The stream and boggy ground are type III terrain.
  • Built up areas are type III 'town sections'. The Church is a two piece feature split lengthwise (one 'town section' on each side).
  • The hills have type II slopes with level tops.
  • Woods on level ground are type II. Wooded slopes are type III.
  • Hedges are type II. Enclosed fields are type II (the 12 feet of hedges, as well as a dozen 6" tall trees, are new Christmas additions to the terrain collection - they are by Andy Worsley of The Last Valley, though I did a little extra work on the hedges to make them fit in).
The deployment zone for each player is marked on the map with a red line. On the table, the zones can be seen marked out with lengths of fine chain (I still think that fine chain is a very good idea for this kind of thing - it always lays flat and bends exactly where you want it to because of the links; it doesn't move once placed because of its weight; it is easily removed; but, you do need a wall hook to hang it from when it's not in use, if 'heaped' it easily tangles; it is cheap - I think I paid around £1.20 a meter on ebay). 

Each player will choose an order of battle using a basic force plus one 'package' chosen from his list. Deployments will be made secretly on the map after the 'Army Characterisation Deck' draw (6 cards for each player) and prior to table deployment. 

Both players may choose to deploy some of their force as a single off-table reserve. If this option is taken, the Russian baseline entry point must be marked on the map, Prussian reinforcements must arrive through the town (via Rasmandorf's off table bridges). Their activation and imminent entry point may be announced when the player's Major Morale card is turned. Thereafter, they move onto the table in march column on any appropriate move card. 

Note: The scale on the map is in 6 cm increments and a unit in line has a frontage of 18 cm.

Note: Any routing Prussian troops will seek to escape via the bridges behind Rasmandorf or, if cut off from them, towards one of the table ends.

Note: The full range of Stratagem card definitions will be active for this scenario. If the Prussians draw a reinforcements right / left stratagem it will be assumed that they are arriving via a secretly constructed pontoon bridge in that sector.


Map note: The River Spree is off table behind the Prussian deployment area (top of map) - the on table watercourse is just a stream.


Victory Conditions


The victory conditions are simple enough and they are the same for both players. 

  • Marginal Victory: Be in sole possession of one hill and the road exit in the Russian deployment zone at the end of turn six (nightfall). 
  • Decisive Victory: Be in sole possession of both hills at the end of turn six (nightfall). 
  • Total Victory: Be in sole possession of both hills and the road exit in the Russian deployment zone at the end of turn six (nightfall).

Prussian Order of Battle

Basic Prussian Force
Basic Force
  • 1 Regiment of Cuirassier.
  • 1 Regiment of Dragoons.
  • 1 Regiment of Hussars.
  • 2 units (four battalions) of Combined Grenadiers.
  • 5 Regiments of  Musketeers.
  • 2 batteries of Artillery.
Package A
  • 1 Regiment of Dragoons
  • 1 unit (two battalions) of Combined Grenadiers
  • 2 Regiments of Fusiliers
  • 1 Regiment of Garrison Infantry
  • 1 Battery of Artillery.
Package B
  • 1 Regiment of Dragoons
  • 2 Regiments of Hussars
  • 1 Regiment of Fusiliers
  • 2 Batteries of Heavy Artillery (in redoubts)
Package C
  • 1 Regiment of Cuirassier
  • 1 Regiment of Hussars
  • 2 Regiments of Musketeers
  • 1 Regiment of Fusiliers
  • 1 Battery of Artillery
Russian Order of Battle

Basic Russian Force
Basic Force
  • 2 Regiments of Cuirassier
  • 1 Regiment of Horse Grenadiers
  • 2 Regiments of Hussars
  • 3 Regiments of Grenadiers
  • 6 Regiments of Musketeers
  • 2 Batteries of Artillery
Package A
  • 1 Regiment of Horse Grenadiers
  • 2 Regiment of Cossacks
  • 1 Regiment of Grenadiers
  • 4 Regiments of Musketeers
  • 1 Battery of Artillery
Package B
  • 1 Regiments of Cuirassier
  • 2 Regiment of Dragoons
  • 1 Regiment of Grenadiers
  • 2 Regiments of Musketeers
  • 2 Batteries of Heavy Artillery
Package C
  • 4 Regiments of Cossacks
  • 2 units (four battalions) of Combined Grenadiers
  • 4 Regiments of Musketeers
I think this scenario will be fought in two to three weeks time. The last two gaming nights have been cancelled due to the weather; I'm hoping we can get Graham's game in over the next week or two, then get this one going.

Tuesday 27 January 2015

Latest additions - newly recruited Austrians

Having finished painting the upgrades to all of the existing Austrian units I've started to add some completely new units. 

I am starting with four German infantry regiments: The first pair will be 21 Lacy and 41 Bayreuth; the second pair are 23 Baden-Baden and 29 Loudon. I have chosen to do these two pairs of units because each pair wears an almost identical uniform, allowing me to paint them in 'double batches' of 48 figures without much thought.

The first pair of units have now (less basing) been done.


 22 Lacy (left) and 41 Bayreuth (right). Only the pompoms differentiate the units.

These are Front Rank figures in the marching with shouldered musket pose. 

I know this pose is not to every one's taste, the marching with musket upright pose is more popular and somehow looks more SYW, but I love this pose because it is the easiest / quickest pose to paint.

Flags are over painted versions of the Greenwood and Ball design.
From the direction you usually see your Austrians (before they turn and run), I think the pose looks quite purposeful.

One thing I have done, is to replace the cast on officer's partizan pole with a wire one. I'm fed up of having straighten them out and touch up flaked paint; they stand too proud of the unit and are forever getting caught on player's sleeves. 


Lastly I thought I'd show the difference between old and new painting styles. The unit on the left, 14 Salm, was painted ten to fifteen years ago (?). They style hasn't changed that much over time but there are differences. 

Next up, regiments 23 and 29 in with dark blue facings. They are in the 'marching with musket upright' pose. They are black under-coated and ready to go.


Saturday 17 January 2015

As one pile disappears, another lifts its shiny head

So, with the Russians finished and the last four units of Prussian infantry and two units of Prussian cavalry on hold, I've been working on getting my Austrians back into the fight. 

At the moment this is largely a case of upgrading my 16 man infantry units to 24 man units and re-basing the army on 45mm wide bases to match the Prussians and Russians. It's an awful job; trying to match painting I did fifteen (?) years ago is quite difficult; painting figures and not having 'new' units to show for the effort is a bit dispiriting. On the up side, I only have two units of Hungarian infantry to go.


When the Hungarians are done, there will be a small 'game-able' army all ready to go. It comprises:

5 regiments of cuirassier
3 regiments of dragoons
1 regiments of hussars

8 regiments of German infantry
2 regiments of Hungarian infantry
1 unit of combined German grenadiers
3 battalions of Grenzers

3 batteries of guns

9 command stands

Then I can start increasing the size of the army by adding a few new units. Here are the plans for that expansion - the number in brackets is the number of units already in the shiny pile. I expect to have this lot done by the end of the year.

3 regiments of cuirassier (1)
2 regiments of dragoons (1)
2 units of combined elite companies (1)
4 regiments of hussars (1)

8 regiments of German infantry (6)
1 regiment of Hungarians (1)
2 unit of combined grenadiers (1)
3 battalions of Grenzers (3)

3 batteries of guns (1)

This will give a nicely balanced army of 54 units comprising: 28 units of infantry, 20 units of cavalry and 6 batteries of guns that will able to take the field in war game campaigns with the Prussians (50 units) and Russians (54 units).  Except for a 'universal' pontoon train and some 'universal' limbers that I plan to add for completeness, this is where my Seven Years War project will end for the foreseeable future.

Then, I can start my Peninsular War collection. 


Friday 16 January 2015

An army finished - Russian SYW - Roll call!


Today I put my brush down on my Seven Year War Russian army. Finishing an army is a significant moment for any war gamer. The chance to say "finished" is never one to be sniffed at. Every usable Russian in my lead pile has now been painted. Every planned unit has been done.

Will there be more units to come? Maybe but, not in the immediate future. I may, in years to come, add a unit of field guns, two or three units of line infantry, a unit of dismounted dragoons, and possibly a unit or two of jagers, but not for now; for now I have enough; my enough is, thankfully, nowed.

What did I need to paint to finish the army? Well, actually not that much but, after the Zorndorf project, I felt uninspired to finish the last three units of cavalry and command stands. The units I have added are force balancing additions for campaigns and the like.

What made me paint them now?  I looked at the battles I could do and found Paltzig 1759. I could just about do it if I added a couple of units of cavalry - which I had in the lead pile - so I waded into them. With just 11 more figures needed, after that, to remove the pile completely, the temptation was too much. I had to take them off the to do list altogether.

So now, less three units and three commands to bases I have to finish basing (a mere trifle), I have decided to "Roll Call!"

After register, the army musters 931 (little lead) men and 12 guns.

Dragoons and Horse Grenadiers: Two regiments of each.
Hussars: There are four regiments of hussars but one is at double strength - Horvat - this latter unit wore the same uniform as two other regiments, so it's a useful colour scheme.
Cuirassier: Four units of cuirassier.
 Three batteries of howitzers.
Five units of the Observation Corp. The four regiments that took part in the SYW plus their combined grenadier regiment (?).
 The line infantry....
..that amount to 15 units - perhaps too few?
Combined grenadiers from the infantry: There are three units of these.
Cossacks: I have painted 64 of these buggers. You absoletely need them for any Russian army, but you can't find any (war game) military reasons to include them. We are not talking 1812 here - these cavalry were generally useless, even in campaign terms.
Field guns: Three batteries, of everything, these might be the first component of the army that might need reinforcement, but only by one battery.

There is, of course, another thing I've been painting. It's not complete, but my next post will detail my plans and show where I'm at...........


EDIT: Whoops, forgot to mention these guys. Four Grenadier Regiments.

Monday 5 January 2015

Solo Zorndorf - part 5

This report will combine the action from turn 5 until midway through turn 6, at which time the battle was effectively ended. Turn five and six were unusual in the number of high initiative swings they produced - the double six domino appeared no less than four times, and there were several other doubles too. 

On the Russian left Demiku's cavalry and Schorlemer's cavalry came to grips all along their lines.
On their right the pressure was building as Seydlitz brought his cavalry to an undefended length of the Galgen-Grund but, as it was, the Russians had had enough.

They broke and fled towards the Hof-Bruch.
Things were not going well for the Russians. The Observation Corps was beginning to feel the sting of Prussian musketry.
But, at the Galgen-Grund things were going from bad to worse as their line collapsed.
Seydlitz was across the Galgen-Grund and, cutting off the Russian retreat as they fled helter-skelter for the safety of the wetlands of the Hof-Bruch, his troopers captured them in their thousands.
What Russians remained to the left of the Observation Corps were pressed back onto the boggy ground. The elated Prussians began their advance to finish them off.
Only the Observation Corps remained largely intact.
The cavalry action on the right was now beginning, and the Prussians were getting the best of it here too.

This ended turn 5.
The last of the Russians fleeing to cross Hof-Bruch in the direction of Quartschen were captured by Sydlitz's troopers.
Then, by chance, things started to turn in the Russians favour on their left. Perhaps, just perhaps......
In the centre the last of Saltykov's and Galitzyn's troops were being shot to pieces.
In a last counter attack, born of desperatation, a couple of determined battalions of combined grenadiers take advantage of a lull in the musketry. 
First one regiment of Prussians took to their heels...
...then another. 

Was this last gasp of the Russian infantry enough to swing the battle. 

The Prussians are down to a handful of morale chips. The Russians still have some to spare.
Back on the Russian right they are throwing themselves into the fight with some elan. Schorlemer's cavalry begin to break.

The Russians are invariably rolling dice of less value than the Prussians but are winning hands down on almost every roll.
Even the Cossacks are encouraged. 

We are using a difficulty check before allowing Cossacks to close - this does not apply to Heroic Cossacks!

At first they are thrown back but,.....
..........they attack from every direction and overwhelm their adversaries.
It looks like it is too late. Without warning a fresh attack by Dohna's infantry upon the Russian left causes the Observation Corps to disintegrate.
The Russians draw double six and the Prussians draw a nine. The Russians have 21 initiative points. Low and behold, first card up is Command Indecision and they lose the lot! It never rains when it pours.
The Prussians now spend their six initiative points and win the first sixteen of the next initiative with a high double of their own. By the time it is spent, their are no Russian infantry still in the field. They only have a couple of regular cavalry units (the others having galloped off in pursuit), a few regiments of unreliable Cossacks, and two morale chips left. The Prussians have troops galore and one morale chip.

The Russians throw in the towel and order a general retreat.

The last two turns saw the Russians finally run out of luck. They got their cards at the wrong time, their firing was ineffective due to poor dice rolling, and the Prussians got much more initiative. Only in their last gasps did their luck begin to change but it was far too little, too late.

This was another solo success, as far as I'm concerned, The battle took seven or eight hours to play out, and playing it a turn at a time was definitely the way to do it. It also made the AARs easier to write as things were fresher in my mind. I hope you have enjoyed reading the AARs.

Saturday 3 January 2015

Solo Zorndorf - part 4

The only advice I received about what the Prussians infantry should do, is to attack. So, that is what I decided their plan should be. I decided that the Russians should hold their centre, possibly making a local counter attack if the situation looked favourable, whilst trying to outflank Dohna's infantry with Demiku's cavalry; the Russians should give up their position to the right of the Galgen-Grund as a lost cause.

So the game began. Turn 4. Let the Prussians at 'em!


Fat chance, the first dominoes give 17 initiative points to the Russians and only 6 to the Prussians. And the Russians go first!

I've included this shot to show how I'm running the initiative for this battle. Each side draws a domino from a cloth 'cash' bag. The player with most spots wins the initiative and will go first. The number of spots on the winning domino is the number of initiative points won. Except, if either side draws a double the spots on both dominoes are added together and this is the number of initiative won. The loser gets the spots on the high side of his domino as initiative and goes second in the initiative round, unless it is double domino - when the loser gets both sides. The turn will end on a double blank domino and any domino totalling an odd number of spots being drawn together. It sounds more complex than it is in practise. I'm using the left hand clockfor the Russians, right for Prussians; there are no impetus phases in my domino driven games.


The Russians used their initiative to forward the advance of Demiku's cavalry, bringing them them up to the Langer-Grund. 

This is only a minor obstacle - stop at contact then no effect. In reality, it was the a slight dip with some soft ground at its bottom.
Along the line the Russians who can see Prussians in front of them let fly with volleys of musketry and to good effect. The Russians momentarily catch sight of the Prussians coming through the Stein Busch. The Russian battery commander is on his metal and immediately orders a salvo of canister from his Secret Howitzers.

My favourite Piquet sequence card is Heroic Moment. When you first play Piquet you generally use it to get a unit bonus to fire, or hope you draw a move card that will allow you to move a unit twice, or perhaps use it a a melee card for a chosen unit. All well and good but, it is so much more than that. The last line of the rule book definition is "Some room for interpretation is allowed; heroic people should also be innovative!". To me that means only one thing - you can bend the rules with it! In the above case visibility range should be limited to 4", because of the trees, and the Prussians would therefore be out of sight; but, this is 'heroic' artillery fire; perhaps the Prussians walked into a clearing visible from the battery, perhaps they just made too much noise crashing about in the undergrowth but, whatever they did, that artillery saw them and opened up.
Between the Zabern-Grund and Galgen-Grund Seydlitz launches his cuirassier into the last remaining Russians.
Schorlemer, seeing the threat that Demiku poses to Dohna's flank comes forward at the first opportunity.
On the other flank the Russians are finished.
On the other side of the Galgen-Grund, the fire fight is vicious. Both sides give everything they have got. 

However, the Prussians have been constantly mauled by the Russians and at last, their will to fight is lost and they melt away.
Marschall's dragoons now face the Russians without infantry support but, the Prussians have been lucky with their cavalry attacks so far.
Before Demiku can turn onto Dohna's Flank, Schorlemer's cavalry engage them in some inconclusive melees.
 Dohna's infantry burst through the Stein Busch and are on top of the Russian centre.

At long last, the Prussians turn an infantry move card. Such are the vagaries of Piquet.


Beyond the Galgen-Grund Frederick has brought up the infantry he rallied in the rear. 

He relinquishes them back under Manteuffel's command.

They begin to press a flank attack across the Galgen-Grund.

The Galgen-Grund was a shallow steep sided muddy 'ravine', overgrown with bushes, with a stream at its base.
The Observation Corps is now coming under pressure and one of its units cracks....
....but Browne is on hand to stop the rot and they are just a soon rallied.

A regiment of Dohna's infantry have moved across the Langer-Grund - probably a bit of local initiative being shown, it better work or that colonel will be cashiered.
At the end of turn 4, the whole of the Russian line is engaged in fierce fighting. 

On the left, Dohna's infantry and Schorlemer's cavalry are pressing the Russian left.
In the centre the bulk of Dohna's infantry, ably supported by the remnants of Kanitz's command have emerged from the Stein Busch and are engaging the Russians closely.
On the Russian right, Manteuffels infantry are launching an assault across the Galgen-Grund.
Everything is poised for the end game. Both sides have barely 20 morale points. Both sides still have reserves with which to launch an attack or bolster a defence. It's going to be close.