Wednesday 31 December 2014

Solo Zorndorf turn 3

It's my Birthday today and I decided to spend it on battles. 

For a treat I went to Leeds with my wife and son, had lunch, and then went on to watch The Battle of Five Armies - my wife fell asleep mid way through, my 8 year old son grinned and said "cool" a lot, I wondered about the endless possibilities when it came to 'ways to kill an orc' - though, to be fair, the film covered most of the bases. 

When I got home I opened a beer and disappeared to play out the rest of turn three - which I started yesterday.

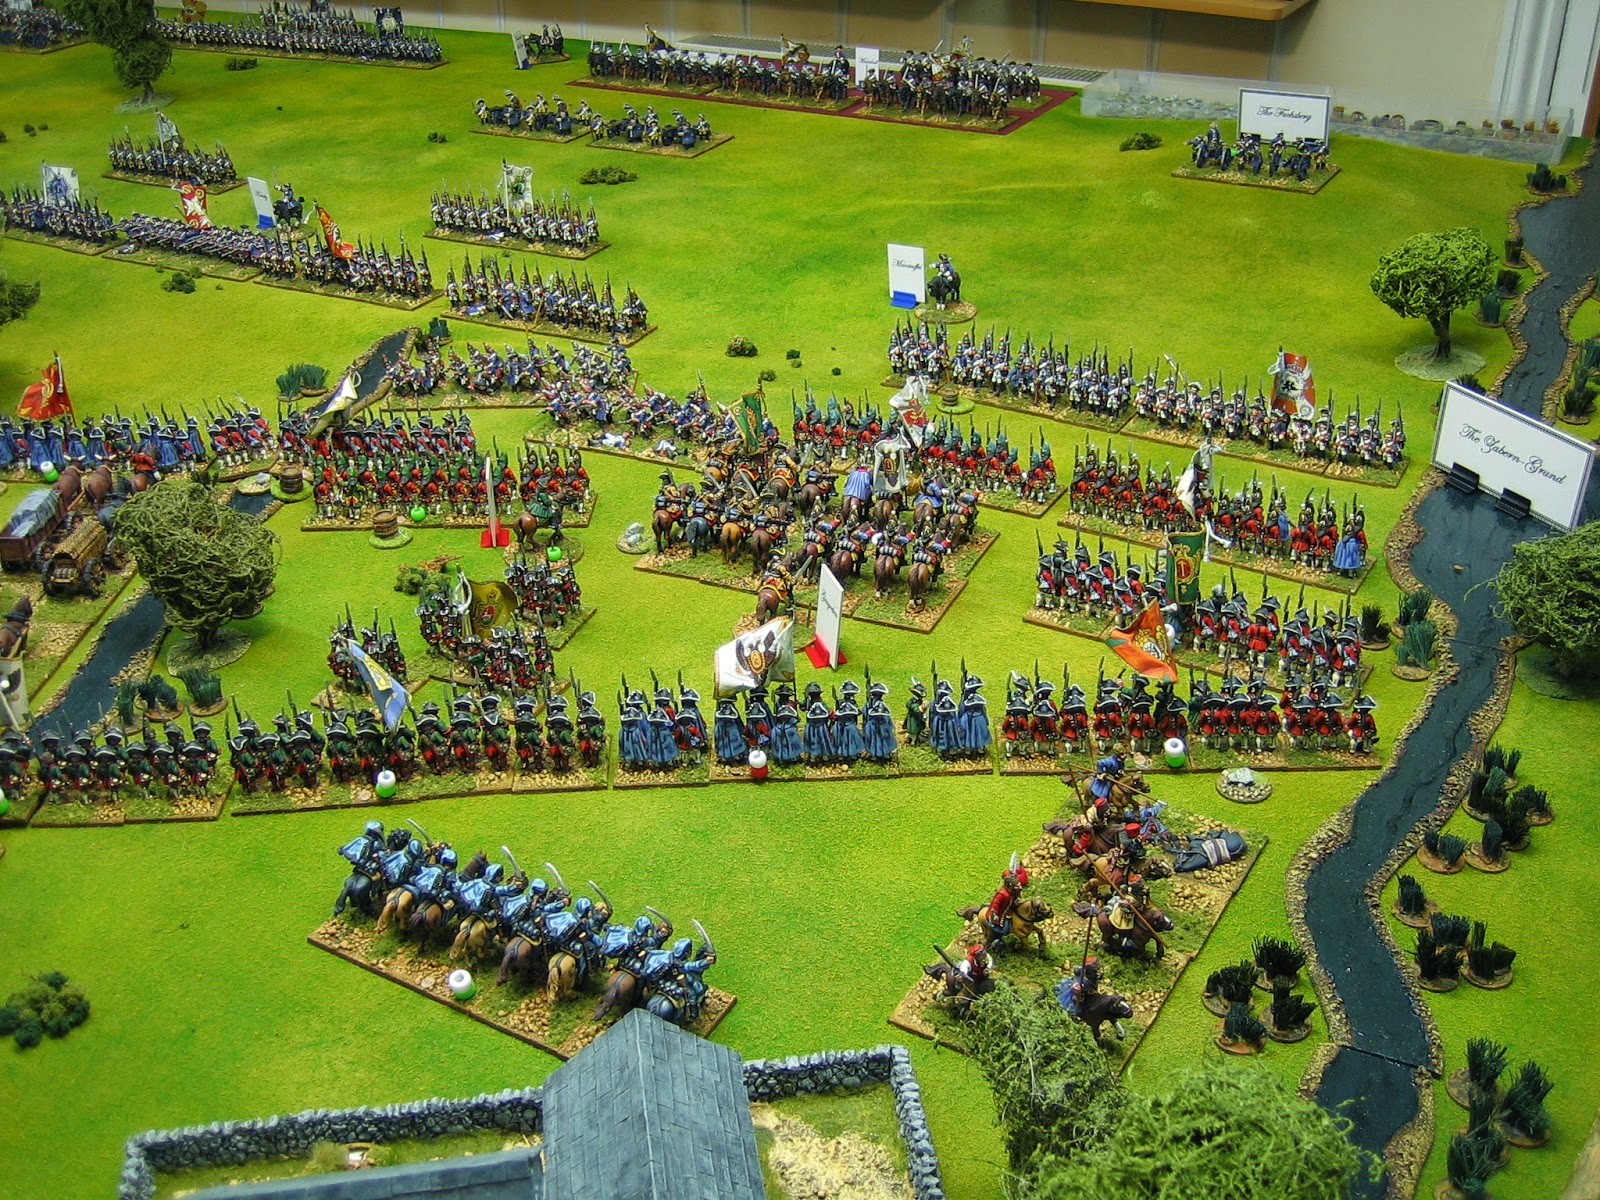
The turn has proved to be an interesting one. My opinion on what might happen proved correct but, not quite in the way I thought. The Prussians will end the turn in the ascendancy. However, the Russians are far from finished - they are a very tough nut to crack and their deployment is, basically, solid.


Left of the Galgen-Grund the Russians begin to redeploy to face the possible collapse of their right flank. Having two full lines, with a partial middle line of reserve grenadiers, allows this without too much thinning - a precautionary measure, you understand.
Certainly their position here is precarious. But, not everything is going the way of the Prussians and, after a vicious fire fight and a gallant charge by Gaugrebens cuirassier and horse grenadiers both sides have taken significant losses.


Then Seydlitz's cavalry launch an almost fanatical charge into the Russians. They must: They only have Seydlitz left to save the day.
The progress of his cavalry is a 'Hohenfrieberg' to behold. Smashing the first line of infantry aside and halting the enemy cavalry in its tracks.... 
 ...Seydlitz's troopers swing onto the flanks of the hapless and isolated Russians.
In moments it is finished, and the remnants of the Russian right now number just three regiments.
To make matters worse, Frederick, has been rallying the remnants of Manteuffels command as they retreated to safety. He is now personally leading them back into the fray. 


Finding encouragement in the success of their comrades, the remaining Prussian infantry renew their attack. Manteuffel's grenadiers pour in volleys of musketry to disorder the Russian infantry in preparation for a cavalry charge - the volleys are devastating - no charge will be needed against these Russian Grenadiers as they melt away.

The Prussians have managed to rally back a lot of lost casualty markers (in a manner similar to FoB). This new house rule has added considerable staying power to units lucky enough to rally.
The situation on the Russain right now looks hopeless - 'two green bottles standing on the wall....'
Meanwhile, Dohna's infantry have advanced and Demiku's cavalry have gone forward to out flank them.

Schorlemer's cavalry has not yet advanced. I felt sure that they would have time to do so if Demiku moved, but Dohna's attack has gone in much faster than I expected. As far as the Prussians are concerned, I've made a mistake.
Dohna is in the Stein Busch. He is in position for a joint assault [with Kanitz] of the Russian centre.

My question here is, should the Prussians delay and await cavalry support from beyond the Galgen-Grund, perhaps giving time to the Russians to organise - inviting a counter attack - or should they press on? 
Everything is set for the climax. It may come next turn, possibly the turn after. Both sides still have a lot of morale chips.

Happy New Year!

Tuesday 30 December 2014

Solo Zorndorf part 2.

Turn 2.

This turn will see the Russians getting most of the initiative but the Prussians seeming to do more with the little they get. By the turn's end the battle is, to my mind, beginning to take a very different course to its historical counterpart.


The Russians begin to reform their shattered right wing into new lines in the face of Prussian fire. Slowly but surely the steady rate of the Prussian volleys begins to tell.

The Russians get some big initiative swings but the Prussians have an extra 'Muskets Reload' card in their deck, not to mention a 'Brilliant Leader (Wild)' card.
The confusion of the right is too much for Fermor to bare. He is in fear of Frederick's [supposed] genius and concludes the battle is already lost. He cannot allow himself to be captured, after all, someone must relay the dreadful news of defeat to the Empress - and shouldn't it be him?

Historically Fermor left the field early in the battle on some 'very important business' elsewhere. In the game, this must be a military possibility. I have added a "Merde" card to the Russian deck. When it is turned, if his army has lost more units than the enemy, Fermor must roll greater than the turn number on d20 or flee the field. It is turn 2 - and, guess what!
The general situation mid way through turn 2. 

The Russians are reforming their right.

Kanitz is pressing his attack both sides of the Galgen-Grund (partially supporting Manteuffel) to the Stein Busch.

Malachowski's heroic hussars have stalled.
It is time for Marschall's regiments of Dragoons to ride to support.

No special card is required to activate these off table reserves because they are deployed immediately behind Manteuffel and Kanitz with no intervening rough terrain to prevent them being brought forward normally on cavalry move cards.
Kanitz's command exchanges vollies with the Russians deployed between the Stein Busch and the Galgen-Grund. The shooting, by both sides, is indecisive.
Dohna advances. 

Kanitz has penetrated the Stein Busch. This activates Dohna's command.
Seydlitz recrosses the Zabern-Grund somewhere behind the Prussian infantry and advances in their support. 

Historically Seydlitz shifted his command from the left bank of the Zabern-Grund to the right bank some distance behind the advancing Prussian infantry. This manoeuvre took some time to complete. Seydlitz's command can activate at any time if it proceeds on the left bank of the Zabern Grund on 'Cavalry Move' cards. If it awaits special activation (requiring an 'Other Difficulty' check on the 'Special A' card) it can deploy and move to the right of the Zabern Grund. Waiting for this card might pay off, or it might not - the Prussians failed to turn this card on turn one, on turn two they turned it and just passed the 'Other Difficulty' check.
The general situation at the end of turn 2.

The whole of the Prussian army is activated and most of it is advancing on the Russians. Only Schorlemer's cavalry (on the Prussian right - in the far distance) is holding back.


On the Russian right the Russians are just about holding their own and Manteuffel's dwindling command is under severe pressure; Seydlitz's heavy cavalry, now beyond the Fuchsberg, is riding to Manteuffel's aid.

Marschall's dragoons are advancing in a 'column of regiments' towards the gap between the Galgen-Grund and Steinbusch where the Russians are giving as good as they get.
Indeed, the fight in this gap could go either way.

I think that the Russians might completely lose their position between the Galgen-Grund and Zabern-Grund. The Prussians have done much better than they did historically. This was down to three things conspiring against the Russians: Much better Prussian musketry rolls; the inability of the Russians to rally because the 'Pillage and Loot' card appeared on both turns at bad moments; the charge Malachowski's hussars with back to back 'Move in Difficult Terrain' cards disrupted the Russian reserve lines before they had time to empty a few saddles - in past games, the hussars have got caught mid charge with a few deadly volleys.


Sunday 28 December 2014

Solo Zorndorf part 1.

A video clip is something new to this blog. I've done it because there is nowhere I can take a single shot from that will cover the entire table, so panning a video seemed logical. I'm sorry for the appalling quality of it, but it was taken on my little pocket camera on a rather creaky tripod. Anyway, I thought it was worth a go. I'm not sure I'll bother again.

I'm using classic Piquet rules [house] amended for big battles. I have randomly determined unit and officer quality except for Fermor, who I made poor, and Frederick who I made skilled. I drew a random hand from the army characterisation deck. I added a few other scenario specific cards to both decks which I'll detail as they come up in play. I'm also going to use dominoes to determine initiative points rather than rolling D20s. 

Onto the game.

Turn 1:


Following a quickly staged artillery barrage Manteuffel's command emerges from the smoke into a hail of canister fire.

Historically the infantry advance was preceded by a lengthy Prussian artillery preparation. To quickly determine the casualties caused by this fire I rolled D6-1, halved, rounding down Vs all of the units before 'the angle' in the Russian line. 
 Both sides then begin pouring in volleys of musketry.
 The Russian line cracks and Prussian grenadiers charge into the gap.
The reserve lines restore the situation after a brief fire fight. The Prussian grenadiers run.
Malachowski's Hussars pour across the Zabern-Grund into the flank of the Russians before they have chance to turn.

Quite a feat, achieved with two back to back 'Move in Difficult Terrain' cards.
The first Russians encountered are thrown back, with loss, in disorder. Then more hussars charge into the fray.
Pandemonium rules and the Russians are on the run. The solidity of the initial deployment is shattered.
Before their officers can regain control the Russian soldiery begin to loot their own baggage. Breaking open casks of brandy they become totally useless.

Historically, this happened at various times during the battle. I have found that the easiest way to represent this happening is to add a 'Pillage and Loot' card to the Russian deck. When it appears, any Russian infantry in retreat (rout) are immediately removed from play.

The situation at the end of turn one.


Friday 26 December 2014

Can you see what it is yet? More solo Christmas


This is a game I've played quite a lot in the last twelve months. It always was one of my favourite battles to read about and, as a close run thing, has the makings of a superb war game. Zorndorf 1758: The bloodiest battle of the Seven Years War will be fought yet again before the year is out.

However, it is my belief that to make this game play like Zorndorf it must start with the first crucial mistake having already taken place. For the game to look like Zorndorf Kanitz's command must have already drifted out of its intended alignment. Here is a link to my thoughts on this subject:

http://olicanalad.blogspot.co.uk/2014/04/operation-zorndorf-deployment-decisions.html

I have added two pieces of terrain to the set up. I have added the piece of wetland that juts out from the Hofe-Bruch behind the Russian lines, and I've added the outskirts of Quartschen behind the Russian right. This latter addition is because this sector of the field has never been used in any previous re-fight so it might as well have a landmark in it, really Quartschen should be just off table. 

Just for a change, I have set the table with the Russians deployed on the other (window) side of it - it means the pictures will be slightly different. As you can see, I can only set this battle up using the drop leaf table extension. It makes the table 15 feet long, but also makes it difficult to traverse - the gap between the table a the tall cabinets at the end of it is only 14".

Anyway, I'll leave you, for now, with the following shots of the set up. I've used the Osprey book "Zorndorf 1758", the Duffy books and Kronoskaf as sources.


The Russian line beyond the Galgen-Grund.

Malachowski's Hussars with Seydlitz (off table) behind and beyond the
Zabern-Grund. Manteuffel's infantry, advancing beyond the Fuchsberg, are
emerging from the artillery smoke (not pictured) and about to engage.
The Russian cavalry under Demiku stand in support of the Observation Corps
at the Langer-Grund


Between the Galgen-Grund and Zabern-Grund the Russians await
Manteuffel's attack. Kanitz has drifted to his right.

Kanitz, having drifted to the right, is no longer marching in direct support of
Manteuffel. Behind Kanitz, off table, are the Dragoons under Marschall.
Beyond them are Dohna's infantry and Schorlemers cavalry.

The end of Dohna's infantry and the cavalry under Schorlemer
refuse the Prussian right wing.

The Prussian line is a long thin one.

The Russian lines are far more populace.

Multiple lines ready to give support to each other will make this a nightmare for the Prussians

But what the Prussian army lacks in depth, they make up for in prettiness

I can't wait but, for now, I have to make with the vacuum cleaner in readiness for tomorrows household carnage. Tomorrow my wife and I are having just shy of a hundred people around for drinks and nibbles.

Thursday 25 December 2014

Marignano solo - turn 4

A momentous turn is about to begin. The French, sure in their numbers throw all caution to the wind and decide to settle the issue with force of will.

They are cock sure and begin to manoeuvre their cavalry accordingly. 

Their Landsknechts are ordered forward too. 

The French have definitely decided that this is the time to finish it.
On the French left, Francis orders another charge. The Swiss are wavering. It will not take much.
But they cannot totally defeat them. 

They are forced back but still hold the field. 

What are the Swiss made of?
Schinner is at hand."Rally boys!" And the rot is stopped. 

He manages to hold the Swiss in the fight.

Then, woe worth the day, he falls. Schinner will take no more part in the action.
Undaunted, and seeking revenge, the Swiss square on the right ploughs forward.
This pike square is destined for history. 

Die roll after die roll it throws puke in the face of death.

Onward....
 Onward.......

Ever onward, it throws back one unit then another.

This is truly unbelievable.

It's the Swiss!
On the other side of the field the Swiss are not fairing so well. Charged from all directions they can barely hold out.
The situation is desperate for the Swiss: They must do something now or fail.
The Swiss are holding on by their fingernails. 

The French are close to cracking.
And then the centre gives way and the Landsknechts, almost spent themselves, give to pursuit.
Francis I, in the thick of the action (rallying his troops), is seriously injured and will take no more part this day.

But his forces are winning. They are in the ascendancy, though it is almost too tight to call. 

Having lost Francis the French are almost at zero morale too. It's only the Swiss losses keeping them in credit. 

The French need the Swiss to draw Major Morale.
The Swiss are down to zero morale and draw back to back Army Morale cards. The Swiss roll a 1. 

The Swiss pike squares begin to withdraw and their shot runs for it. 

The cavalry, largely uncommitted, under Sforza withdraws in the face of overwhelming odds.

The battle is over. 

It has been a very close run thing. D'Alencon didn't activate and the French were down to a single morale chip.

A great little solo battle. I enjoyed that tremendously.

Today, Cristmas Day, I set up another solo battle to fight out. 

I'll post tomorrow on which battle it will be. I love this next battle but the Lads are so fed up of it they will not play it with me any more - so it's a great one to set up and fight solo.

Tomorrow I will play.....................

Merry Christmas,

James