Monday 27 August 2018

Punic Wars Libyan Spearsmen - FOR SALE

THESE UNITS HAVE NOW BEEN SOLD 

I've been sorting out my Punic Wars collection with a view to making more space in my cabinets for future collections. In doing so, I find I don't have room for everything without a slight over-spill. 

Consequently, to keep things 'shelf tidy', I need to let two units from my Punic Wars collection go. Mulling it over, the thing I probably have too many of are Libyan spearmen - I'll still have six units when these depart the building.


Each unit is 24 figures strong. The figures are Renegade Miniatures. They were painted by yours truly using enamels. The shield transfers are by Little Big Men. The bases are marine plywood, 60 mm square.

So, here are some pics of the units.


 LOT 1 SOLD


LOT 2 SOLD


The price is £204.00 per unit (£8.50 per figure) or £380.00 for the pair. The price includes insured postage by RM Special Delivery within U.K. Other postage by arrangement.

Money received will be spent on figures for my Napoleonic collection, and possibly one or two additions to my Italian Wars stuff (where shelf room is still available).

Thanks for looking.

Sunday 26 August 2018

Seven days in Venice

It's not the first time I've been to Venice but it's a great city and it's worth visiting at least twice in a lifetime. Leaving the arrangements to my wife again proved best as she came up with a wonderful apartment, with outdoor space, in Dorsoduro very close to the Canale Della Giudecca.

The weather was variable. It ranged between 31 and 34 degrees Celsius, was breezier on some days than others, and there were even some clouds on the last morning. All in all, perfect weather for messing about in boats - and with no cars or buses, you tend to do a lot of that in Venice. 

Apart from its unique architectural beauty Venice can boast a few bits of interest to the military enthusiast - and I spent a lot of time thinking what a great renaissance skirmish scenario a Venetian city battle would make, what with so many canals and bridges. 


My first military port of call, pun intended, was the Arsenale and the maritime museum. The Arsenale is where the Venetians built their naval ships, at one time employing 2,000 people to build its galleasses and whatnot. 

The Arsenale is still an active military base so you can't actually get into most of it but, the maritime museum has a few exhibits worth seeing, including a 'chariot' and several very nice scale models. There are also a few cabinets with proper lead soldiers in them. 

Anyway, some pictures of what is there (caveat: most descriptions from memory).

A 'Chariot'. 

For state of the art WW2 technology, I think this piece of kit is scarily basic. 

This one was used against the British in Alexandria.

 A 17th century galleass.
 16th century swivel guns (recovered from the sea floor?) on reconstructed mountings

A Lepanto period galley. I'm definitely going to do this as a naval game at some point. Galleys (so wind isn't a major consideration) with cannon!

One of the most interesting models was this beauty. An 11th century Venetian galley.

The figures manning it were, at best guess, 40 mm. 

I liked it so much I took three pictures of it.


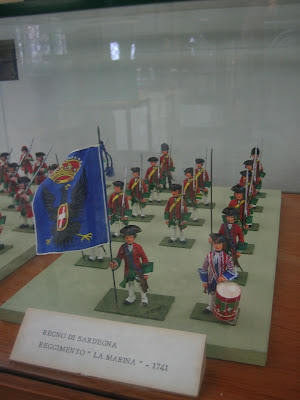
The next lot of pictures I took for no other reasons than that they are of toy soldiers and they provide uniform guides for various horse and musket period marines. I will not be painting them, but someone might find these useful (sorry about the light, the sun was streaming in).


 Finally there was this thing that took my fancy. 

It's the flag ship of some Korean dude.

I believe that it might be called a 'Turtle Ship' and if my long term memory serves there is a full size replica of one somewhere (Korea?).

The model is belter (as models go) so I took three photos of it.


Next up, the Doge's Palace. The military angle is quite small here as it only comprises a small selection of the stuff in Venice's 'armoury'. Also, just so you know, not all of it is pictured here. Some of my shots were spoilt by the sunlight bouncing off the glass cabinets, including some containing some wonderful suits of armour (medieval and renaissance knight's full harness); there were many cabinets full of various weapons but, though nicely displayed, they were a bit samey. Also, I forgot to take my camera to the palace and had to use my wife's, with limited memory space. 

Most of the collection dates from the late 15th through to the 17th century, so quite a bit had more than a passing interest. However, this visit to Venice was a family holiday so lengthy lingering over old steel was not an option. 


Persian stuff. There is only one cabinet of this stuff and again the light has ruined the pictures of some stuff in it. Fortunately, the photo of the Persian 'mace' came out reasonably well. 

BTW, all of the cutting weapons were described as daggers which, given their sword-like size, I thought a little adventurous.

I have no idea what this is (above the obvious). It was in a closed room and the photo was taken whilst leaning over the barrier at an ungainly angle with a security guard giving me the evil eye from ten paces. 

Whatever it is (it looks eastern to me?), I bet it was pretty high velocity for its time!


So there we have it for my 'military bits of Venice'. Not exactly military fuelled but, for a family holiday, enough to keep me going - along with the book "1809. Thunder on the Danube" by J.H. Gill (thanks Gonsalvo, an excellent recommendation).  

Black Powder - The infantry in melee versus square rules


Following the game a couple of weeks ago, where I mentioned a dissatisfaction with the melee rules for infantry versus square, I've had a week off in Venice where I had a deal of time to think about it. I've just posted a reply to the comments to that post and thought it might be useful to reprint it as a separate blog entry here:

I have played quite a few games using rules from the 'Warlord stable' now, and I'm quite impressed by the tool box approach, which is very similar to the approach of Bob Jones and all those, including myself, who have written supplements for the 'Piquet stable'. Rules should never be hard and fast. Indeed, in most games here we generally run a 'special rules menu of the day' approach.

Being a Piquet player, I also agree with Gareth to some extent. No combat should ever be a sure thing. However, the case of the square at Garcia Hernandes was a VERY rare event; anyone reading Nosworthy's book 'Battle Tactics of Napoleon and his Enemies' can plainly see the strength of a well formed square versus cavalry, as he goes into the occasions when a square was broken, how and why, in some detail - like the instance where lancers prodded one to death from out of bayonet reach following a heavy downfall of rain which rendered the use of muskets impossible. BP largely accepts this by saying cavalry can never charge a square if it is in good order, which goes some distance beyond the rulings in some Napoleonic rule sets. 

In BP, the problem isn't the combat factors, which look about right for infantry Vs square, and cavalry Vs square for that matter, and the break test is probably dead on for cavalry versus square too. Nor, as it happens, do I believe the rule is far out of place for later periods where squares had significantly more firepower - e.g. later 19th century colonial periods. The problem is the special break test rule for square in melee when fighting infantry in the Napoleonic period / muzzle loading, black powder era.

My solution, following a week in Venice, where I had time to think about it, will be as follows:

Following a combat where any infantry win a melee Vs a square, the break test will be treated as standard, and if the square retires it will do so as a disordered line. All troops fighting Vs the square, including cavalry (if any), will get their full post combat options (such as sweeping advance).


I think that should work. Very little fiddling about with the rules as they stand, just a slight change to the reading of the special 'square taking the break test' rule.

Wednesday 22 August 2018

The Bridge at Hermoso Santo report


Just a few lines to report on the 'Reserve Demolition' scenario that I posted a couple of weeks ago. The photos are from the second game.

The game was played twice. The first game, as much as anything, turned out to be a rules checker game. We had to look up so many things, and play other things as 'probably best to...' that the game barely flowed and as a result, by the end of play, there was no result. 

 The second game was, by and large, played through to a conclusion. There were still a few things that we needed to look up, and one or two things where what we looked up didn't tally with our 'historical knowledge', but we muddled through to a French victory - the British singularly failing to activate their engineers before being overrun by the French. 


One thing in Black Powder that didn't make much sense, unless we are missing something, is the treatment of squares in the 'Break Test' phase. Let me set the scene. 

  • The French cavalry forced a British battalion into square before withdrawing to a safe distance. 
  • In the British turn, the British square was unable to come out of square for one reason or another - enemy not with 12"; failed order; not withdrawing under free move. - 
  • In the subsequent French turn the square was charged by infantry. The French infantry duly won the melee round to good effect, the British square was shaken in the encounter, and then the square rolled 5 in the Break test. Usually this would be a retreat, but the rule says squares ignore this result and stand. If attacked by cavalry I think that would be OK, and the other players thought so too, but versus infantry it seemed a bit odd - very, very odd - so we made it break because squares can't retreat. Personally, I've always been under the impression that squares assaulted by infantry were dog meat. 

Anyway, onwards and upwards, as they say. Next up I'll be painting some more troops for the allies. I'm going to do four units of Portuguese - two line infantry a battalions, a battalion of Cacadores and a battery of foot artillery.


Tuesday 14 August 2018

The Bridge at Hermoso Santo - My first Peninsular War scenario

I've now reduced the Napoleonic lead mountain by 33% - three of the nine cavalry units I have are done, as are fifteen of the forty infantry battalions. With plans to add another twelve units or so, we'll call it 25%. 

Well, at long last, there are enough Peninsular War figures painted to do a scenario and I've decided to make it an old favourite. It's loosely based on Charles S. Grant's scenario, Reserve Demolition (scenario number 20 in his book Scenarios for Wargamers, published by WRG 1981). 

“A 'reserve demolition' is the modern parlance for a bridge prepared for demolition but which must not be destroyed until the time is right.” [C.S.G.]

I've played this scenario a number of times, with various modifications, and it's always been a winner.

This time I will play the scenario using Black Powder rules (which I haven't before), so some special rules for blowing the bridge have been devised but, apart from that, the rules will be pretty much as written in the master rule set and the Albion Triumphant supplement - with one exception: As the supplement suggests, I will not allow French Legere units to deploy into skirmish formation en masse as, by 1809, their training had generally limited them to using the tactics of the Ligne units. However, I have always thought of Legere as being a cut above average French infantry so, for the moment, I will give them 'First Fire' and make them 'Valiant'.

General Background

Wellington has been rebuffed by the French and his army is temporarily incapable of offensive strategic action. Nothing but small forces now remain between the French and Portugal. Wellington has given orders that all bridges that might be used by the enemy are to be prepared for demolition. They are not to be blown without direct orders from him as he might yet use them, if he is given time to concentrate the army, for a counter-stroke.


The table set up for the Reserve Demolition scenario, looking north. Note the Engineer's column moving south towards Hermoso Santo (upper left). The table is set for 10' x 6'.
The object of the scenario is a single stone bridge that crosses a deep, swiftly flowing river running north to south (impassable terrain). At either end of the bridge is the small village of Hermoso Santo. Due west of the village, commanding a crossroads, is a farm. North of the farm is long rugged ridge strewn with large boulders, brush and tumbled down walls (rough terrain); whilst to the south of the farm there is a smaller, similarly rugged, hill. Below the heights the land is well cultivated with vinyards, olive groves and small fields (cornfields represent areas giving light cover to those within). In the photo above, the 'chain-line' marks the limit of British deployment west of the river.


New additions: I think I might have painted my favourite French unit so far - three battalions 2nd Legere (two pictured here). Figures by Front Rank, painted by yours truly in enamels.
British Briefing

Deployment: 

  • The officer of engineers, his wagon and the riflemen assigned to him as sappers, must be deployed on the road leading north from the village four 'moves' from the bridge. 
  • One unit can be deployed east of the river. 
  • All other units must deploy west of the river within the marked deployment area. 
  • British forces deploy after the French player has organised his attack but before the French player deploys his first forces on table.
Mission: 
To hold the bridge, with minimal losses, until ordered to destroy it.

Briefing:  
You are responsible for holding and, ultimately, destroying the bridge if the orders arrive to do so. Unfortunately, although the enemy are within a day’s march of the bridge, the officer of engineers and his sappers have not yet arrived with the explosive and other equipment to blow it up – though their arrival is imminent.

In game terms: 

  • To blow the bridge: After the arrival of the engineer's column, sufficient powder charges must be unloaded and then laid at the bridge (the wagon holds six charges). Once laid, and Wellington's order to destroy the bridge has been received, the bridge must be blown. 
  • It takes one 'order move' to unload one charge (one barrel) and one 'order move' to lay it. 
  • It takes one 'order move' to detonate the charges. 
  • Each charge laid is worth a D6. When the charges are detonated a D6 is rolled per charge laid and the scores are added. If the result is 14 or more, the bridge is destroyed. If the detonation fails to destroy the bridge laying further charges will be fruitless in the time available.

This morning you sent a dispatch rider to Wellington to inform him of the presence of the enemy and requesting further instructions. The rider returned with frustratingly awkward orders: The bridge must be held at all cost and is not to be blown without express orders to do so. You must maintain your force as intact as possible as Wellingtons will require it later.


In game terms: 

  • Under no circumstances must you let the bridge fall into the hands of the enemy and you can only destroy it if Wellington orders it directly. 
  • Orders may arrive to blow the bridge at the end of each British turn. So that the French player doesn't know if any orders have arrived, make up a deck of playing cards containing 1 joker and nine other cards. Deal the British player one card at the end of each British turn. If he has the joker in hand he can blow the bridge.
  • Whilst fulfilling your orders concerning the bridge you must extract at least five units (counting routers as half), west of the river, before the bridge is blown.

New additions: French 4th Dragoons and 1st Hussars. Along with these I've added a few 'commanding' officers, mostly French, and a couple of stands of skirmishers for the Gordons. I'm thinking of rebasing my skirmishers onto larger bases - four figures on a single stand 40mm deep and 120mm wide, to simplify movement and sorting them out to their parent units (they can be name plated on a stand that size).
Forces
C-in-C: Staff rating 8

  • Brigade commander: Staff rating 7 [aggressive]. 1 Highland battalion; 1 Light Infantry battalion; 1 British Line battalion; 1 Light Dragoon regiment; 1 [half] battery of foot artillery.
  • Brigade commander: Staff rating 8 [hesitant]. 3 KGL battalions; 1 [tiny] Rifle company; 1 battery of foot artillery.
  • Officer of Engineers: Staff rating 8 [irresponsible]. 1 [tiny] Rifle company; 1 wagon with six demolition charges.


French Briefing

Mission: 
Capture the bridge intact.

Briefing: 
You command an advance guard tasked with seizing a vital bridge over which the main army will cross to reach Lisbon and end the war. You have divide your force into two columns, sending one by a circuitous route to approach from the north whilst you will lead the other from the south.

In game terms: 

  • You must choose which column you will lead from the south and which will enter from the north. You must mark the brigades in each column as van or rear.
  • Your column will arrive from the south as soon as the game starts with the first brigade's units being allowed to make an on table march of one move at full rate before the start of the first turn. 
  • The second force may arrive at the start of turn one but will receive a -3 penalty to its order rolls (because of the circuitous route this column has taken to reach the battlefield), reducing to a -1 penalty on turn two, and no penalty thereafter.
  • Units entering the table need not be in column of route but must start their move in contact with the road. 
Intelligence suggests that the British are preparing all of the bridges in the immediate area for demolition. For the operation to succeed speed is of the essence. Once at the bridge any demolition charges must be neutralised.


In game terms: 
  • If the bridge has been prepared for demolition, you can prevent the bridge from being blown by placing troops on the bridge. Whilst there the troops can be ordered to remove any charges (the reverse of how they are laid - see British briefing) but, because you do not have an engineer present, such orders receive a -2 penalty. 
  • Occupying a village section in contact with the bridge will cause a -2 penalty to be applied to any British orders involving sapper operations. 

Forces:
C-in-C: Staff rating 8

Column 1:
  • Brigade commander: Staff rating 7. 3 Legere battalions. 
  • Brigade commander: Staff rating 7 [aggressive]. 1 Dragoon regiment; 1 Hussar regiment.


Column 2:
  • Brigade commander: Staff rating 7. 3 Ligne battalions; 1 battery of foot artillery.
  • Brigade commander: Staff rating 8. 3 Ligne battalions.
It's all looking pretty French, so here are some Scots (I did some time ago) to balance things up. In the foreground are the 71st Highland Light Infantry with the Gordons coming up behind.

Pre-game sequence


  • The French player secretly determines which column enters from the south and which from the north, and which brigades are van and rear.
  • The British player deploys.
  • The French player deploys the van brigade of his southern column on table.
  • Turn one, dawn, the French move first.
  • Play until the bridge is blown, or the British give up.