Sunday 8 September 2024

Zorndorf - Battle report

This game was set up three weeks ago. Unfortunately, players had commitments and we were not able to meet until last Wednsday night. In the first session we completed three turns - here is the report.

The Prussians opened the battle with a two hour preliminary bombardment: The Prussians chose six units of Saltykov's infantry and inflicted d3 unit integrity losses on each.

But, it was the Russians who advanced first: Demiku advanced his cavalry, supported by Cossacks, and they were met in the open fields below Wilkersdorf by Schorlemer, who in turn advanced to greet them. A ding-dong, back an forth, cavalry clash is about to happen and it will last all evening.  
On the eastern flank, Manteuffel's strong line of infantry (mostly grenadiers) advanced on the many lines of Russian infantry between the Galgen-Grund and Zabern-Grunds. The Prussian artillery, lines of sight now blocked by their own infantry are made redundant. 

What is about to happen here comes as a shock to all.
The contestants exchanged several volleys of musketry. The Prussian fire was lethally accurate - the return fire was desultory in comparison. The Russian first line, which had already reinforced by their second following the artillery bombardment, began to waver and crumble. 
Seizing their chance, the Prussians advanced to contact. They had rolled even on a Move card and the Prussian grenadiers crossed bayonets with their foe.
The Russians collapse!
At the end of the first evening's play, Manteuffel's attack has (so far) been a complete success

It was aided, it has to be said, by their far superior sequence deck - integrity loss and so forth was rallied on successive Leadership cards, whilst the Russians failed to daw a single Leadership card on which to rally their crumbling lines.
Following the success of Manteuffel's attack, the second line of infantry under Kanitz moved to attack Galytsin's infantry beyond the Stein-Busch wood.
The Russians have not been wholly inactive. In support of their western cavalry advance, parts of the Observation Corps have gone forward. 

You might also note Seydlitz's four cavalry regiments emerging from behind the Stein-busch.
Looking west the disjointed (to my mind) advance of the Observation Corps can be clearly seen.
Seydlitz's cavalry which, having rolled three 'even' moves on two successive march cards, has moved from east to west (a combined move of 72") behind the Stein-Busch and deployed from columns of squadrons into lines. Historically, he actually did this but, historically much later in the day (after stabilizing the eastern sector which historically had not gone in Manteuffel's favour).

Note: Because of my big table (6' x 14' 8") I have increased rule measurements by 50%.
At the western end of the field the cavalry battle played out for most of the session. Casualties on both sides were heavy. At first, the melees went for the Russians but, yet again, the Leadership cards told: The Prussians have five in their deck, the Russians only have three and the Prussians got to turn theirs where the Russians failed to do so (two turns ending on same initiative rolls). 

The Prussian cavalry's counter strikes stabilized the situation - honours were about equal.
And that was where the session's action finished. We will meet to complete (hopefully complete) the battle next Wednesday evening. 

Another shot of Manteuffel's infantry - heroes of the hour.
As yet not fully committed, Kanitz's infantry.
From behind the same, showing the uncommitted Russians beyond. The Russians are in trouble but, this is a Piquet battle and is not done yet.


Thursday 22 August 2024

Still ringing the changes: Zorndorf 1758

After so long playing the Napoleonic Peninsular campaign I'm still ringing the changes. The Ilkley Lads next battle will be a Seven Years War affair. Not wanting to have to set up something new every week, I've decided to do a big game that will last two or three sessions. That prospect lends itself to doing a big historical refight. To make life easy I decided to do Zorndorf - I know this battle back to front and could probably set it up blindfolded. It's also an excellent battle to base a wargame on.

The inconclusive Battle of Zorndorf, contested by Prussia and Russia, was a struggle of epic proportions and its historical casualties look like something more akin to a wargame than reality. At the start of the day Frederick could count on c. 37,000 effectives and Fermor could count on c.43,000. After twelve hours of bloody fighting, with both armies still maintaining the field, the Prussians had sustained c.13,000 casualties (34%) and the Russians c. 18,500 casualties (43%) - personally, I find those numbers astonishing. 

In my opinion, historical battles of the Seven Years War are generally easier to represent on a wargame table than those of other horse and musket wargame periods, such as Napoleonic or ACW, because their deployments generally require less table depth. The linear nature of SYW battles often makes them fit naturally onto a wargame's table without much need to compress depth. Zorndorf is a prime example of this feature.

Zorndorf can be set up at various levels of troops scaling but, I like to set it up with one wargame unit  equal to an infantry regiment of two battalions or five squadrons of cavalry. Incidentally, this is why my cavalry units are only 8 figures strong: Five squadrons of cavalry had almost exactly the same frontage as two battalions of infantry deployed side by side. This unit scaling still gives me a Russian line measuring approximately 13' long, so I need to raise the table's drop leaf (extending my table to 14' 8"). Fortunately, this is not a battle about insecure flanks, otherwise I might need even more. One thing I have done for this battle is to reduce the overall artillery numbers - not because I don't have enough guns, but because when I've scaled batteries more accurately they dominate this particular game too much - this is not an exercise in re-enactment, it's a game for fun.

In consequence of the extension being raised, it is impossible for me to take a photograph of the whole table from any part of my wargame room, so I need to take a shot from each end.

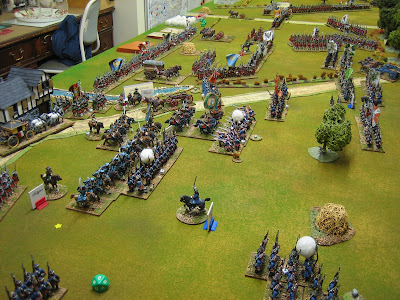
This first shot, looking east, shows the extent of both side's infantry lines, with the Prussians looking down onto the Russian lines from the higher ground to the north. Between the two sides is the Stein-Busch, a fairly open wood. The other key features can also be seen: To the left is the village of Zorndorf (which should be in flames after being torched by passing Cossacks), to the right is the village of Quartschen and, intersecting the Russian side of the field, are (west to east) the Langer-Grund, the Galgen-Grund and the Zabern-Grund. The Grunds are essentially natural water cuts that drain the land north of the river Metzel (which runs west-east behind the Russian position). The Grunds varied in depth, being no more than wet and boggy ground at their northern reaches, to steep sided 'ravines', at some points 10m deep, along their southern reaches - they are still very visible today (check out Google Earth for a very unspoilt battlefield. Modern day Zorndorf is called Sarbinowo). Seydlitz, having scouted the lower reaches of the Zabern-Grund, declared it unpracticable to cavalry so I'm counting the lower parts (defined on the table by streams) as impassable to cavalry and type III watercourses to infantry. I'm counting the upper reaches (defined on the table by boggy ground and pools) as type III watercourses to cavalry and type III terrain to infantry.

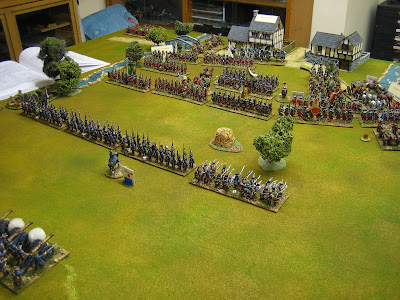
This shot, looking west, shows the two side's cavalry wings extending into the far distance. It clearly shows the extent of the Langer-Grund and Galgen-Grund. On the northern (Prussian) side of the table I have added the 60m contour. This high ground is not a hill, it is more the higher end of a long shallow slope that drops down 30m to the river Metzel some 3km to the south. Between the two lines there were several folds in the ground, notably around the Stein-Busch and to the west of it (the Fuchsberg knoll). These were enough to obstruct line of sight to certain low lying areas of the field but in reality the smoke, blowing south from the Prussian artillery and the conflagration at Zorndorf, did more to impair vision - apparently Manteuffel's infantry emerged from the smoke just 40m in front of the Russian line - so I choose not to portray them.

The Russian cavalry wing under Demiku. I've seen this wargame force deployed in several ways. Often it is deployed as a continuous line (I've done it that way myself) but to shorten it slightly I now deploy it in two lines. It comprises two units of cuirassier, a unit of dragoons and four units of hussars. There are also three units of Cossacks (generally, not much better than useless in this period): These are leaderless but are not out of command in consequence; they will each roll d8 for movement activation; they cannot rally; two cards in the Russian sequence deck (Special Event) prevent them acting on the next card turned - they really are quite unreliable, just as they were historically.

Bounded on their left by the Langer-Grund is the Observation Corps under Browne. This comprises four large units of line infantry, each representing a three battalion regiment, and a large unit of their combined grenadiers. All of these units have five unit integrity points rather than four and that is their only 'big unit' benefit - they actually performed poorly on the day. The Corps has an attached battery of artillery. 


To the right of the Observation Corps come the first and second lines of the regular infantry with units of combined grenadiers positioned between them. 

Historically, the first line was commanded by Saltykov and the second line by Galytsin. However, due to a quirk in the rules, the game will actually work better if the infantry is divided into right and left sectors - with the two divided geographically by the Galgen-Grund (pictured bottom right). 

Galytsin will command this, the left infantry sector. It comprises seven units of line infantry, two units of line grenadiers and two units of combined grenadiers; one battery of artillery is attached.

The right infantry sector, commanded by Saltykov, lies between the Galgen-Grund and the Zabern-Grund. The command comprises eight units of line infantry, two units of line grenadiers and a unit of combined grenadiers; two units of artillery are attached. 

Another shot of the same sector showing the southern end of the Zabern-Grund and Quartschen. The army's right wing cavalry, under Gaugreben, are also stationed here: they comprise a unit of cuirassier, a unit of horse grenadiers and a unit of hussars. Guarding the crossing over the Zabern-Grund is a unit of Cossacks.
Starting left to right, at the eastern end of the field are two Prussian cavalry commands. These begin the game off table but are positioned at their predefined points of arrival. Beyond the upper reaches of the Zabern-Grund is the command of Malachowski, this comprises four units of hussars. In the foreground is the command of Seydlitz; it comprises three units of cuirassier (including the Garde du Corps and Gendarmes) and a unit of dragoons.

This shot clearly shows the upper reaches of the Zabern-Grund - streams, pools and ponds.

To their right, to the left of Zorndorf and above the 60m contour, is the main infantry strike force. Leading is Manteuffel's command, comprising a unit of line infantry and three units of combined grenadiers; it has a battery of artillery attached. Behind them is the command of Kanitz, comprising five units of line infantry, two units of fusiliers and a unit of combined grenadiers; it has a battery of artillery attached. Behind them all is Marschall's command of four units of dragoons. Frederick the Great, commanding the Prussian army, can be seen just in front of Zorndorf - I should have painted him foolishly licking his lips.

Behind Zorndorf, refused, is Dohna's infantry command comprising three units of line infantry, two units of fusiliers and a unit of combined grenadiers; a unit of artillery is attached.
On the far right is the cavalry wing of Schorlemer. It comprises three units of cuirassier, a unit of dragoons and two units of hussars.

Note, the yellow star between the infantry lines. There are three of these, one in each infantry sector (Observation Corps, left and right). These are Prussian victory objectives. They will each cost the Russians six army morale points if contacted by a Prussian unit - this will encourage the Prussians to press an attack and might be the only way the outnumbered Prussian infantry can win; no such objective points exist on the other side of the table.
I have stationed Fermor, commander of the Russian army, in the right infantry sector. Here he is alongside his sumptuous coach. The coach was scratch built, in a moment of madness, from Milliput (chassis) and old postcards (coachwork) after purchasing some Foundry draft horses and various wheels (in a bring and buy odds and sods box) at a show.

One last shot of the Prussians - doomed men?
For the first time, we will use Field of Battle (2nd edition) rules for this battle. 

Here, the sequence card decks have been sorted out before shuffling: 27 basic cards in each deck. The Prussians have a skilled army deck, the Russians a poor army deck. 

I've added two Special Event cards (Cossacks) and a Blunder card to the Russian deck. I've added a Sieze The Moment card and an Event card to the Prussian deck. The Prussian Event card will activate Seydlitz and Malachowski - possibly Marschall and Dohna too - though I'm yet to decided exactly how.

Our new to group player Nigel H. will like these cards because they have instruction notes on them. Less to his liking, the game does use the full gamut of polyhedral dice.

To decide the Army Morale Points for each army I added up their unit integrity points and divided by 3. This gives the Prussians 44 AMP and the Russians 54 AMP - this should be enough to get a historically bloody result.

Because there are so many units, I'm not going to dice up the unit quality (combat and defence dice) for every individual unit. I'm simply going to assign CD and DD by unit type (Prussian cuirassier, Russian cuirassier, Prussian combined grenadiers, Observation Corps grenadiers, Russian line grenadiers, etc.) and let the dice do the talking - with 84 units on the table that should be enough variation.

Note: This shot was taken before I finally decided how I would deploy Demiku's cavalry this time around.

Sources: 
Zorndorf 1758 by Simon Millar (actually one of Osprey's best books, IMHO). 

My well thumbed copy of The Army Of Frederick The Great by Duffy.

Opened, my dust jacketless (I've never seen one with a jacket) copy of Russia's Military Way To The West by Duffy. 

Also, free on line, and an invaluable resource for anyone interested in this period, is the Kronoskaf Seven Years War Project site: Here is a link to its excellent piece on Zorndorf.


Monday 19 August 2024

Italian Wars - Cerignola revisited with a new set up and rules

Following the gaming experience we've had with my Napoleonic rules (Sacre Bleu), I decided to revisit my set for the Italian Wars (Hell Broke Loose) and do some cross pollination. It seemed to work pretty well in the first game we played, so I persisted and now, after only three gaming, sessions I think the new rules are pretty much there. (Above, one of those games with a hot, back and forth chaotic melee between Landsknechts, Swiss and Gendarmes deciding the issue).

Time to try them with a battle I know well: Cerignola 1503.

So, here is the set up. Gonsalvo de Cordoba's Spanish army arrived at Cerignola in Apulia with just hours to widen and deepen a drainage ditch, throw up an earthwork and spike them with vines grubbed up from the slopes below the town; work only ceased as, late in the day, the French army came up. 

The French commander, Louis d'Armagnac the Duke of Nemours, immediately called a council of war. Most officers thought that it would be best to attack the next day (when their artillery had come up) but, Yves d'Alegre and Tambien Chandieu sought an attack without delay, the former citing a shortage of water for the horses (the day had been hot and exhausting), the latter threatening to withdraw his Swiss if an attack was delayed. The exchanges grew heated and when d'Alegre called d'Armagnac a coward the issue was finally settled - the French would attack with only hours of daylight remaining.

The Spanish right and centre.

The infantry line comprises Gonsalvo's five newly constructed Spanish coronelias, or at least their prototype  (combined arms units of arquebus, pikes and swords were present at Cerignola but they were smaller here than they would become), and two tactical units of Landsknechts. The Peredes brothers command the Spanish, the Landsknechts are commanded by Fabricio Zamudio. 

I've put the army's Genitors here (they had been out harassing the French advance). Post picture edit: They fall under Gonsalvo's command.

The Spanish left.

Behind the infantry are six units of men-at-arms, a unit of mounted crossbow and two light guns.

Three of the men-at-arms  (just out of the picture) are commanded by Gonsalvo in person, the the other cavalry are commanded by Fabricio Colonna. The guns are under no direct control.


The French left and centre.

On the left are the cavalry commanded by, the primary instigator the early attack, Yves d'Alegre: Three units of Gendarmes and two units of mounted crossbow.

Next to them are the French infantry (three units of crossbows and two units of French pike) under the command of Gespard de Coligny.

Beyond them are the Swiss (three pike  units) under Tambien Chandieu.

The French right.

Here are the bulk of the French Gendarmerie (five units) under Louis d'Ars.

De Gaury and Romane has the French army deployed like this, echeloned back from the right.

Post picture edit: Louis d'Armagnac helped lead this attack. I have placed him here as joint commander of this battle group (as well as being C-in-C).


The French artillery and it's guard (three guns and two units of Stradiots) have lagged behind and are still marching toward the battlefield. 

The chain marks the edge of the battlefield and, despite the visuals of the table-top deployment, the artillery train is actually marching up from behind the French line (not the Spanish): and will arrive on the road exiting the French table edge. The two stretches of table hinge at the end of the chain (top right) - it was done this way so that when they arrive at the connecting table edge they are physically close to where they need to be.
This set up is slightly different to that I've done in the past (published on various history websites - I'm talking about maps I've done for, and been pinched from, this blog). The new deployments being largely based on the description of the battle in Gerald de Gaury's biography of Gonsalvo de Cordoba. 

The Grand Captain is quite a hard to find book but, it has the best narrative of Gonsalvo's involvement in the 2nd Italian War that I've yet come across. Recommended.

That is not to say that this book is a 'definitive work'. For instance, de Gaury isn't big on numbering troops and I don't think he gets the meaning of the word 'lance' (the basic sub-unit in a formation of Gendarmes/Men-at-arms) when he does: E.g. He refers to "480 lancers" rather than 480 lances, which would actually be 480 Gendarmes, each with two or three heavy cavalry lancers and one or two lesser armed men (coutillier and page/groom).

Finally, two minor issues regarding language: Firstly, I'm no student of foreign languages and I have, until recently, struggled with the pronunciation of Cerignola. For other bears with little brain, it's Cherry-no-la and, before you jump on the bandwagon, I'm bagsying Cericola as fictional Italian Wars battle name for the future. My second issue is with the spelling of the Spanish formation Colonella (I've seen it written at least half a dozen ways over the years and for a long time I'd settled on this one). However, in Julian Romane's recent work (2020) The First & Second Italian Wars 1494-1504 I came across yet another, Coronelia. I like it and I've switched.

Note: This game was played out in an evening three weeks ago. The French, led by a newcomer to the group (Nigel H.), and for the first time ever, won. The issue was largely decided by a unit of French Gendarmes on the right. These managed (with some timely good dice rolling) to cross the ditch and win their melee. This opened the door for the rest of d'Ars command to pour into the rear of the Spanish position which had been pinned in position by the Swiss (who failed to get over the ditch for a considerable period). It was a close run thing though - the French were down to a only and handful of morale chips at the end - and if the Spanish had rolled better for their 'musketry' (they rolled very poorly all night) things might have been different.

Thursday 20 June 2024

Some new stuff hits the table: A town battle.

In what feels like a new era, I decided to put on a Crusades game using To the Strongest (with some house amendments). Partly this was to get some new stuff on the table. Some new units and some new terrain.

On the new terrain front, this game will centre on a large Saracen town being assaulted by the Franks. Since last reporting on building progress I've added two or three general town sections and 'grand mosque'.

On the Saracen side (Mark D.), only the towns garrison started deployed (by myself, the game umpire); the Saracen relieving forces would start to arrive on the flanks from move one.
Prior to the arrival of the players I also deployed the central command of the Franks for Graham H. The flanking commands would be deployed by Graham before turn 1.
The rest of the Franks: A small command of Religious Order (Hospitallers) and a much larger Armenian force. 

The Armenian force has increased dramatically: I've increased the number of infantry units from four to eight and added a unit of Armenian heavy cavalry. It's now a full contingent.
The Saracen relieving forces. A Seljuk command with two deep 30+ figure units of Mutatawia infantry (one of them new). A Turcoman command. Before Graham deployed his flanking Frank forces, Mark chose which Saracen force would arrive on which flank (the black/red aces correspond to cards at each flanking road entrance).
Two new units of Adhath glaivemen formed part of the town's garrison. The glaives were made out of heavy white metal spears: the heads flattened, trimmed with clippers and filed; the spear heads on the figures were cut off at the top hand then the hand was drilled to take the glaive head. 
Among the Franks are two new small units of dismounted knights.
I also made a siege tower. This is basically MDF. Although I don't have a curtain wall for the town I decided to call the outer face of the town as such. The tower allows easier activation over it.
The grand mosque. It stands on a low rocky outcrop. I made the dome using card fins and a paper skin.
So troops can be put in/on it, I decided to make the upper tier removable.
Two of the new town sections.
These were made with removable wall pieces so that they have more versatility.
Graham deployed the Armenians to his left and the Order troops to his left - the advance begins.

It gets to the wall in impressive time. The drawbrideg on the tower is dropped (it has small brass hinges pinched from a small wooden box of disgustingly cheap liqueur chocolates I got for Christmas).
The Franks force their way into the town with ease.
Seljuks and the Bro's clash. Order troops are soooo good. The Saracens do not fair well in the initial exchanges. Note the depth of the Mutatawia units - this is three stands side by side.

And the Turcomans, led by their cavalry, have arrived. They shoot volley after volley to little (zero) effect.

Next week Mark can't make it so I'll take the Saracens (to their doom).

To be continued....