Thursday 28 July 2016

Page view counter has been removed from this blog

I have removed the page view counter from this blog.

In the last week I've had over 5000 hits from Russia, none of which have done more than click the counter around. Normally the count from Russia would be in the low hundreds.

It's akin to having Clever Hans, the counting horse, in the side bar. Once you know what is happening, it loses all of its charm. Consequently, and sadly, it has had to go to the knackers yard.

Bohemian Blitzkrieg Campaign: Turn 5, Prussian Move Phase

Whilst the Prussians and Austrians lick their wounds and prepare for further operations south of the Riesengebirge, the Prussians north of Prague make the following marches.

Henry (10 SP) at  Pirna via Nollendorf to Aussig.
Moritz (17 SP)  to Aussig.


Bohemian Blitzkrieg: The Battle of Sobotka

For this battle both sides had secret deployment. This isn't something we do very often, as most of our games are scenarios / historical re-fights, and to my mind it showed: both players deployed in a somewhat a-historical fashion.

The Austrians weighted their right. Massed infantry and cavalry, supported by heavy artillery on the high ground, made this a very well inhabited sector.
The centre of their position was occupied by more infantry and cavalry but 'the gap' between right and centre was linked solely by guns. On the left, more infantry, including the bulk of the Grenzers were supported by hussars.

The position reminded me a little of the deployments at the Battle of Prague.
The Prussian deployment too had a unsavoury gap in its centre. 

The Prussian right consisted of a strong cavalry detachment, all of the Grenadiers and a battery of medium howitzers. These troops were supported in the centre left by a strong infantry command.
The centre was vacant of infantry but had a particularly large, strong cavalry command supported by heavy guns. The Prussian right consisted of more infantry with the extreme right being held by hussars
The centre in more detail.
The Prussians opened the battle with an attack from their left.
The Austrians counter-attacked around the village but more Prussian infantry moved to throw this response back before its effect was felt.
The cavalry on this flank soon came to grips too. The Austrians getting the better of the first clashes here.
On the other flank the Austrians moved their Grenzers, supported by hussars along the long flanking ridge.
The Austrian artillery, even from its advantageous higher ground could not prevent the Prussian attack from developing to threaten their left.
However, the Austrians were developing an attack on their right with some alacrity.
They also began to shift infantry from their centre left towards their centre right. To threaten the oncoming Prussian infantry.
This presaged a major move by the Prussian cavalry.
Towards the end of turn 5, the position was this. On the Austrian right the Prussian attack had stalled but the gap between the Austrian right and the centre was coming under pressure.
Further to the Austrian left the Austrians were shifting troops left and these were now under imminent threat from cavalry on their flank. On the Austrian left, the main Austrian attack was proceeding with little resistance. The Austrians have broken into the village and threatening to completely isolate the Prussians beyond it.

 The next turn saw the battle decided.

As expected, the Prussian cavalry launched charges into the flanks of the Austrian infantry in the centre before they had time to change face. This shock precipitated a complete stall in the attacks of the Austrians who began to be repulsed in every part of the field. (Peter [Prussia] won almost all of the big initiative swings and seldom failed to cause massive casualties with every die roll for the remainder of the evening).
On the Austrian left the Austrians actually managed to maintain a semblance of an attack but, even here, stiff Prussian resistance caused the Austrians to falter. What looked like a well organised attack was halted, and the Prussians began to gain ascendancy.
When the Austrian central cavalry reserve pitched into the victorious Prussian cavalry things came momentarily back into balance. 
That cavalry clash was decided in the favour of the Prussians. 

The Austrian centre collapsed and the Prussian cavalry splayed out to roll up the Austrians to either side. 

The Austrian wheels had truly fallen off and they began to withdraw.

A decisive bloody victory to Schwerin and the outnumbered Prussians. Losses were as follows:

  • Prussia: 10 SPs (24%) in the battle.
  • Austria: 17 SPs (32%) in the battle, 2 more in the pursuit for a total of 19 (36%).
The Austrians under Konigseck retreat to Munchengratz where they merge with the army under Macquire.

For the first time in the campaign, the Prussians have more Victory Points than the Austrians with 66 to 60.

At the end of Turn 4 the strategic position is as follows:


Friday 8 July 2016

Bohemian Blitzkrieg: Turn 4, The Battle of Sobotka - the set up.

At about the same time as Bevern and Macquire were undertaking their action at Niemes, a far larger action was in the offing 25 miles to the south at the small town of Sobotka. Here, Schwerin and the newly combined forces of Konigesck and Serbelloni met on a large, open plain dotted with small villages.


At Sobotka: Round 1 of the Pre-battle Manoeuvre phase:

Konigseck (53 SPs) rolls 3 +3 +1 = 7. 
Schwerin (42 SPs) rolls 3 + 5 = 8.

Schwerin wins the initiative. He has the choice of the following battlefields: 15, 25, 27, 36, 58, 63. He chooses three: 15 deploy northern edge, 25 western edge, 27 northern edge. 

The battlefield roll is a 2 indicating battlefield 25. 

Both sides commit to battle. 

This is the largest battle to date with two large armies meeting in the open field. Last Wednesday night I indicated to the players that as this would be a large battle (68 units all told) I would be using the drop leaf extension to increase the table dimensions to approximately 15' x 6'. The extra table space would, of course, mean extra terrain so I informed the players that I would add some of adjacent battle map 22 to the northern end of the table.

As with all of the terrain maps I can only go so far in accurately depicting what is shown. In this case, the woods and villages were not a problem and I could do a fair job at representing the high ground (though the large hill runs somewhat straighter across the table end to the south than it should) but, as with a previous map, I have come up short big time on the road front - about 10' short. 

Having looked at the map I decided to lose three lengths of road (indicated in the photograph of the map with an asterisk). 

I chose to keep the road running behind the long high hill at the southern end of the table because a road traversing rough terrain might prove useful to one side or another (all roads being type i and easy going). I was sorry I wasn't able to do the road that joins the village in the south west corner to the road running behind the hill but I thought the central road, and the road running off table to the north, were superfluous so I didn't mind losing them at all.  


This is a map of what I came up with, it's not inch accurate, but it is fairly close.


Taking one photo of the whole field, when the drop leaf table extension is up, is almost impossible so I've taken two shots. 

This one is from the eastern edge looking south....
....and this one is from the eastern edge looking north. 
The Austrian Army (53 SPs): Eatern table edge: Konigseck commanding.

4 Hussar Regiments (20 squadrons)
4 Dragoon Regiments (20 squadrons)
1 Combined Elite Squadrons (5 squadrons)
6 Cuirassier Regiments (20 squadrons)

2 Combined Grenadier units (4 battalions)
13 German Infantry Regiments (26 battalions)
2 Hungarian Infantry Regiments (4 battalions)
4 Grenzer Battalions

2 Heavy batteries (represented by four guns)
2 Medium batteries (represented by four guns)


The Prussian Army (42 SPs): Western table edge: Schwerin commanding.

3 Hussar Regiments (20 squadrons)
4 Dragoon Regiments (20 squadrons)
6 Cuirassier Regiments (20 squadrons)

3 Combined Grenadier units (6 battalions)
10 Musketeer Regiments (20 battalions)
2 Fusilier Regiments (4 battalions)

2 Heavy batteries (represented by four guns)
1 Medium batteries (represented by four guns)


This battle will be started on Wednesday night. I expect it to take two or three sessions to play.

Bohemian Blitzkrieg: Turn 4, The Action at Niemes

Macquire deployed around and to the left of the village.
Facing him, the Bevern's Prussians were deployed in the centre and to the right.

What Bevern didn't know, was that Macquire would try to withdraw at the earliest permissible opportunity and Maquire's Army Characterisation card draw would allow him to do so - the Austrians had drawn only 9 morale chips.

Rule Note: In Age of Reason, a battle ends when a player loses so many troops and objective points that he is forced to withdraw. Piquet battles end in a similar fashion but with a wholly different mechanism and consequently I had to come up with something that, at a certain point, would end a and / or allow withdrawal. I said that once a force got to zero morale and failed a major morale check it could declare a defeat, end the game and withdraw. I must confess that I think I have got this wrong, as this battle will show.

The Austrians, with an open flank beckoning, decided to throw their Grenzers forward to exploit it. The Grenzers went forwards unsupported (I thought a little cavalry support might have been useful - but no one listens to me) with alacrity.
This small band (three battalions) rounded the lake and forced a refusal of the Prussian's right flank. However, it was at this point that their inability (as skirmishers) to press home (where was that cavalry? But no one listens to me) was felt.
Meanwhile the bulk of the Prussian infantry began its advance on the hill top village.....
....whilst the Prussian cavalry began to move out towards the threatened flank.
The Grenzers are charged and take to their heals with heavy loss.
As the Prussians begin their assault on the village the Austrians, now on zero morale, fail a major morale check and declare a withdrawal and the game ends. This action, I will not call it a battle, caused the loss of just 1 SP per side. 

After the battle Macquire retreated to Munchengratz. In the 'Pursuit Fire' stage of the retreat Macquire rolled four dice against Bevern's eleven dice. Both rolled two sixes so no SPs were lost in the retreat phase.

Graham (Austria) left feeling the happier commander having fought an un-costly delaying action. Peter (Prussia), though happy to accept the action for what it was, probably left feeling a little cheated. I must admit, I felt the same, the action ended in a most abrupt and unsatisfactory way.

Graham was helped by his low morale chip count. If he had drawn double the amount of morale he might have had to fight for the village against overwhelming numbers, so it might be said that Graham had just been lucky to get such a low number of morale chips and by spending them at every opportunity was able to get down to zero and escape very quickly. I think he was able to get away too easily.

I have been thinking about how to change the withdrawal criteria for a couple of days. Before next week's battle (the Battle of Sobotka), I wish to introduce a new withdrawal rule. However, because we have played the campaign using the other rule in two battles, and because the rule change is quite severe, I will need the approval of both players before it can be implemented. With that in mind I'm going to outline the rule here so that Peter and Graham, and you too, can think about / improve it:

Rule Note - Withdrawal Criteria: No army can begin to withdraw until it reaches zero morale chips. Thereafter, command groups can only be withdrawn after failing a major morale check: On failure the player must declare that the command will withdraw otherwise it will fight on. 

Withdrawing units, capable of doing so, must move towards the friendly or a flank table edge on all applicable move cards (they may otherwise act as required) at half rate or more until a Major Morale card in their sequence deck is turned. When a Major Morale card is turned withdrawing commands may be removed from play in their entirety. On being removed in this way, units in contact with the enemy will lose any remaining UI, all others within 12" of the enemy will lose 1 UI per unit. Units physically withdrawing off the the table edge on move cards are treated as 'removed on Major Morale' for the purposes of UI loss. 

The exception to this rule concerns commands entirely consisting of cavalry. Cavalry commands can be automatically withdrawn if they are the last commands to withdraw - a declaration of withdrawal will suffice. 

Well that is the rule. For some people this kind of rule is an anathema as they would like to physically play out the withdrawal as part of the game and let the chips fall where they may. However, I'm of the opinion, and I think Graham and Peter would agree, that sometimes a game just looks over and one side or the other simply doesn't want to play on for any longer than necessary to get a fair result - it's not a matter of winning or losing, it's a matter of having fun. We only have so much time to play our war games, so why would we want to play a game that we've lost any interest in playing further when that limited time can be used to fight another game? 

Anyway, onwards and upwards.


Saturday 2 July 2016

Bohemian Blitzkrieg: Turn 4. The Battle of Niemes - the set up

Bevern having advanced south from Zittau, ran into Macquire at Niemes. Instead of falling back, Macquire decided to make a stand. 

Pre- Battle initiative rolls: 
  • Mcquire rolls 5 +2 +1 = 8. 
  • Bevern rolls 4 +4 = 8. 
The result is equal indicating an automatic encounter battle without any pre-battle manoeuvring. 

The random battlefield roll is 59, 10 is added for Niemes being a rough terrain dot (generally speaking the higher the roll the rougher the terrain), indicating battlefield 69.

The battlefield comprises the squares either side of the number 69. Again, I must point out that this map will be transferred to the table as best I can. The map should be seen as one drawn by an ADC not the Ordnance Survey.

Rule Note on Terrain: As we are using our home spun set of Piquet rules to fight the battles it might be best to define the terrain features given in the battlefield maps.

Hills: Hills are defined by height and by 'hatch lines'. One contour hills are type i; two and three contour hills are type ii. If a slope is 'hatched' the difficulty is increased by one level from the bottom of that slope up. In the map above, picture a village with buildings terraced up a steep slope (type iii - a two contour hill is type ii but the hatch lines increase the difficulty by one level from the bottom of the second contour) with more gentle slopes (type ii - because the hill is two contours high) below.

Woods: Woods are defined as light or dense. Both are type iii terrain affording type iii cover. However, cavalry cannot be rallied from disorder caused by moving through light woods and cannot enter dense woods. Close order infantry cannot be rallied from disorder caused by moving through dense woods.

Boggy ground is type iii to infantry and type iv to cavalry. It affords no cover. Close order infantry and cavalry cannot be rallied from disorder caused by moving through bog. 

Water features: There are four kinds of water feature. Narrow rivers are type ii streams. Thick rivers are fordable type iii rivers. Wave patterned rivers are type IV rivers. Wave patterned lakes are impassible type V. Usual modifiers apply.

Villages: All villages are type iii. Usual modifiers apply.

Fields and heavily cultivated ground: These will be represented by walled or hedged enclosures with standing crops, orchards and the like. They are all type ii and afford type ii cover.

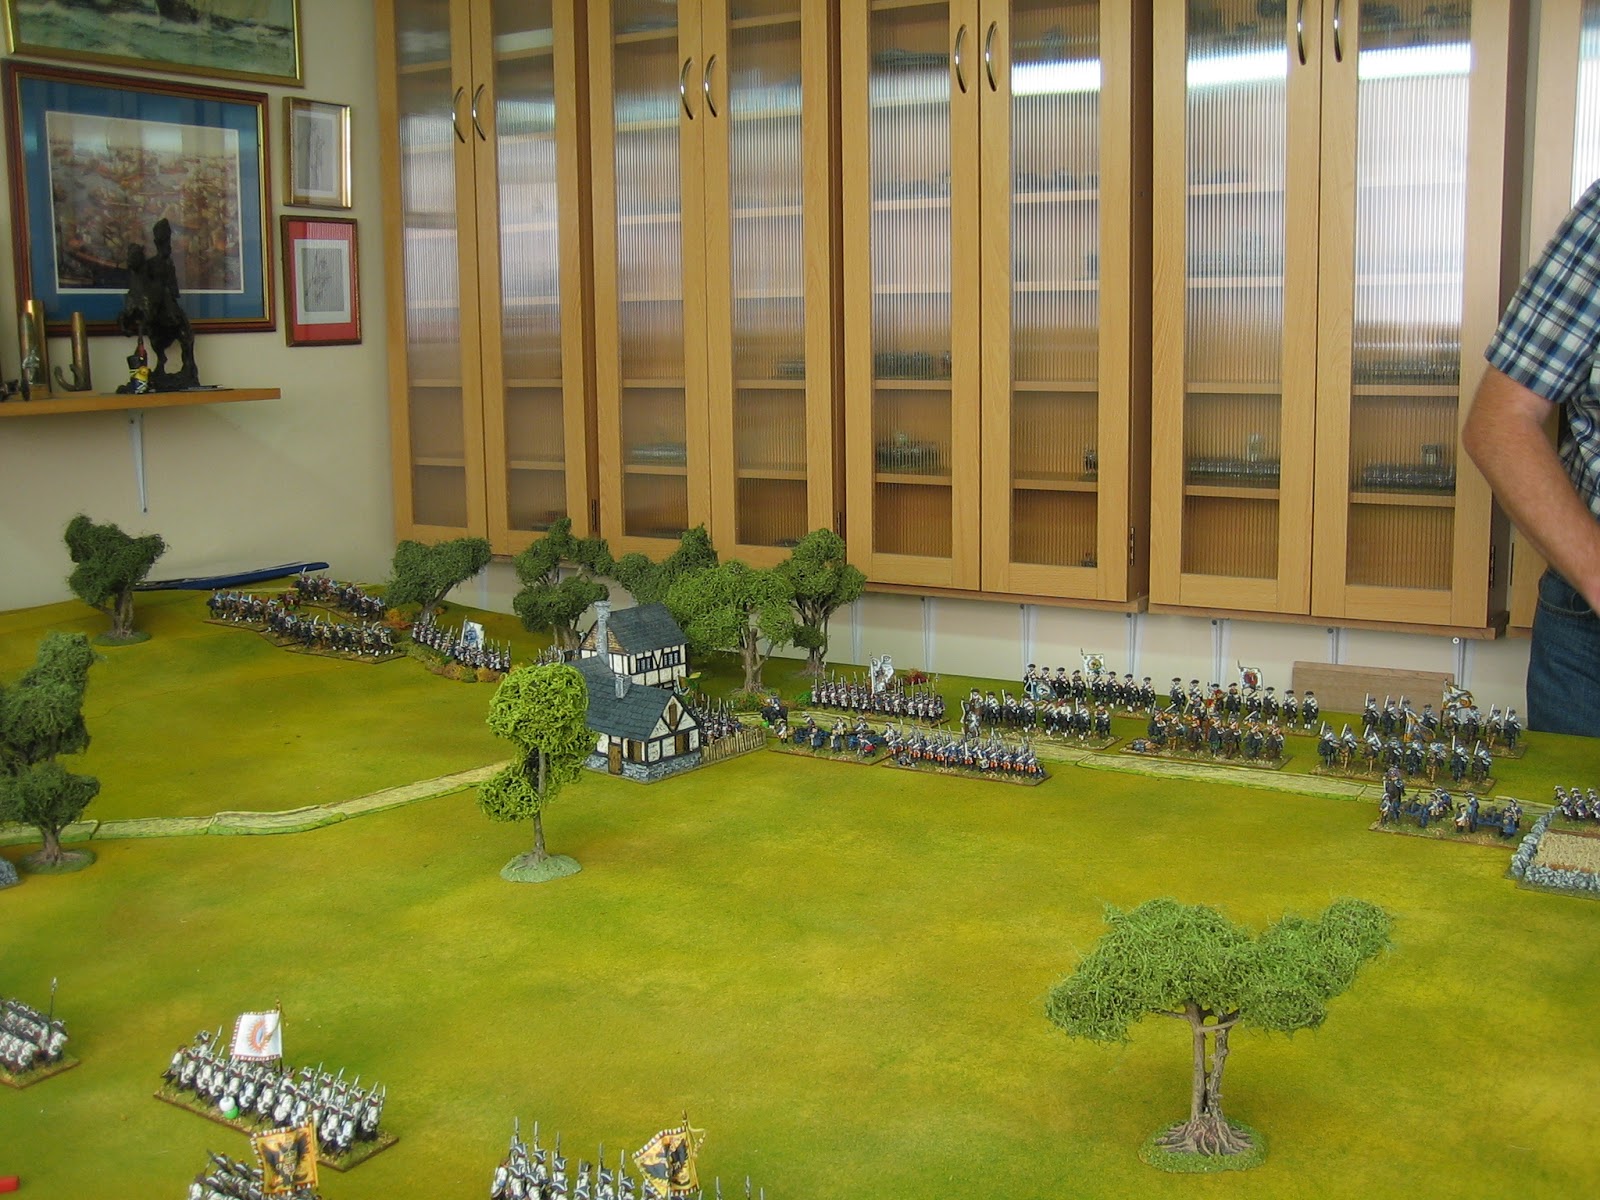
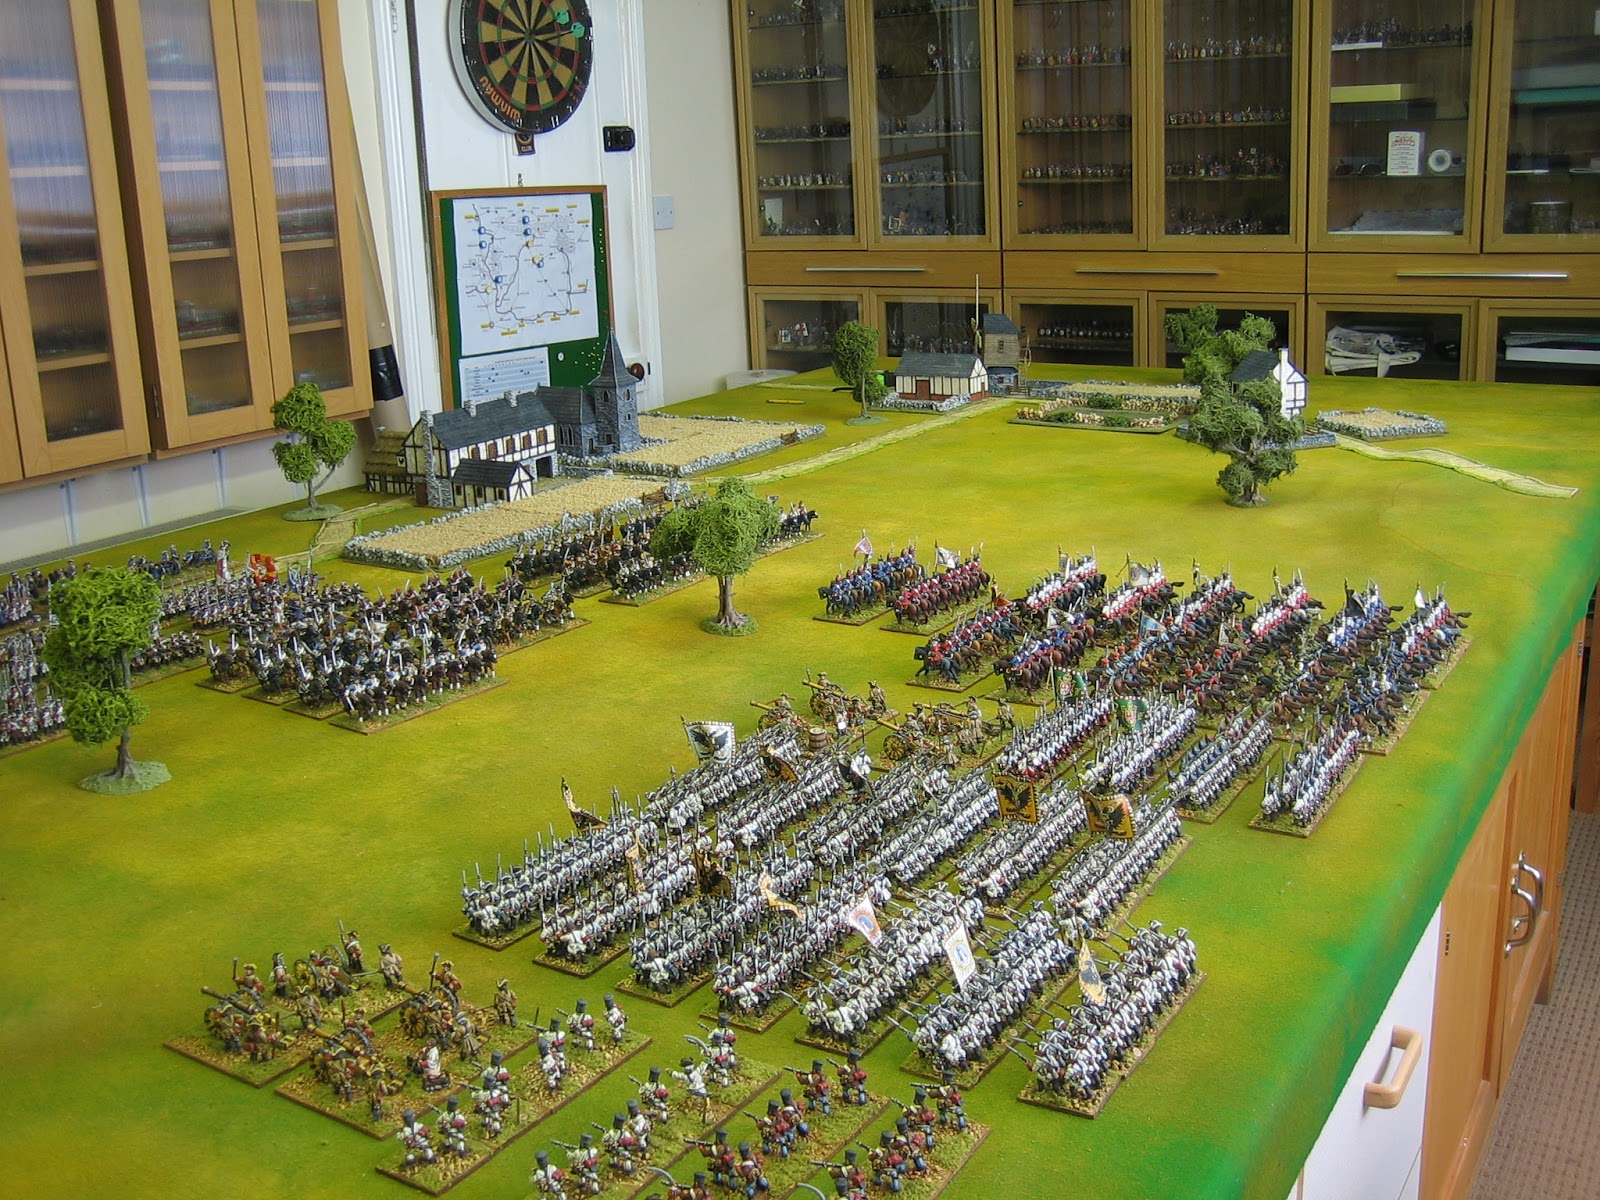
Here is a shot of the table laid out. Macquire, as defender, has chosen to set up on the left side. As defender with 13 SPs, he gets enough earthworks to cover the front of two units. The armies have been put out but not deployed.


Here is the same picture with the top contours, not that clearly visible in the photo (and much clearer in the flesh), drawn on. 

The hill shapes are as close to the map as I could manage.

Macquire's force (13 SPs):

1 Regiment of Hussars
1 Regiment of Dragoons

4 Regiments (8 battalions) of German Musketeers
3 Battalions of Grenzers

1 Heavy gun
1 Medium gun

2 unit's frontage of type iii earthworks.
Bevern's Force (24 SPs):

1 Regiment of Hussars
2 Regiments of Dragoons
3 Regiments of Cuirassier

2 units (4 battalions) of Combined Grenadiers 
6 Regiments (12 battalions) of Musketeers
1 Regiment (2 battalions) of Fusiliers.

2 Heavy guns
1 Medium Howitzer

Friday 1 July 2016

Bohemian Blitzkrieg: The army lists

For this campaign I'm using my own army lists rather than those laid down in the Bohemian Blitzkrieg campaign rules. I'm doing this for two simple reasons. Firstly, my table-top rules are for infantry regiments as opposed to battalions. Secondly, so that the lists fit with what I have in my collection, because there is no point having army lists you can't fulfil.

The lists are not set in stone. However, as I will be deciding, as umpire, the composition of all armies that come to grips with each other in the campaign, a guide to give some consistency of approach is essential. This consistency means the players will be reasonably sure of what they will have under their command when they commit to battle.

Anyway, they are pretty simple things, so I thought I'd post them for you to see.


Bohemian Blitzkrieg: Turn 4, Austrian move phase.

Lorraine from Aussig to Lobositz to Budin to join with Arenberg - Lorraine takes command of the combined army of 63 SPs.
Konigseck from Munchengratz to Sobotka to link with Serbelloni. Konigseck takes command of the combined army of 53 SPs.

There are potential combats at Niemes (A 13 SP Vs P 24 SP), Budin (A 63 SP Vs P 38 SP) and Sobotka (A 53 SP Vs P 42 SP). Blunder phase rolls: Niemes 6/2; Budin 6/4; Sobotka 2/1. No armies blunder into a battle.


Bohemian Blitzkrieg: Turn 4, Prussian move phase

Frederick at Lietmeritz with 38SP moves to Budin.
Prince Henry at Balzwitz with 10SP moves to Dresden then Pirna.
Bevern at Gabel creates a new command (Retzow, initiative 1) and transfers 1 SP to it, then with 24SP moves to Niemes.
Schwerin at Horitz with 42SP moves to Sobotka


Bohemian Blitzkrieg: Turn 3, Austrian move phase.

Austrian moves carried out were as follows:

Konigseck from Hirschberg to Munchengratz.

At the end of the Austrian move phase there are two potential contacts. Bevern (25SP) confronts Macquire (13SP) at Gabel; Schwerin (42 SP) confronts Serbelloni (34 SP) at Horitz. Blunder phase rolls were double 4 and 4 - 1 so there are no battles simply blundered into.

Although the Prussians issue an invitation to fight, both Macquire and Serbelloni decline and retreat, the former to Niemes, the latter to Sobotka.

Turn three ends as follows: