Showing posts with label Adventures in the Sudan. Show all posts

Friday, 6 December 2024

Beja completed!

This week I have finished the Beja contingent for the Mahdists - I've halved the Mahdist lead pile! It's not the end of painting Mahdists for a while longer as I still have 24 Baggara horsemen (technically part of the Kordofani contingent) to do the Second Battle of El Teb. That amount of cavalry seems a little excessive to me but it seems to be the usual amount for others doing that battle (down to the scenario in Black Powder?), so I'll follow the trend.

Anyway, the last batches of Beja:

Two sword and spear units (#8 and #9), a second captured Krupp, a captured Gatling gun and a command stand. All figures are Perry Miniatures except for the Gatling gun itself, which is an Empress Miniatures piece. The bases are by WarBases. All were painted by yours truly, mostly using enamels; metals colours are mostly acrylic. Bases were washed with diluted acrylic ink and drybrushed with various shades of Dulux household emulsion paint; scrub is Woodland Scenics clumps.
Because all the Beja bases will be mixed up (especially over time) I chose to add a few splashes of colour to the figures in these batches. A few blue, green and yellow waistcoats - I did a few red ones in the early batches. These can be more clearly from the rear: About one in 15 figures isn't dressed in white, off white, beige or dirty orange. 

Note: I still need to texture and paint the base of the command stand - which I decided to add last minute.

I'm rather taken with this Gatling gun from the Empress Miniatures' Sudan range, which I picked up whilst sorting out Peter J's stuff. The gunner is a PM camel rider (left over from doing my Crusades period Saracen baggage train). Indeed, the two units of sword and spear were also largely inherited by me from Peter.
I had no idea what Gatling guns (beyond shape) looked like as I don't think I've ever come across a coloured picture of one before and I do like the amount of brass - it looks great with the gun metal and carriage grey. Note the guy pointing out targets in a fetching yellow waistcoat.
The Beja contingent. At six figures to 100 men (see unit sizes below) the 398 figures represent a force of about 7000 Beja warriors.

The Beja contingent comprises:

A unit of 11 camel mounted scouts (pretending to be 12 strong); three units of 21 riflemen (each pretending to be 24 strong); two Krupps and a Gatling gun; five command stands.
When properly sorted out it runs out to nine units of 33 sword and spear warriors (each pretending to be 36 strong). 

I still need to flag up five units but that must wait for my printer to become operational again - the price of ink!

That's not a bad amount of painting in six or so weeks. I'm in the groove.

Seeing the lead pile diminish by a quarter in so short a time has me worried so, as well as adding a unit of Baggara horse at the Battleground show, I've added some more Korofani troops to bring them back up to the planned eight units of sword and spear, and I've added a few more command figures. Except for another unit of Beja camels which I don't think I need, that just about does it for the Mahdists. Now I'm planning the Egyptian contingent which I'll probably buy over the next few months - my basic OOB is still First Battle of El Teb with a few extra Egyptian/Sudanese units to make up a diminished force for any fictional offensive land operations led by Gordon: I'm certainly not collecting forces for the siege of Khartoum at this figure to man scale because, major period or not, forces of 9,000 Egyptians and 20,000 Mahdists is well beyond scope. I'm still umming and ahing about adding the British Guards Brigade and the Camel Corps.

I've also decided, for definite, that this will be my last major period. After this I'm doing small wars - like the French and Indian War, a few naval bits and pieces, cowboys, etc. Frankly, I'm running out of storage as much as anything.


Saturday, 30 November 2024

More Beja, new recruits and a first game plan - and a loss

Firstly, let's deal with the loss: My Canon IXUS 30 camera is done, dead, deceased. This little camera was used for almost every photo on this blog, the many pictures in several magazines (Wargames Illustrated, Miniature Wargames, Slingshot, Wargames Soldiers and Strategy and Vae Victis - among others), and a few rulebooks too (including Shadow of the Eagles, Osprey's Honours of War and Jump or Burn). That's quite an accomplishment for an automatic, pocket sized, happy-snappy, holiday camera. It was the best camera I've ever owned and I'm going to miss it's sharpness.

My Beja have been reinforced by around 40 Perry metal figures and half a box of plastic figures. These came from Peter J's lead pile. They will allow me to add two more units of Beja spear/sword armed warriors. This addition is very useful and has decided my first game plan. At around 6 figures representing 100 men this brings my Beja infantry force to around 6,500 men. This is the perfect amount to do the Second Battle of El Teb. Peter's collection has also provided a Gatling gun, which now has a Beja crew, for that battle.

This week I've added another unit (#7) of spear/sword armed infantry. This was the last one in my own lead pile. This unit, like the others similarly armed, comprises three bases of six figures and three bases of five figures. These units, thirty three figures but counted as thirty six figures each, represent about 600 men. 
They are all Perry figures, a mix of Perry plastics and metal. All were painted in enamels and are mounted on WarBases MDF, 50mm rounds.
I've also added twenty seven Beja riflemen. I had initially thought to do these in four units of eighteen figures each (three figures per base) but I thought, after painting the first two units, that they looked a little too open. Then I thought of doing them in units of twenty with five figures per base but this looked too close order. Finally, I've settled on this set up: Three units of twenty one figures on six bases (three threes and three fours). This allows them to form in either a loose order line, or more typically, as this picture shows, in a more warband looking formation - four stands up, two stands back. I'm not sure if this is the right density but, it feels right.
 
Counting as twenty four figure units, rather than their actual twenty one, they each represent four hundred riflemen. According to the accounts this is about the right proportion of riflemen for a force of 6,000-7,000 foot warriors.
Anyway, since these shots were taken with my inferior (actually later model camera) IXUS 160 I've done another unit (#8) of spear/sword warriors. One more unit (#9), plus a captured Krupp and Gatling, and the Beja are done. 

For 2nd El Teb I'll need to add a couple of units of Baggara horsemen. Then onto the British. 

There are still the same number of Kordofani figures in the lead pile to bring the combined Mahdist force closer to representing 13,000 or so troops - which is, as far as I can see, more than enough to do any of the major battles. This army has been a doddle to paint - painting 400 figures of my own in a little over a month is going some, even for me.

Monday, 18 November 2024

More new units for the Sudan

 So, continuing with the Beja contingent, I've added two more sword/spear units (each 33 figures); a unit of camel warriors (11 figures - should be 12 figures but I stole a figure to use on a command stand); A command stand (3 figures, including a camel mounted 'Emir'); a Krupp gun with captured/slave crew. 

I've photographed them on this hill because someone sent me an email asking why I had used 'cliffs/bluffs'. The reason is clearly shown here: Where two sections join (under the gun) they can join at a cliff/bluff so that the hand cut slopes don't need to match up. 


All figures are Perry Miniatures.  Round 50mm MDF bases by Warbases. All are painted using enamels by yours truly. I still need to add standards to the sword and spear units.
Spear and sword unit #5.
Spear and sword unit #6.
A Krupp gun with captured Egyptian gun crew and Beja guard. I've based this gun on the diagonal because this system will be useful when it comes to British guns that might need to sit at the corner of a brigade square. I'll measure the 90 degree fire arc from the rear corner. Base is 60x60mm.

Beja command stand #4. I stole one of the camel warriors from the camel unit beyond to make this stand.

A unit of camel mounted warriors. I'll need another of these at some point. Bases are 60mmx75mm: the extra depth allows the camels to be staggered for the 'irregular look'.

....next up, the last two units of Beja warriors to empty the lead pile of them. I'm painting them as a batch of 60 figures - they are very easy (if a bit boring) to do!

Wednesday, 6 November 2024

First units for the Sudan

 I've decided to start this project with the Beja contingent which is now half, more or less, finished. I painted the figures using enamels.

So far I've done four of the seven spear/sword units, two of the four riflemen units and three of the four command command stands. There will also be a unit of camel riders and two 'captured' Krupp pieces. All figures are Perry Miniatures. 

When deciding to do the Beja I took a fantastic piece of advice from Kevin Calder and completely ignored his other piece of advice. 

I decided to copy his round base idea. Round bases are a very simple way of losing the regimented look of 'irregular units' when they are based on rectangular/square bases. The way they can be bunched together any old how is transformative. All of my irregular infantry units will be based on 50mm diameter bases (from Warbases).

I ignored his advice about picking a Sudan sub-period campaign. Sometime between the 1st and 2nd Suakin campaigns, the Mahdi prescribed an edict that all of his followers should shave their heads, wear a skull cap and sandals and, where practicable/available, don a patched jibbeh. In effect, from 1885 all early period Mahdist Ansar looked, more or less, the same. I've decided that my Mahdi will never issue such a decree - this will give my Mahdists an imagi-jihad feel but frankly, for the variation in unit look, I'm happy to go against history: I will have 'Fuzzy Wuzzy' Beja with 'ayrick 'air for the entire period and I will be able to do Kippling, in bad 'Michael Caine':

So 'ere's to you Fuzzy Wuzzy, at your 'ome in the Soudan;
You're a pore benighted 'eathen but a first class fighting man;

An 'ere's to you Fuzzy Wuzzy, with your 'ayrick 'ead of 'air -
You big black boundin' beggar - for you broke the British square.


My first three command stands with Osman Digna (centre) flanked by two other command stands; the mounted figure on the right has had a Beja head swap (originally bald in skull cap). Initially I had thought to do single mounted figure 'brigade level' command stands but, somehow one stand on a base hasn't done it for me for quite some time.

My sword and spear units will all be based around an average standard of six bases (50mm diameter). 

Initially I thought to put six figures on a base but discovered that a mix of six and five figure bases (three of each) actually increased the irregular look - six figures only really fit on a stand one way, especially when mixing metal and plastic figures.

Each base will represent about 100 men.


Each base has three metal figures and either two or three plastic figures.

I have a feeling that the plastic spears will prove to be fragile. In consequence, I have decided to place at least one metal figure on each flank of a base to protect them when handled.
I'm sticking to three basic colours for the clothing: White, dirty orange and tan. The tan will have a natural variation because I'm purposefully not noting the precise paint mix for each batch.
Flags are downloads that have been over-painted. They are slightly oversized for effect (and ease of painting).
Riflemen are based three to a stand (representing 50 men per stand). Fifteen of the eighteen men in a unit are metal, the other three are plastic.
I'm going to continue painting the Beja until they are done (six more units and two pieces of artillery). Then, I'll move onto do half of the British force before moving onto the Kordofan contingent (which is about the same size as the Beja with a few more cavalry).

This is never going to be a huge collection - I'm thinking one session games - but, if it plays well, I'll do an Egyptian army, the Camel Corps and add another half a dozen or so Mahdist units - especially more cavalry/camelry. 


Monday, 20 May 2024

The Haru-pa-kaut

From Wikipedia: Heru-pa-kaut – A mother goddess with a fish on her head.

When at Partizan yesterday, speaking to a few old friends (who I haven't seen for ages) about current projects, I mentioned the Heru-pa-kaut, the latest addition to my 'terrain pieces'. I thought I'd done a post about the Haru-pa-kaut but, looking back I find I haven't. What I did, for reasons I no longer remember, was to simply load up a bunch of photographs and add them to an old previously existing post - so it was probably missed by almost everyone.

Anyway, here she is: The Heru-Pa-Kaut, my first Nile paddle steamer for my adventures in Sudan.


This model basically follows a design I found on quindia studios blogspot. That model was made by extensively converting a plastic kit to make a model for 28mm gaming. When I first found this post my plan was to simply copy what he had done; then, I found out the model price; then, the Yorkshireman in me came out and I decided to go for something scratch built. The linked quindia studios post is definitely worth a visit - if only to show how much better some people are at modelling than I am - his model knocks the socks off mine. Thank you for your inspiring post, Quindia Studios.

Anyway, here is my version, made on the cheap. It's the first boat (outside the odd 1:600 galley) that I've ever made so everything was done on the fly and, outside of the basic design, it was very much an organic process from beginning to end and, until quite far in, I wasn't sure if it would come off.

What's the first thing I chose to make? The boiler. 

Why? Because, I figured, if I can make that I can probably make the rest. Turn around, touch the ground, spit....

The boiler is made from mounting card, thick paper, buttons and a couple of shields, more or less. The funnel is a plastic pen. The body of the boiler is thick paper shaped over internal mounting card ribs/fins. The ribs also serve to form the boilers legs/ and ends. Everything else is just applique work. Buttons were used because they are pre made perfect small discs, as are the shields. The riveted plates were a new discovery on my part: I cut pieces of thin card, placed them on a cork board and poked holes through the card with a thick pin - causing the card to burr on the reverse; then I put PVA glue into the holes to hold the burr in shape before gluing the plates onto the boiler, with burrs (rivets) outward. 

Next, of course was the wheel, shown next to the lower hull without it's sides.

Now, unfortunately I didn't take any photos of the wheel under construction (to be honest, I wasn't sure the first method would work and was concentrating so hard to make it work that it slipped my mind to). However, although a little time consuming, it proved to be a pretty straight forward way to do it. Here's how:

First, using a compass, I drew concentric circles on mounting card to form the hubs and rims for each side of the wheel. I needed four hubs and two rims. There are two hubs for each side of the paddle wheel, an inner and an outer, but only one rim for each. 

Whilst doing that, I did a copy of the hub and rim, as the wheel would look, on a separate piece of paper. This drawing of the wheel would be used as a bed on which the outer wheels could be constructed. I drew a line across the centre of this wheel then, using a compass, divided the wheel into sixteen equal segments - the spoke positions. Now, I did this without thinking because it's generally the method I use to equally divide up a circle but, looking at real paddle wheels, a lot seem to be twelve spoke so perhaps a protractor (and 30 degree segments) might be a better way. Anyway, I did what I did. Also, its on this piece of paper that you need to decide where the water line is and mark it on (you will use this to cut your rim and spokes at the water line), and draw an inner 'hole' on the hub around which your spokes will sit (the spokes cannot go to the very centre of the hub - because they have width, they won't fit).

After very carefully cutting out the mounting board hubs and rims with a very sharp 10A scalpel blade (I used a new blade for each rim), I took a hub and rim, laid them on the 'construction' sheet, which was pinned to a cork board, pinned them in place and cut the rim at the waterline. Then, I PVA glued the spokes into position using tweezers. Then I glued on the inner hub to secure the lot. When dry, I unpinned the now constructed side of the wheel and repeated the process for the other side of the wheel. 

After the wheel sides were done I glued the axle into place - this was made using a length of plastic pen. Now the exact width of the paddle wheel was known I cut out my mounting board paddles and glued them on. Afterwards, I was pleasantly surprised by the wheel's strength, and even more surprised at how good it looked - for a wheel made out of card, by me.

Two notes on the spokes: 
1. Spokes need to be accurately cut to length and need to be long enough to protrude beyond the rim to hold the paddles.
2. I made my spokes out of 'sealed' mounting card - sealing thin strips of card keeps them together and adds strength. To seal a strip of card I rub liberal amounts of PVA up and down it between my fingers. Then I hang the strip dry. The photographed strips are not spokes, these ones are thicker, wider planks that were used later, but the sealing process was the same.

Next up came the engine room (and cabin?). This was a simple mounting card construction with thin card applique: All self explanatory. 

The hull sides (thin card) have also been added to the MDF main deck. The main deck is propped up on supporting platforms of MDF and card (off-cuts) to give it 8mm of height above the waterline. This was the simplest way to get the main deck up to the right height.
Only the wheel arms and drive rods need to be explained. The wheel arms (held to the boat with blue tack at this point) are plastic tea spoon handles. The drive rods from the engine room are Warbases Napoleonic French limber poles (off cuts from another project - never throw stuff away!) 
Another shot of the boiler, now half painted, and the engine room. At this point everything is still separate parts -  nothing is glued in place, I'm still not sure where it all fits.
At this time I decide to do 'etched decking'. I was planning on doing applique planking but this felt an easier, quicker solution: This thing has been time consuming enough already. I also did the water work using thick (old) emulsion paint at this point.
Now I've built the wheel house (as per the engine room), added a rail to the upper deck and a low bulwark to the bow. Things are stuck in place and most of the painting has been done. 

The rail posts are steel tacks drilled and glued into the upper deck and the rail is sealed card. 

The water has been painted and I've added some sponge 'froth' at the paddle end. I used yacht varnish to 'gloss' the water - I hate the stuff because it takes ages to dry, and I mean days!

So the basic boat is done. She looks pretty good to me. 
Most of all, I like my paddle wheel - look how it churns that water. But, the Heru-pa-kaut doesn't have the Sudan look. For that she needs to be armoured.
You cant beat a bit of improvised barricade: Barrels and crates required. Barrels are Renedra plastics; crates and sacks are home grown. I've since added several more sacks because the barricades didn't look right, none of which are pictured I'm afraid.
And of coarse, improvised armour of stout planking and old boiler plates. The planks are sealed card strips - the card strips pictured above, if you remember. The boiler plates are cut up Perry plastic bases with some holes drilled through.
She has a flag, God bless her. The main pole is a tube and the flag is removeable so she can change sides. At some point I'll over paint the flag for better impact and do a Mahdist one at the same time.

I'll leave you with some shots of the almost finished boat. 

I say almost finished because, as I said, I added more sacks (I bought some new Milliput), added better (wire supported) smoke, and added her name plate. Her name plate is positioned above the windows of the engine room - so that the Thomas Cook tourists know they are getting on the right boat. 


Saturday, 27 January 2024

An Arabian Night On The Town

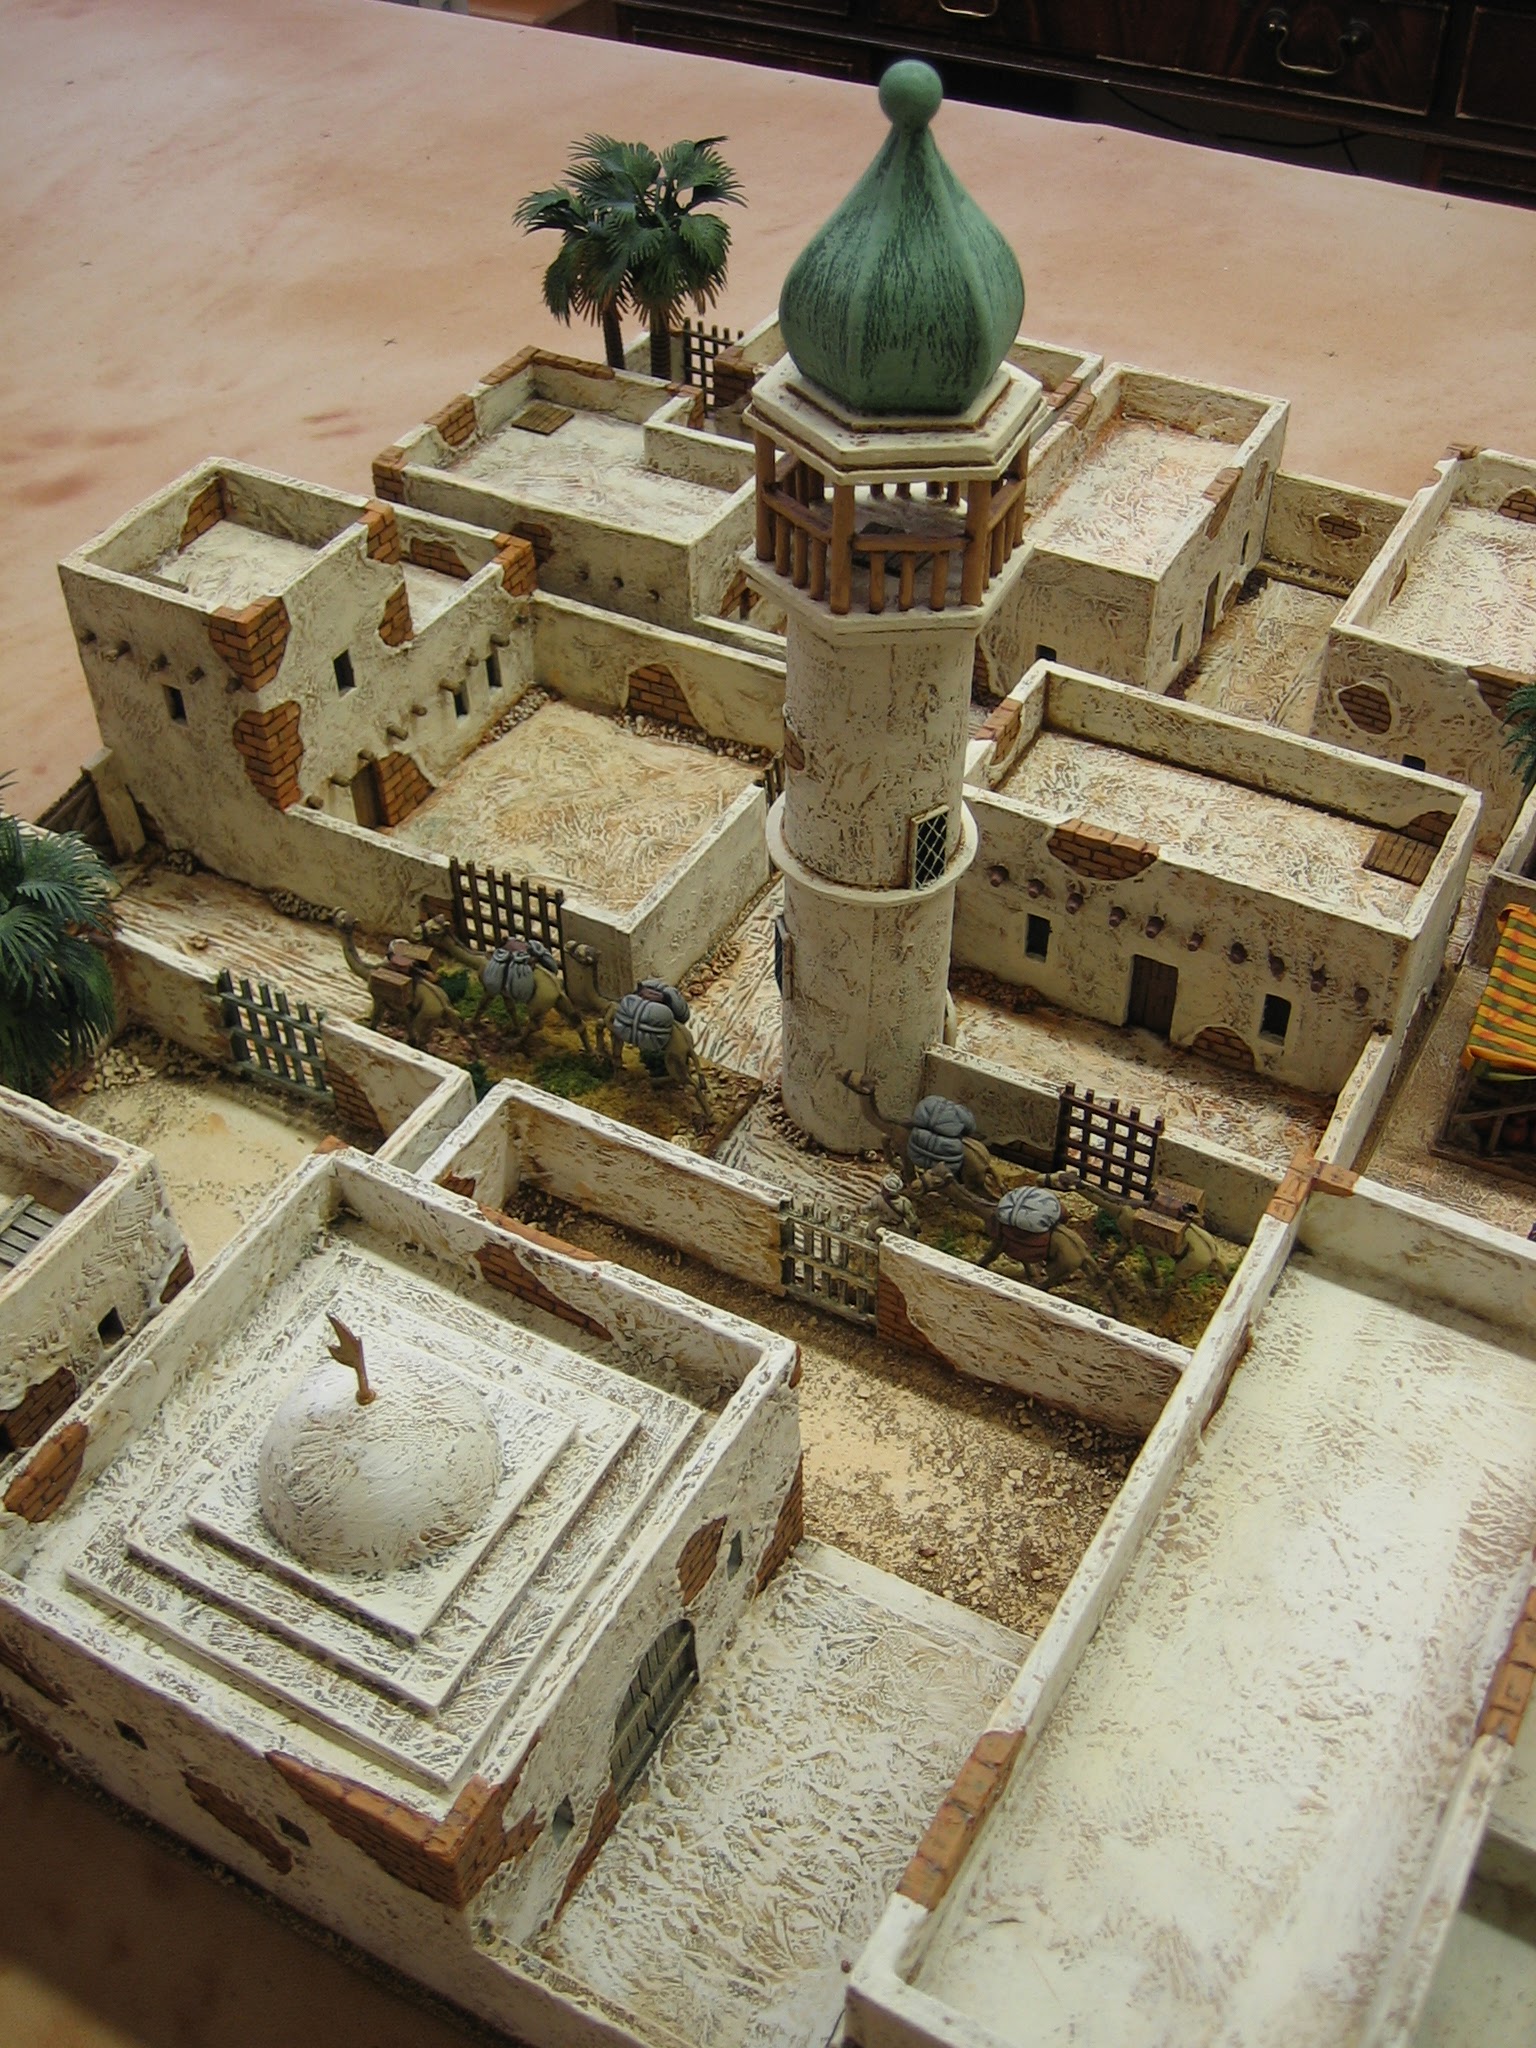
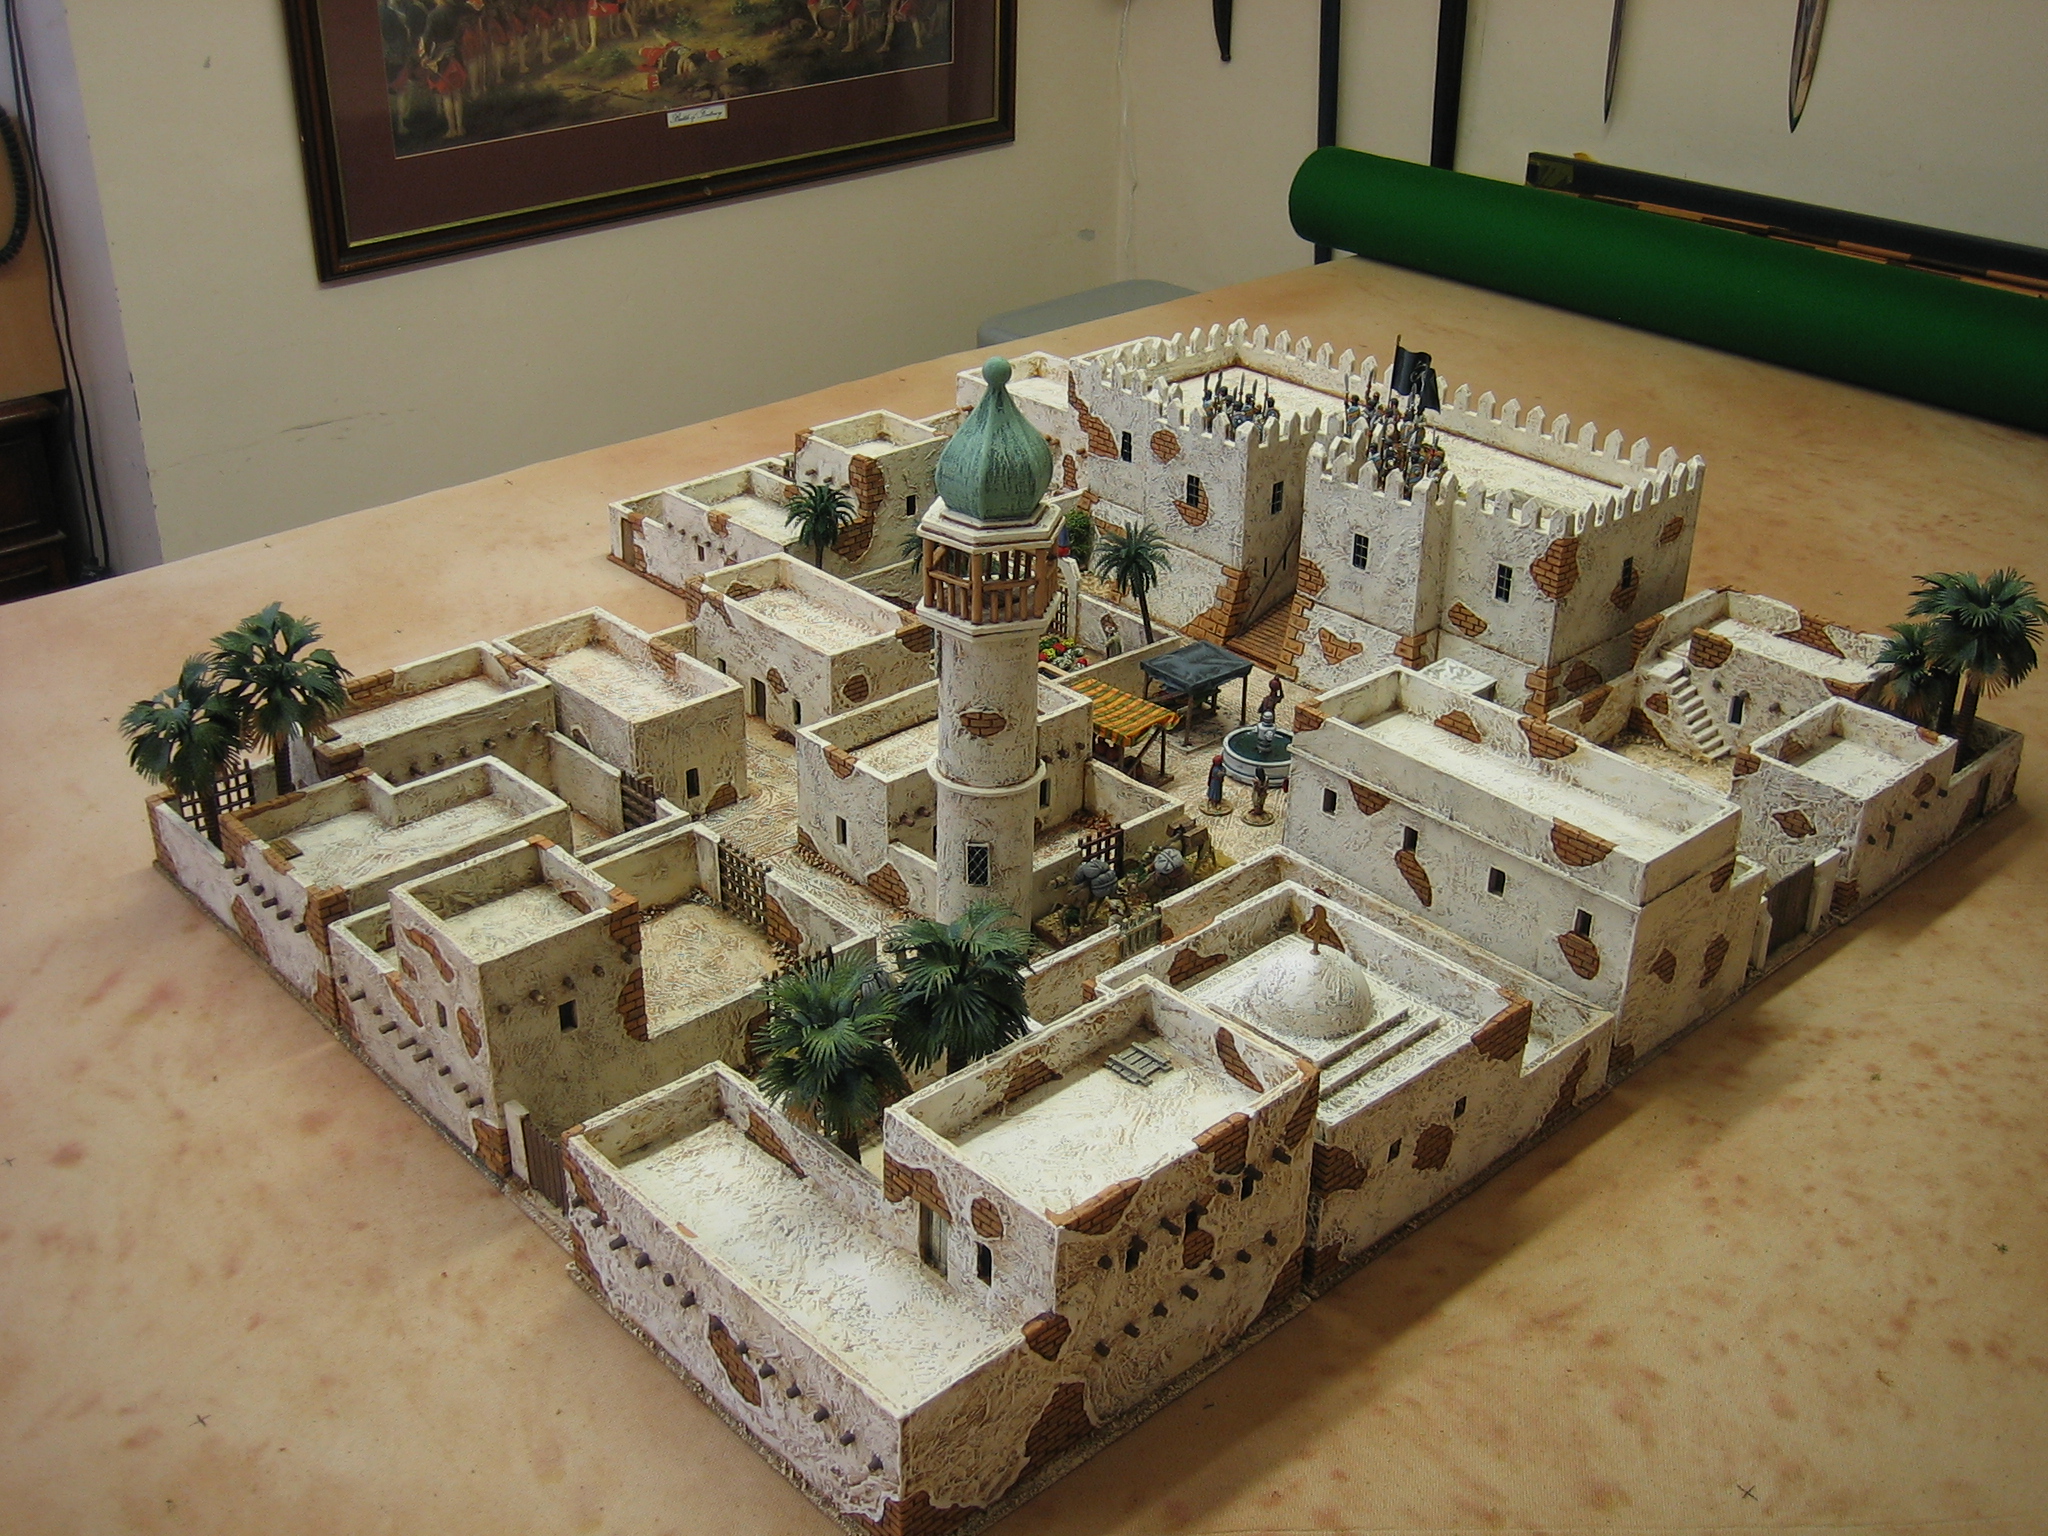
My Middle Eastern building collection has grown over the years. Originally designed as generic buildings for use with my Crusades collection it will now also serve for my colonial adventures in the Sudan. 

Funnily enough, I have little idea of what buildings looked like in the Holy Land in the 12th century and I've only seen a few images of Victorian era buildings in the Sudan. However, these buildings somehow look right for both, even if they are probably not: I put this down to most Middle Eastern wargame buildings looking like this (flat roof with parapet) and this familiarity has, as is often the case, bred a contempt for anything more 'historically accurate'.

Each 'town section' is on a 21cm square base. They would be better on 20cm square bases, to go with my To The Strongest rules table grid, but that did not allow enough room to build enough space to house my troops - each has a capacity of two units. Some of the sections have been designed with attached streets to make a workable road network. Most of the sections have buildings in a self contained compound - a feature common in the Middle East. This compound design allows for my town to be fully enclosed, without the need of separate town walls, and accessible only at town gates; the town gates are separate features that can be removed. So far, I have 14 town sections.

The largest building is the Emir's Palace. Effectively, it is two sections; it serves as the town's / governor's 'citadel' with a reasonable table footprint.

Unlike most of my buildings this one has moving parts - the drawbridge works!
A very simple town section is the market. This is simply a textured base with movable stalls and fountain. Effectively, it is also a very useful 'crossroads' connector piece.
To look after the spiritual side of town life there is a small mosque and minaret. 

The dome and stepped platform on the mosque roof can be removed for the deployment of troops. It has a central locator pin to keep it in position.

At some point I'm going to make a bigger mosque.
Another simple town section, with a bit of difference about it, is this ornamental garden. The shrubbery is made out of Woodland Scenic clumps - the low hedging has been flocked, the flowers are painted clumps. Everything is at more or less the same low level so that troops can be placed on top.
Some sections are usable in more than one way. This one, with a central road 'T' junction, has a moveable wall to enclose the piece when on the outside of the town...
When on the inside the central road can lead to a compounds centrally located gate.
Most of the buildings are simple one or two story affairs and often mixed on a base to make the whole look a bit 'jumbled'.
The amount of broken plaster, showing underlying brick work, came about after reading of the decrepit state of the villages in the 12th century Holy Land following steady depopulation over the previous four centuries: it seems that there simply wasn't enough manpower to repair anything! 

The palm trees are not fixed but, they add to the hot dry feel of the place.
Another shot. The town is 84cm wide and 84cm deep at it's widest points.
All of the buildings were scratch made using 5mm foam board, 2mm MDF (especially the bases), and card (mounting and old postcards, the latter used to make the brickwork). Doors, trapdoors and main gates are balsa. Grilled gates are plastic (cut up plastic bases by Perry).

Plasterwork is mostly artist's (tubed) heavy body acrylic. 

Any framed windows, and a couple of the doors, are by Warbases.
I'm quite happy with the town but, it needs two more sections so that the whole thing can be made square (16 sections), plus another two or three sections for outlying farm / village compounds.