Thursday 26 June 2014

"Carthaginians, tharzands of em!"


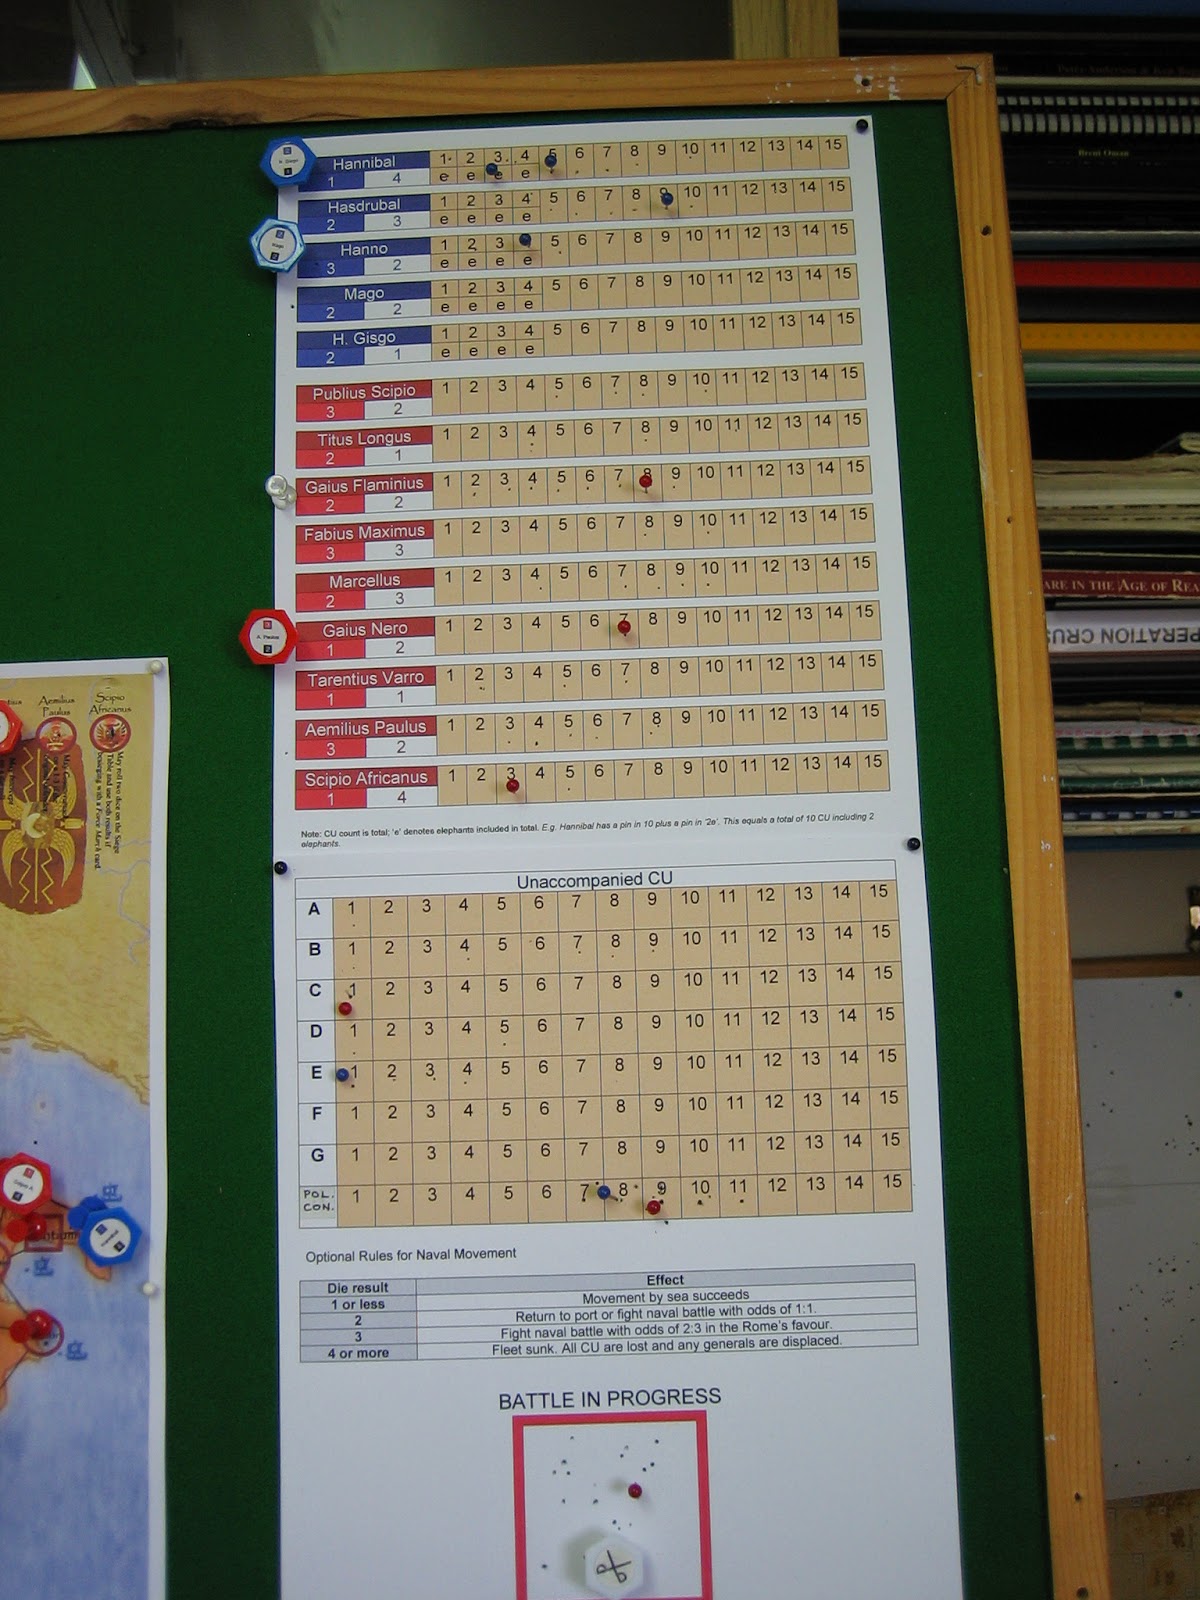
The situation at the start of turn seven - 207 BC to 209 BC. Nero and Longus are the elected consuls. Flaminius and Scipio Africanus are pro-consuls. 

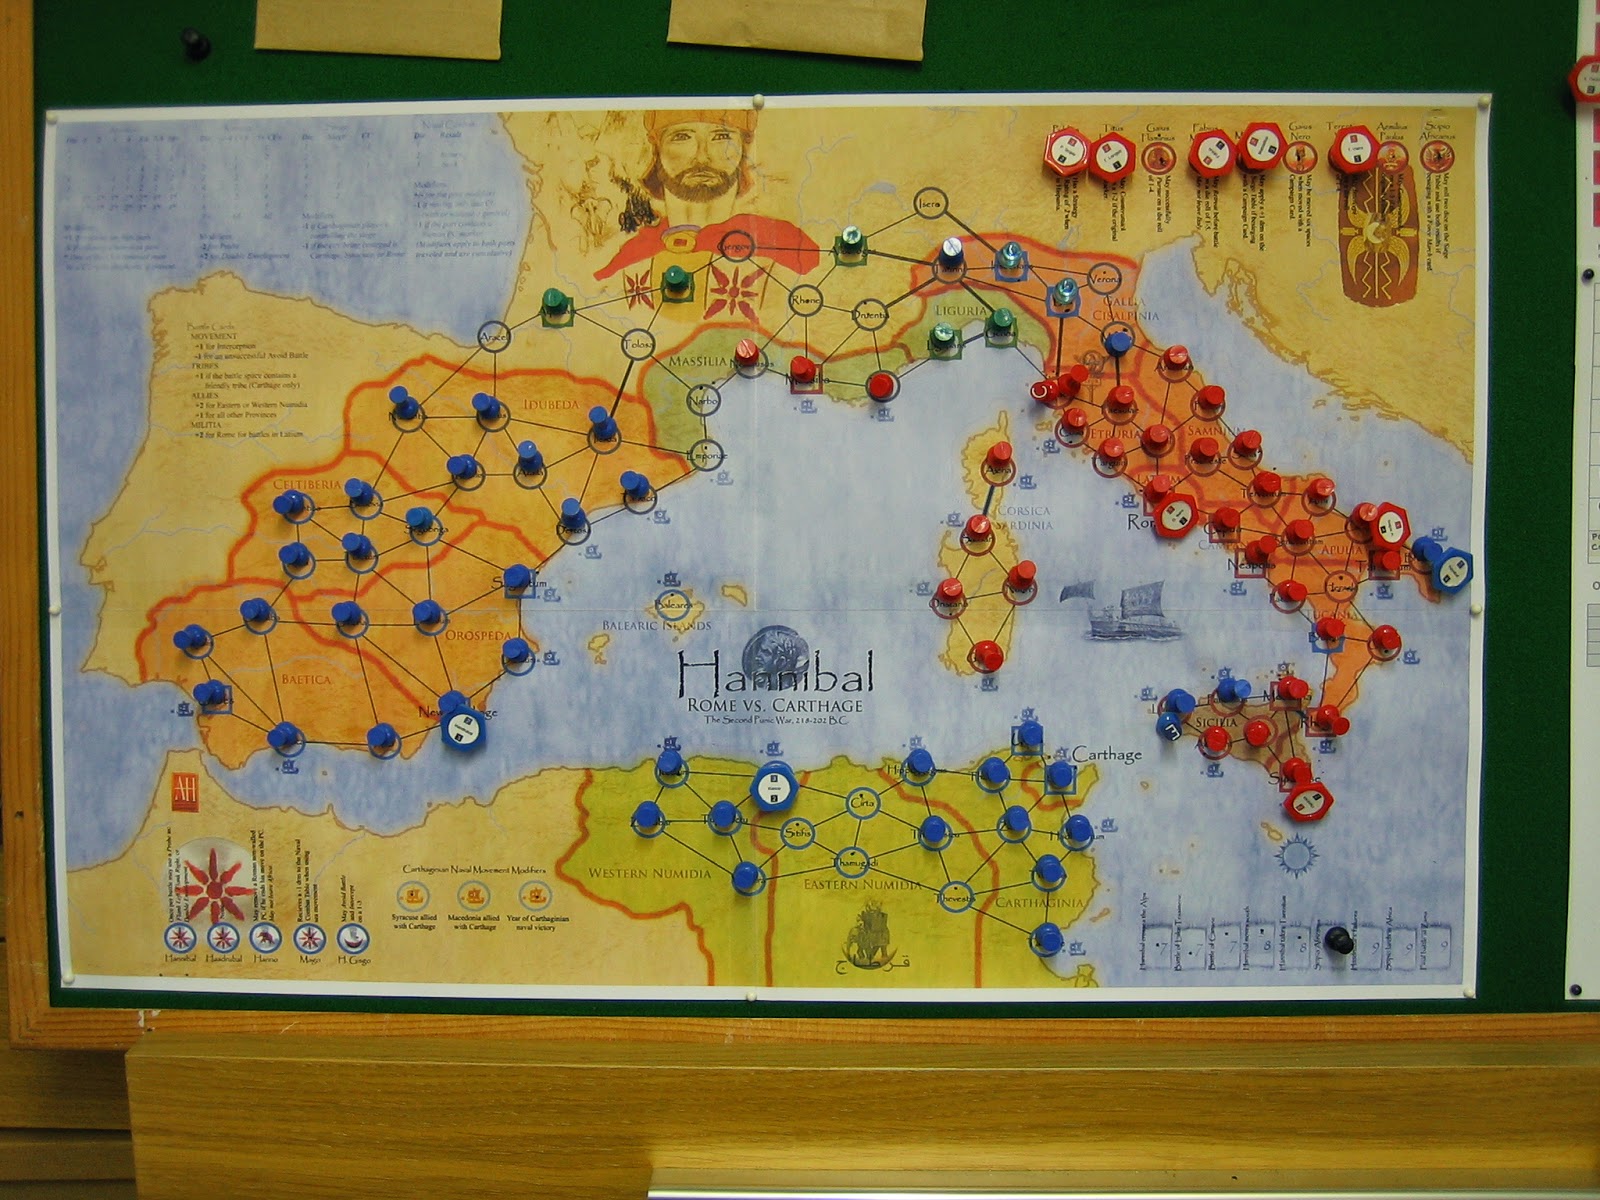
Carthage: Card 57: Hannibal marches over the Alps to Araceli in Gallis Transalpinia. Hannibal's passage is not without cost - he loses 1 CU in the mountains (25% attrition).

Rome: Card 3: Event - Western Numidia Revolts.

Carthage: Card 23: Carthage regains political control over three areas in W. Numidia.

Rome: Card 48: Event - Recruit Auxilliaries. Longus recruits 2 CU.

Carthage: Card 39: Minor Campaign Card - Hannibal and Hasdrubal march to link at Iberus in Northern Hispania.

Rome: Card 24: Scipio sails to Africa. He lands at Carthage. His siege does not go according to plan and he loses 1 CU.

Carthage: Card 33: Major Campaign card. Hasdrubal marches south to New Carthage. Hannibal, the thought of his ignominious reversals gnawing at him, marches to Gergovia in Gallia Transalpinia with 8 CU - is a new invasion on the cards. Hanno marches to confront Scipio at Carthage.


The Situation at the Battle of Carthage. One rectified mistake (not shown here) is that Hannibal has restored his elephant points - elephant points do not count as they do in the board game, they just allow Hannibal to field some elephant units in miniatures battles; elephant units can always be fielded by Carthage in Spain or Africa.

Scipio is massively outnumbered - 11 : 4. The matter of Victory banner allocation has, I think, been resolved. Each side will get 6 banners plus 1 banner for every five units. This gives, for this battle, Scipio 9 and Hanno 14. On reaching zero, that side loses the battle.

Will the terrain come to Scipio's aid? 


The Carthaginian lines - absolutely packed. I offered Peter the option not to field all of his units (within reason) but to take the victory banners attributable to his army size. He refused the offer, asking if if he could keep those not fielded as off table reserves. I said no, so he fielded everything. In retrospect, having thought about it, I should have allowed him to field a balanced force as off table reserves .They could have been 'table sectored' off table and been brought on using inspired leadership cards. As it was, the numbers of Carthaginians worked against them - Cannae fashion.


Rome deployed second, largely neglecting their left table sector. The chips are used as a simple visual aid: Green for light troops,  Blue for medium troops, red for heavy troops. 'Stones' markers on chips show 'blocks' lost (see pics below).

I am currently thinking about a few changes to the make up of the Roman army. I don't like Hastati units being classed as auxillia (I think they should be medium infantry), and I'd like some form of triplex acies rule. If I can come up with something simple for the latter it should go some way to balance the loss of the former, very / over useful, status. This might lead to a re-evaluation of all unit abilities. I did this for hex-less games and it worked well.


Carthage advanced against the Roman left.
Their attack seemed to be developing nicely.
Rome moved to shore up their left against the attack and, for a while, the battle here hung in the balance.
The concerted Carthaginian attack by elephants, light troops and shrieking tribesmen was easily beaten off by the inspired leadership (two leaders were employed by Rome in this sector) and some even better dice rolling - yet again Carthage rolled the proverbial 'bag of the brown stuff'.
At the end of the first nights play the balance of power is shifting towards Rome. Both sides have 6 victory banners left each.
The positions at the end of play. Here on the Roman right the battle has been an enormous skirmish.
In the centre, the skirmish has come to hand strokes - especially around the woods - and the Romans, in terms of 'blocks' killed have come out on top; several Carthaginian units have two or three block (out of four) losses.


The Position on the Roman left has stabilised. The Romans were definitely the winners here but I think the Carthaginians could still turn the tables here.

The battle will be concluded next week.

Saturday 21 June 2014

Scipio Vs Hannibal: Round 2 - On Squexes

 
 The campaign position following our battle of Cannae.

Rome: Card 58: Nero marches to Cannae to transfer troops to Scipio before retiring to Ami.

Carthage: Card 37: Minor Campaign Card: Hannibal marches to Tarrentum. Hasdrubal attempts to sail from Spain to Tarrentum but is forced back to port by the Roman navy.

Rome: Card 27: Scipio attacks Hannibal at Tarrentum.
  
 This battle was set up differently than the others of this campaign. Last week I decided to squex (more of later) the much underused green side of my TSS tiles so that we could play out battles using 'classic' Command and Colors. 
 The Result was an unexpected victory for Hannibal. The victory was due to two things. The first was, as per classic Commands and Colors, both sides were playing to achieve an equal number of victory banners. The second was, being unused to playing the board game as the board game was written, Rome deployed the wrong tactics and didn't cycle through his abundant reserves thus saving the first units into combat from destruction. It's hard to say which reason was the more important, but by the time Rome's fresh units came into the fight both sides were down to just a couple of victory banners and victory became a lottery that Carthage won; I think there is always a temptation with Command and Colors to try and kill something with every card rather than building a proper attack and using reserves properly. As it was, both sides escaped the encounter with minor losses - but Rome was aggrieved.

Carthage: Card 63: Following the battle Hannibal decided to try and make a run for it and prepared to sail for Africa, Carthage, and comparative safety, but the Roman Naval blockade was too close and tight: He failed to sail.

Rome: Card 30: Scipio attacked again. The weather was against him (Carthage plays Card 41, Bad Weather, as an event which limited Scipio to two spaces movement) and Hannibal managed to evade out of reach.

Carthage: Card 61: Hannibal force marched north, moving so fast that he caught Nero at orgy in Ami (Nero is displaced), to Ariminum.

Rome: Card 55: Event, Messenger Intercepted - Rome took one of Carthage's strategy cards.

Carthage: Hannibal moved into Cisalpinia. Hannibal stopped at Insubrians, Gisgo continued on to Taurini.

Rome: Card 46: Event, Allied Auxiliaries - Scipio recruited 2 CU.

Carthage: Card 21: Carthage re-established political control over two areas in Eastern Numidia.

Rome: Card 4: Event, Celtiberia Revolts!

Rome: Card 44:  Event, Allied Auxiliaries - 2 CU recruited in Rome.

Rome: Card 45:  Event, Allied Auxiliaries - 2 CU recruited in Rome.

 
 The situation at the end of the turn. We will start turn 7 next week (just three turns to go).


This will be the next battlefield. I set up the battlefield in between battles to save time. As umpire, I have no idea which generals or forces will be at the battle so it's quite fair. Then, as a double proof of fairness, at the start of each battle each player:

  • Rolls a D6 adding his battle command rating - winner chooses which side. 
  • Rolls a D6 adding his battle command rating - loser deploys first.
As you can see, this table has been squexed with squexes for squex movement. This offset square pattern is not so visually appealing as hexes but, squares are soooo much easier to draw than hexes. I first came across squexes in the ancient naval rules Diekplus by Newbury Rules back in the early 80s. Squexes have always held a curious appeal for me. I frequently use them, especially for campaign maps, because I find they are easier to put information in than true hexes (though they are more frequently Squextangles in this latter case). They are an interesting tool for Piquet 'Theatre of War' Campaigns.

Isle of Fob Map from an Imagi- Crusades campaign based on ideas in Theatre of War by Piquet

Thursday 19 June 2014

The Cardinal Schinner command stand.

The Swiss "Commander-in-Chief" command stand for Marignano is finished. Technically, the Swiss shouldn't have one. Their high command was a committee that, having devised a battle plan, usually split up to lead the various contingents of the army before the battle started. 

But, its nice to have a figure head who stands apart from and above the army's division commanders. Massimiliano Sforza, Duke of Milan, will not serve for this: He was a Swiss glove puppet through whom they mercilessly robbed and extorted every penny they could out of the Milanese. Cardinal Schinner, on the other hand, as a Prince of Mother Church has the gravitas to perform that debatable function - and here, with a cross carrying monk and a high ranking Swiss minder, he is. 


Perhaps I'll try doing a Julius II figure next. I even have a choice of seated characters to convert. Graham H. kindly gave me a "Conference at Yalta" pack last night - Hmmm, which one should I use?

Tuesday 17 June 2014

Monday 16 June 2014

Cardinal Schiner - Something to do on Father's Day.

Cardinal Schiner, more than any other individual, brought about the Battle of Marignano in 1515. He incited the Swiss, who were on the brink of deserting the Duke of Milan, to attack a French army almost twice their number. After rousing them to action with a haranguing speech outside the Cathedral, he rode along side the Swiss to field of battle and, in company with a cross bearing monk, encouraged them in their attack.

So, when I posted my Swiss OOB here yesterday, it didn't come as much of a surprise when Oli posted his comment about fielding a suitable 'Schiner' figure. I was, when he posted, unaware of the Perry Miniatures mounted Cardinal figure. If I had known I might not have already taken the hint and started to covert an existing figure in my lead pile. That was yesterday - Fathers' Day (a day dad's get to do as they please - or so I've heard).


Here is a painted version of the figure I started with. He is a Landsknecht command figure by Wargames Foundry. I already have a few of these and need no more. Having looked at a Cardinal's costume on google, I knew this guy would do.

The first thing I did was to take off his head - Schiner had a very short beard (better painted than sculpted) and that hat would never do. Then I clipped off every piece of redundant clothing with some small, and vary sharp, wire snips; then I trimmed him down further with various modelling knives; then I filed everything down with needle files. 

I think the trick when doing this kind of conversion is to 'round off' every sharp edge to where, where it will matter, the 'human' begins - it helps a great deal when adding stuff on top if there are no sharp edges to pare down to.The only thing I didn't completely remove were his sleeves. I needed to keep a remnant of these to poke out from Schiner's habit.

After filing, I glued a new head on him and him to his horse. This figure is a one off, there were no casting issues, so I could sculpt him to his horse. I could use the horse as a 'hard handle' during sculpting. 

His head is from one of the new W. Foundry renaissance arquebusier sculpts (...less said...). 
The rest as you can see, was a doddle. 

Milliput clothing is fairly easily applied with a sharp blade and various pin shaped implements.

A filed down shield for a hat brim (Perry Islamic Crusades range shield) saved a lot of faffing around. It has a Milliput top and 'tassles'.
 The habit with shoulder cowl was common dress for 16th Century Cardinals, as was the wide brimmed hat with thick cords and 'pom-poms'. 

Flowing robes are much easier to do than tight, or stylish, clothing. There was no equipment or weapons to do.

I'm not very good at this kind of thing, but even I can manage a simple figure conversion like this.

The hat cord is a piece of simply wound brass wire from a tag on a posh (over priced) candle holder: Waste not, want not.

Note the nose extension. Schiner had a nose you could ski jump off!
And here he is, giving his blessing, with his cross bearing buddy. The latter is from the W. Foundry Conquistador range (I think).

When painted in red, I think this figure will do very nicely. As soon as he's done I'll post a picture.

Sunday 15 June 2014

First thoughts on the OOB for Marignano 1515 - The Swiss


Firstly, thank you to everyone for leaving useful comments on the last Marignano post and for the several more detailed emails you have sent to me. Several had one thing in common - the Swiss army might well have been bigger than the one described by Oman in his The Art of War in the Sixteenth Century. The new numbers seem to come from more modern Italian sources (Oman published his book in 1937). Unfortunately, not speaking Italian, they are books I can't read. It also seems to be the case that the pike squares were probably fairly equal in size.

I cannot vouch for the new numbers but I like them. From a game design and spectacle point of view they provide for a much more equal fight and unit breakdown. However, some of the numbers I've been shown are huge, one having over 24,000 Swiss. I have decided to split the difference between the 'accepted' new number (about 21,000) and Oman's maximum (15,000). I have decided on approximately 18,000 Swiss plus some guns and Milanese horse.

SWISS ARMY

18,200 Swiss infantry – 364 figs, 50:1
800 Milanese Cavalry – 16 figs, 50:1
10 to 20 guns – 2 light guns, 10:1

Advance Guard – Enfants Purdus
Arquebus
24
Halberdiers
16
Swiss Van
Swiss pike
96
Swiss Arquebus
12
Swiss Main
Swiss pike
96
Swiss Arquebus
12
Light guns
1
Swiss Rear
Swiss pike
96
Swiss Arquebus
12
Light guns
1
Maximillian Sforza
Men-at-arms
8
Mounted arquebus
8


The Swiss pike in their squares of 96 pikemen with some attached skirmish shot. Excuse the French flags on the first unit. As you might know, all of my flags are on aluminium tubing and are fully interchangeable. I just need to paint up four more Swiss flags. These flags will probably end up on the poles of some French Landsknechts. 

How to do interchangeable flags link:

http://olicanalad.blogspot.co.uk/2010/07/top-tip-flags.html

Also note the mix of manufacturers here - Foundry and Old Glory (and the odd TAG figure) pike, Front Rank (and the odd Foundry Conquistador) shot.
The advance guard, the enfants purdus, again of mixed manufacture. I really like the idea of this group of 40 figures. They will start almost upon the French position and, in the very early stages of the game, give Bourbon something to think about whilst the Swiss pike deal with Flourange and come into the fight.

In the background are two light guns. Most give the number of guns at around 10. However, they seem to have gone in dispersed, so I have given the Swiss 20 guns (2 models) but I will lessen their effect by making them light.
The Milanese horse. It is thought that Sforza might have had 200 - 500 men-at-arms. As any that have read my comment on French Lances (see French OOB - comments) I'm at a loss as to what this means - does it mean total cavalry or Italian Lances? I have decided to call it 200 lances (400 heavy cavalry) plus a number of lighter 'archer types'; in this case I have decided to make the lighter types mounted arquebus for a little variation and to match my figure collection to the OOB. I've given Sforza a grand total of 800 cavalry.

So there we have it. My first thoughts on the Swiss. I look forward to your further thoughts on this prospective army list.


Saturday 14 June 2014

Cannae or Can'tae

Following his defeat, as he marched by Rome, Hannibal looked vulnerable to being crushed. Things did not pan out as I expected.

Rome: Card 12: Political control of Pisae and Croton.

Carthage: Card 14: Event, Ligurian Recruits - Hannibal adds 2 combat units (CU).

Rome: Card 16: Marcellus (pro-consul) moves with 4 CU to Syracuse and a siege is successfully begun.

Carthage: Card 19: Event, Pro-consul Dissmissed - Marcellus is relieved of his command.

Rome: Card 64: Flaminius moves to Syracuse with 4 CU and the siege is successfully continued.

Carthage: Card 35: Event, Diplomacy - Political control is negotiated over Brundisium in Apulia.

Rome: Card 5: Syracuse lamely submits and Flaminius enters in triumph - back in Rome Marcellus 'The Besieger' plots his personal revenge; Flaminius must have been behind his dismissal.

Carthage: Card 50: Event, Adriatic Pirates - Hasdrubal sails for Brundisium onboard a fleet of fast pirate ships with 3 CU. Because of the straits he lands out of reach of Flaminius.

Rome: Card 51: Event, Epidemic - Hasdrubal's army falls victim to sickness but casualties are minimal (no effect on CU).

Carthage: Card 6: Hannibal marches south to Terventum.

Rome: Card 53: Political control take of Falerii.

Carthage: Card 2: Hannibal marches to join his brother in Brundisium.

Rome: Card 11: Political control take of Nice.

Carthage: Card 40: Minor Campaign card, Hanno moves to Saldae and prevents Roman control. Hasdrubal boards his ships again (without CU) and sets sail for Spain. The Romans are waiting for him and his fleet is dispersed (Hasdrubal is displaced).

Rome: Card 42: Political control take of Nemausses in Massilia.

END OF TURN: Rome had the worst hand of strategy cards I've ever seen. Her temporary advantage was lost.

TURN 6: 211 BC - 210 BC

Flaminius is made pro-consul.
Scipio Africanus is made pro-consul and marches to Cannae with 5 CU.
Paulus and Nero are elected as consuls (placed in Rome).

At the start of turn 6 the strategic position is as follows.


Carthage: Card 7: Hannibal marches to Cannae to do battle with Scipio.

Hannibal has 7 CU plus 1 CU for allies in Italy.

Scipio has 5 CU plus 3 CUs for allies in Italy and a 'Brown Card'. (We have decided that strategy cards with a brown banner can always be used as an extra CU in battle - they can, of course, be used as something else if a suitable argument can be made). 

As battles go, this one was not the most exciting. Also Peter could only play on the first night (on which the all campaign moves above were made) and I had to finish it off for him in a short session on the following night. The resulting campaign consequences were also negligable (both sides lost 2 CU). The report is a shot one.


 Initial deployments. Note that Hannibal, having been reinforced from Spain, has elephants again.
 Light troops clash as the Romans rush forwards.
 Elephants advance onto the flank of the legions. Elephants were used well, for once, in this battle and caused much damage.
 The infantry clash was fairly equal for much of the time as each side traded victory banners almost 1 for 1.
Then the luck went all one way. The Romans dispatched unit after unit without significant loss to themselves. The surprising thing about the Roman victory was the number of units which were only one 'block' away from being destroyed - of the 12 or so remaining Roman units more than half had only one block remaining.

Hannibal retreated back to Brundisium.

Next week we will all be back to the continue the campaign.

Wednesday 4 June 2014

First thoughts on the OOB for Marignano 1515 - The French

Graham H. moving even quicker than the Swiss at Cerignola
In the last couple of weeks I've been going through my sources (my 16C book list) to settle on my order of battle for Marignano 1515. I have chosen to base my game on two books in particular, Oman of course, and the booklet "Marignano 1515" published by the Lance and Longbow Soceity.

I have decided, for no particular reason other than the lead soldiers I have available, to plumb for a figure scale of 1:50. So far, I think I have settled on the raw numbers composition of the French army. 

I would ask that you look at it, and if you have information that I don't, or an idea I've not had, to let me know about it. OOBs in this period are largely a matter of educated guesswork and feeling rather than historical documentation, so if you 'feel' otherwise please, let me know.

FRENCH ARMY

10,000 cavalry – 200 figs, 50:1
20,000 infantry – 396 figs, 50:1
72 guns – 6 gun models, 12:1

Florange
Gendarmes
8
Archer (heavy) cavalry
8
Mounted crossbows
16
Stradiots
16
Bourbon
Gendarmes
32
French crossbows
72
French pike
72
Guns
6
Francis I
Gendarmes
48
Mounted crossbows
16
Mounted arquebusier
8
Landsknecht pike (Bandes Noires)
120
Landsknecht pike
72
Landsknecht shot
12
D’Alencon
Gendarmes
24
Archer (heavy) cavalry
16
Mounted crossbows
8
French crossbows
48


Surprisingly, I need to paint up very few figures for this army - 12 Landsknecht pike, 60 crossbows, 8 Archer cavalry, and 16 Mounted crossbows - all of which are in my stock cupboard. Even more surprisingly, I don't think I'll need any more figures for the Swiss, but I'm still working on their OOB so we'll see.

Actually, I have a question about the Swiss that, perhaps, one or two of you might have thoughts on: Were the three Swiss pike squares equal (-ish) in size or was the mainward larger than the other two at Marignano? I ask because in Sides', Renaissance Battles 1494 - 1700 Vol 1, he puts the mainward at twice the strength of the other two. The Swiss had used unbalanced pike squares in other battles but is there evidence for this at Marignano?