Friday, 29 October 2021

I'm thinking about monetising this blog.

 Hi Guys,

I'm thinking about monetising this blog. I don't know if this would change your thoughts about being a subscriber so I'm asking the question.

When I started this blog it was a wargame diary and the amount of hits and followers didn't bother me much. It's a still a wargame blog and as such will never constitute a pay packet but, monetising might put a few quid into the coffers for future posts, if you get what I mean. 

I doubt the sums involved would be sizable but frankly when it comes to hobby spend anything would help right now. Any proceeds from monetising would be ring fenced for gaming purchases.

Leave a comment, as a subscriber or otherwise, on how you would feel about this: Pro or Con.

If the general feeling is neutral or better I'll do it. If definitely anti I will not do it.

It's your choice on this one. 

Regards,

James


Thursday, 28 October 2021

Humpback bridges, cheap and cheerful.


Having made about seventeen feet of stream some time ago I needed some bridges. I decided on three. They needed to be small, so simple humpbacked bridges seemed the best route. I chose to go simple. I chose to go cheap. I chose to play a trick. Then I built them, fell ill and didn't post this as originally intended - fortunately I remembered to take the memory card out of my camera so that I didn't accidentally erase the pictures; erasing pictures on the camera card is something I do regularly to speed up the find and download process.

You don't need many materials or tools to make these things, and those materials you will need are useful for many other things - so no pointlessly wasted materials left over. Cheap as chips - £0.50 each, tops.


Biggest cost can be seen here, 5mm foam board. But, it has so many uses that you'll use what you don't use on this job for others - zero waste here.

Having marked out the sides of the bridge using a set square, ruler and a compass onto 5mm foam board I cut the shapes out using a surgical scalpel with a 10A blade. 

Note that the bridge was deeper than this when it was drawn: It's had about 5mm cut off the bottom; that's where the compass point at the centre of the circles was located. The arch isn't quite a whole semicircle.

My stubby handled size 10 scalpel is probably the most used tool I own - I use it for just about everything because the blades are much cheaper than craft blades, and if you mutter to yourself whilst you work, it's funny to say "Scalpel, nurse." once in a while.

If you are watching carefully you will have noticed the trick I'm about to pull already. Can you see it yet?


Edit for RichardL: Easier said than done now they are made but, approx dimensions are: Length 120mm. Height 40mm. The lower arch at waterline is 40mm across. The arch corresponds to the width of my stream and it is that wide for no other reason. Just do what feels right for the water you want to cross. If the river is much wider you may need two or more arches like this one I made some time ago.


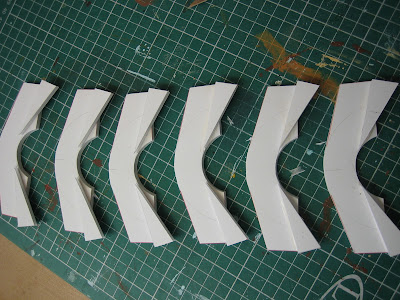
I didn't throw away the angles from the top of the bridge walls as these will be used....
...to make the ramps that will support the roadway. 

The trick is obvious now, isn't it?
Whilst the roadway support ramps were drying, I cut out my 2mm MDF bases to match my stream basing. 

This is another outlay similar to the foam board but, again MDF is such a useful thing to have around the place.

BTW: To buy quite small pieces of 2mm MDF look up picture framing supplies - it's used for backing pictures.
I cut the excess off from the road ramps and now the basic structural work is done.

Got the conceit I'm planning. Surely you see the trick now?
I added my stream texture, and two strips of foam board to the basing. These foam board pieces will stiffen the bottom of the lower arch and keep its sides straight at water level. (See second picture down: That picture shows how these strips work).

You can see that I do my footprint plans bold, using a fine felt tipped pen. The "52mm" is to remind me how wide to cut my roadway. 

Also note that before I did the water texture I masked off the areas where the bridge will sit. This needs to be flat.


The lower arches, made from thin card. I actually used cartridge paper in this case but, anything from old Christmas cards to cornflake packet is about right. 

The pins just hold everything in place whilst the glue dries.
Now here is the big fudge: The conceit that makes these bridges work. 

The problem with wargame bridges is that they usually have to go over water that is above ground level. Obviously, 'in the wild' streams flow a few feet below the level of the surrounding ground. This means that the arches of a wargame bridge, to look right as arches, actually have to be higher above ground level than they should be. This causes a problem for the modeller. Either he has to have bridges with an incredibly steep roadway or he has to make bridges overly long to make the road gradient less steep.

I have done neither. My conceit is to lay the roadway directly over the lower arch, thus reducing the overall height of the roadway by 6mm - 7mm. Thus, the bridge can be short and the road gradient shallow. But, the level of the road is lower than the stone arch on the outer wall of the bridge that is supposed to support it. That's the trick! The eye will be tricked by not being able to see both the outer arch and the roadway at the same time. It's so simple, it's downright stupid.

Because I was using cartridge paper I did my roadway three layers thick, one applied after the other. If I had used Christmas cards, two layers would have sufficed. The last layer went over the base edge and was trimmed flush when dry - only do this with the last layer; cut the other layers shorter, as in the picture above.

After doing the brickwork using thin balsa wood (bricks and arch-work) or mounting card (top stones on the walls), and texturing it and painting it with household acrylics (Dulux emulsion paint), I coated the roadway with a strong mix of plaster filler and PVA / water (1:1).
I painted the road, adding a few rocks and some 'verge' to the inner surfaces, and based and painted the stream to blend into my streams.
Here the conceit of the roadway is explained. The eye doesn't see the relative heights of the arch and the road because it can't see where they join. It is tricked completely.

One last point. Most humpbacked bridges have a splayed entrance, the roadway being wider at the entrance to the bridge and narrower in the middle. This is actually very difficult to do and causes problems when it comes to cutting the shape of the roadway. To make things simple for myself, I chose to ignore this facet of a humpbacked bridge completely: K.I.S.S.


Tuesday, 26 October 2021

A Scenario based on The Combat of Moys 7th September 1757

Firstly, let me say that I'm glad to be able to post again. I've been quite ill with Covid, even having been jabbed twice. Now I'm able to post again, and work for the first time in nearly a month, I'm feeling much better about things.

Looking towards the Galgenberg.

The first game here after the hiatus will be a scenario based on The Combat of Moys 1757. 

Rather than detail the battle, here is a link to an account of Moys, on Kronoskaf: Seven Years War Project.

 Looking from the Jackalsberg.

Suffice to say, a detached Austrian corps from the army of Prince Charles of Lorraine has been confided to General of Cavalry Nadasdy. With it, he will make a surprise attack, in overwhelming numbers, to crush the corps of General Winterfeldt which is isolated from the rest of the Prussian army on the right bank of the Niesse at Gorlitz.
There are several maps of the action, all slightly different. I think this one is one of the better ones
because it doesn't show the defensive canal that Kronoskaf shows (and details in its text).
Personally, I don't think this canal was there in 1757 (I believe the map was surveyed in the 1870s).
If it had existed I'm not sure the action could have happened as it did: I might be wrong, correct me if I am.

The table (10'6" x 6') is a nice one with several points of interest.
The three villages of Moys (left), Leopoldshayn (top right) and Hermsdorf (right) are nicely positioned for a game.
and the brook (right) and Rothwasser (left) make a nice 'frame' for the action. The Jackalsberg redoubt, being small, is also game perfect. 

The table I have set up is not a true representation of the terrain: The terrain features have been squeezed together to give an impression of the terrain. 

The Austrian main force.

Hermsdorf should be off table but, as the brook is quite well populated with houses along most of its length (on all of the maps) it felt appropriate to move it closer to Leopoldshayn: The gap that opened between the Austrian right and Hermsdorf as they advanced on Moys is key to the narrative of the combat; so, Hermsdorf had to be moved to where the players can see it. It is still tucked away from where the action will take place so I can't see any problem arising from this shift of position.


The Prussian main force on the Langeberg.

The Niesse is also on table when it should be much farther back (off table). Again, it was added to help the narrative: It gives something for the Prussian reserve to be held behind before they are activated. 

The hills are a simple representation of the high ground without the 'summit knolls'. Having taken a virtual drive around the battlefield on google earth, keeping a watchful eye on the altitude gauge, I'm fairly sure that apart from the Jackalsberg, none of the hills have steep slopes and are, for the most part, flat topped.

The double ridge which held the first and second Prussian positions has been amalgamated into a single ridge: The former ridge is superfluous to the action and objectives - what's one more hill to a Yorkshireman? 

Prince Carl Bevern takes command of the Jackalsberg as
Arenberg's grenadiers advance.

A third battery, not shown on the map above and little mentioned, was apparently situated on high ground directly south of the Jackalsberg. I have added the battery but made it virtually impossible for it to shift position by adding a small lake (pond) and the Birkenbusche: It is in range of the Jackalsberg and the southern outskirts of Moys.

Moys.

The position of the Birkenbusche (Birchwood) is different on all of the maps, as is its size. I've added it to stop the third Austrian battery from moving: apart from this it should bear very little on the action.

The area was littered with several small lakes or ponds. I've added some of these purely for visual effect. Except for the one that prevents the third battery moving, they can be ignored and moved about as required.

The banks of the Rothwasser (running past Moys) and the brook (running through Leopoldshayn and Hermsdorf) were both heavily foliated by trees (pussy willows) and numerous small holdings. Consequently, they limit line of sight like woods (to 4") and provide cover to troops on their banks.

In short, my table is a deceit designed to help the combat run as a scenario.

Petazzi's Light troops advance on Leopoldshayn.

I have scaled down the troops to my big battle scale. In this I use one unit to represent two battalions of infantry, ten cavalry squadrons, or a battery of heavy guns. Odd numbers are represented by either increasing or decreasing the units battle quality by one level as required / thought best. 

This scale makes most SYW battles manageable but still provides enough units to make up the proper command groups (divisions) and their correct general deployments. 

To get the battle going quickly, I have rated the quality of all units and commanders by 'Umpires Decree' - the players will not roll to randomly determine these.

The third battery, overlooking the Rothwasser and towards Moys.

The following objectives for victory have been set for the Austrians: Take the Jackalsberg, Moys and the Langeberg. Alternatively, destroy the Prussian army and force every one of its units (except uncommitted reserve units) off table. The Prussians need only defend the key objectives until sunset (end of turn 8) to win. The bar has been set high for the Austrians because they have such an overwhelming numerical advantage. 

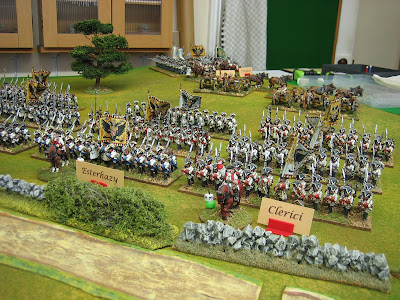
The serried ranks of Austrian infantry - an impressive sight.

We will use my Men are Like Lemons SYW rules. Three special rules will be in operation:

Austrian Reserves: This command can be activated at any time. If the Austrians activate Forgach's command group the best result they can achieve is a draw.

Palffy's Command: On the appearance of the Stratagem card, Palffy's command may be activated to arrive on table behind the Rothwasser. After activation it will arrive on the appearance of the player's next Major Morale card.

Prussian Reserves: If the Austrians take the Jackalsberg or any part of Moys the grenadiers can be activated. If the Austrians take the Jackalsberg and any part of Moys, or put troops on the Langeberg the musketeers can be activated. These are the troops dispatched by the Duke of Bevern from Gorlitz as he slowly grasped the scale of the Austrian attack.