Tuesday 17 September 2024

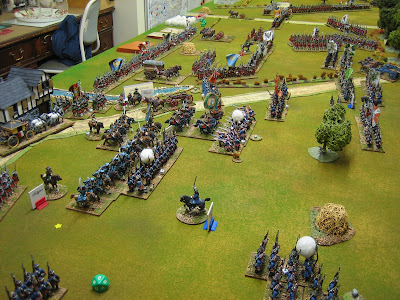
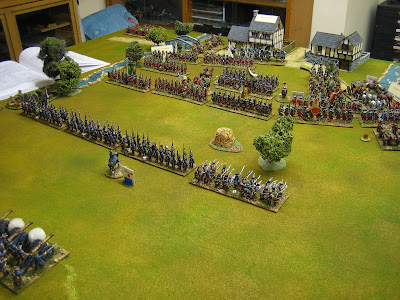
Combat at Reichenberg 1757

My main source for this set up was the Kronoskaf SYW project aided with maps from volume 1 of Horace St. Paul and the Campaigns of the Austrian Army in the Seven Years War by Neil Cogswell.

Because my information isn't as complete as I would normally like, this set up has been a case of making the shoe fit. In consequence, I had half a mind to call this set up 'Combat at Reichenbrogue'. However, I think it's close enough to pass muster under its historical name - though I'm always happy to be corrected if I've got it all wrong.

The battlefield (12 x 6 table) covers the area between Reichenberg in the east (bottom left), westward along a spur of the Schwarzerberg (called the Jeschkengebirge on Kronoskaf) and the village of Franzesdorf to the forest on the eastern slopes of the Schwarzerberg itself (top left). The river Neisse separates Reichenberg from its outlying 'suburb' of Rosenthal and the rest of the field.

The Austrians are defending this line in some force and have established several entrenched and barricaded positions along it. The Prussians are attacking from the north.

The high ground in front of Reichenberg is held by two battalions in an entrenched position.
The spur of the Schwarzerberg (shown as three individual heights on the St. Paul maps but as a long spur on the official German survey map) is defended by 7 infantry battalions, 11 companies of grenadiers and 3 batteries of artillery. In reality, only 1 battery was in the redoubts and entrenchments and the other 2 were in reserve on the reverse slope but, given that the Austrian player would immediately order them forward I saved him the trouble and placed them in the redoubts to begin with. Edit: I've actually changed my mind about this, put two batteries of guns on the reverse slope and shortened the two outer redoubts so that there isn't enough room for the guns and infantry to be in them together. Otherwise, the Prussian infantry will get (un-historically) slaughtered as they move up.

Rather than have individual heights I decided to put a saddle in the spur. Here the Austrians deployed 11 squadrons of cuirassier and 10 squadrons of dragoons.
In the forest, positioned behind barricades and abatis, are a battalion of grenzers and 2 battalions of infantry. On the road I have placed 2 battalions of infantry advancing from Gabel - this was for the picture, showing their arrival point, but they will start the game off table and arrive when activated (dice rolls, etc.).
The Prussians have advanced from the west and swung into line facing the Austrian defences from the north. Their main infantry force comprises 8 battalions of infantry, 3 battalions of grenadiers, 2 battalions of fusiliers and 2 batteries heavy of guns.
To oppose the Austrian cavalry the Prussians have advanced 15 squadrons of dragoons.
5 squadrons of hussars secure the Prussian right wing.
The entrenchments require some explanation and definition. In truth, these were designed with bastion like angles to cover every approach. This (because I use square bases for my figures) is always difficult to represent so I find it easier to 'square off' the redoubts and give them much better fire angles: troops within have a 180 degree frontal arc measured from the back of the position. Whilst defending the occupying units fire separately, measuring from the redoubts nearest point and choose which unit (infantry or artillery) will defend in melee with the result applying to both; the attacker can choose which unit it wants to target with fire. Redoubts are hard cover. In front of the entrenchments the Austrians had dug wolf-pits (these were covered traps - deep holes with spikes at the bottom) which will cause disorder to attacking troops. The barricades in the forest (most likely abatis - which I don't have terrain pieces for, so I've used my 'temporary barricade' pieces and cheveaux-de-frise) are treated in a similar fashion but they are soft cover and have no wolf-pits.


Zorndorf Battle Report 2

On the western flank, below Wilkersdorf, the cavalry battle raged on with the Russians finally gaining ascendancy.
Whilst, in the centre, the Prussians began to take up positions from where they could assault the Russians beyond the Stein-Busch and the Russians made preliminary moves to oppose them. 
Manteuffel continues his attack against Saltykov's troops between the Galgen-Grund and Zabern-Grund, then Gaugreben's cavalry intervene....
...with some success and the onslaught is temporarily halted....
....until Manteuffel's hard pressed grenadiers are reinforced by Marschall's dragoons.
In the centre, Galytsin's infantry secure their open flank on the Galgen-Grund and in conjunction with the Observation Corps launch a counter-attack against Kanitz and bring his advance to a halt.
At this point, Dohna's infantry march from Zorndorf, pass through the Stein-Busch and pour vollies into the open flanks of the Observation Corps. The action is now pretty much general along the entire front. The advantage swings back and forth with the initiative and both sides are nearing their break point.
The Russian advantage still lies with the cavalry under Demiku but they can't bring the Prussian morale points down quickly enough with what he has left.
In the eastern sector it is all up for the Russians: The Prussian cavalry is stacking up for the kill.

In the centre the action is becoming especially fierce but, it's all up. The Prussians win with a difference of plus nine morale points. 

The battle was hard fought throughout but Manteuffel's one sided local victory in the first session probably decided the issue - the Russians never recovered from the stack of morale points they lost there.


Sunday 8 September 2024

Zorndorf - Battle report

This game was set up three weeks ago. Unfortunately, players had commitments and we were not able to meet until last Wednsday night. In the first session we completed three turns - here is the report.

The Prussians opened the battle with a two hour preliminary bombardment: The Prussians chose six units of Saltykov's infantry and inflicted d3 unit integrity losses on each.

But, it was the Russians who advanced first: Demiku advanced his cavalry, supported by Cossacks, and they were met in the open fields below Wilkersdorf by Schorlemer, who in turn advanced to greet them. A ding-dong, back an forth, cavalry clash is about to happen and it will last all evening.  
On the eastern flank, Manteuffel's strong line of infantry (mostly grenadiers) advanced on the many lines of Russian infantry between the Galgen-Grund and Zabern-Grunds. The Prussian artillery, lines of sight now blocked by their own infantry are made redundant. 

What is about to happen here comes as a shock to all.
The contestants exchanged several volleys of musketry. The Prussian fire was lethally accurate - the return fire was desultory in comparison. The Russian first line, which had already reinforced by their second following the artillery bombardment, began to waver and crumble. 
Seizing their chance, the Prussians advanced to contact. They had rolled even on a Move card and the Prussian grenadiers crossed bayonets with their foe.
The Russians collapse!
At the end of the first evening's play, Manteuffel's attack has (so far) been a complete success

It was aided, it has to be said, by their far superior sequence deck - integrity loss and so forth was rallied on successive Leadership cards, whilst the Russians failed to daw a single Leadership card on which to rally their crumbling lines.
Following the success of Manteuffel's attack, the second line of infantry under Kanitz moved to attack Galytsin's infantry beyond the Stein-Busch wood.
The Russians have not been wholly inactive. In support of their western cavalry advance, parts of the Observation Corps have gone forward. 

You might also note Seydlitz's four cavalry regiments emerging from behind the Stein-busch.
Looking west the disjointed (to my mind) advance of the Observation Corps can be clearly seen.
Seydlitz's cavalry which, having rolled three 'even' moves on two successive march cards, has moved from east to west (a combined move of 72") behind the Stein-Busch and deployed from columns of squadrons into lines. Historically, he actually did this but, historically much later in the day (after stabilizing the eastern sector which historically had not gone in Manteuffel's favour).

Note: Because of my big table (6' x 14' 8") I have increased rule measurements by 50%.
At the western end of the field the cavalry battle played out for most of the session. Casualties on both sides were heavy. At first, the melees went for the Russians but, yet again, the Leadership cards told: The Prussians have five in their deck, the Russians only have three and the Prussians got to turn theirs where the Russians failed to do so (two turns ending on same initiative rolls). 

The Prussian cavalry's counter strikes stabilized the situation - honours were about equal.
And that was where the session's action finished. We will meet to complete (hopefully complete) the battle next Wednesday evening. 

Another shot of Manteuffel's infantry - heroes of the hour.
As yet not fully committed, Kanitz's infantry.
From behind the same, showing the uncommitted Russians beyond. The Russians are in trouble but, this is a Piquet battle and is not done yet.