
In what feels like a new era, I decided to put on a Crusades game using To the Strongest (with some house amendments). Partly this was to get some new stuff on the table. Some new units and some new terrain.
On the new terrain front, this game will centre on a large Saracen town being assaulted by the Franks. Since last reporting on building progress I've added two or three general town sections and 'grand mosque'.


The Armenian force has increased dramatically: I've increased the number of infantry units from four to eight and added a unit of Armenian heavy cavalry. It's now a full contingent.
 The Saracen relieving forces. A Seljuk command with two deep 30+ figure units of Mutatawia infantry (one of them new). A Turcoman command. Before Graham deployed his flanking Frank forces, Mark chose which Saracen force would arrive on which flank (the black/red aces correspond to cards at each flanking road entrance).
 Two new units of Adhath glaivemen formed part of the town's garrison. The glaives were made out of heavy white metal spears: the heads flattened, trimmed with clippers and filed; the spear heads on the figures were cut off at the top hand then the hand was drilled to take the glaive head.
 Among the Franks are two new small units of dismounted knights.
 I also made a siege tower. This is basically MDF. Although I don't have a curtain wall for the town I decided to call the outer face of the town as such. The tower allows easier activation over it.
 The grand mosque. It stands on a low rocky outcrop. I made the dome using card fins and a paper skin.
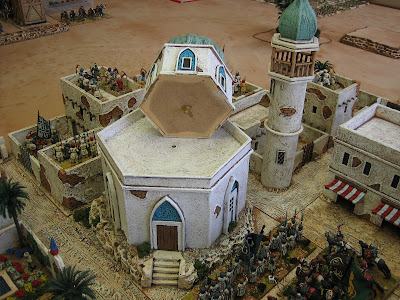 So troops can be put in/on it, I decided to make the upper tier removable.
 Two of the new town sections.
 These were made with removable wall pieces so that they have more versatility.
 Graham deployed the Armenians to his left and the Order troops to his left - the advance begins.
 It gets to the wall in impressive time. The drawbrideg on the tower is dropped (it has small brass hinges pinched from a small wooden box of disgustingly cheap liqueur chocolates I got for Christmas).
 The Franks force their way into the town with ease.
 Seljuks and the Bro's clash. Order troops are soooo good. The Saracens do not fair well in the initial exchanges. Note the depth of the Mutatawia units - this is three stands side by side.
 And the Turcomans, led by their cavalry, have arrived. They shoot volley after volley to little (zero) effect.


Next week Mark can't make it so I'll take the Saracens (to their doom).
To be continued....
13 comments:
Great looking table - the troops, the town, everything. Thanks for sharing
Wow, that table and your armies look amazing. Love era siege tower. We've had some good games uses TtS so I'll be interested in reading your AaR. What mods did you make?
Peter
A splendid collection and a grand looking table! I really like the Grand Mosque, very well done there!
Great looking table , terrific work on the giant mosque it looks great , how you did the onion domes is superb.
Great looking table , love the grand mosque I am going to attempt to copy your design.
The domes. Draw a circle the size of the dome's base and equally section it into sections radiating from the centre (using a compass or a protractor) then cut it out - this is your dome base with the fin positions marked out. Draw out a master radial fin template onto stiff card and cut it out - fins are the skeleton of the dome. Remember to make its base slightly shorter than the radius of the base because the fins can't go to the centre, there needs to be a spot/hole around which all the fins will sit when in position - I used picture frame mounting card for the fins and base. Then, using the master template make one fin for each radial. Glue them into position. Next get thick paper (I used good quality artist's sketching paper) and cut a panel big enough to stretch from one radial fin to the next: glue into position with PVA and carefully trim it at the fins, then do the next. Next, before it all dries, go to where the paper panels join and liberally coat with PVA and, using the handle of a brush, rub the paper panels at the connecting fin until the join is invisible. Repeat until the dome is panelled out. Then you will need a spike, or bead to go on the top to fill the spot/hole around which you positioned the fins. That's it, a simple, boring job but, effective.
Sorry, forgot to mention - before you cut the paper panels, seal one side of the paper with PVA (the inner) - so that it is less likely to shrink or expand when it's painted. Before painting, I also sealed the outside of the completed dome with two coats of PVA (for added stiffness/strength).
Oh wow, that's a fantastic looking setup.
The Town looks splendid but not sure th eFranks would've dragged a siege tower along for it.
I second Ray's comment/opinion. In my version however, the WOW would be in caps.
Have you ever considered starting a YouTube or Patreon channel? I think it would be great to see 15-20 minute tutorials regarding your terrain or painting, or summaries of tabletop battles.
Great set up and splendid building work. You have a very enviable collection and wargames room!
Looks fantastic! What a collection.
Inspirational James, as so often on this blog. I was also impressed by a seige-style game that didn't bog down but was apparently full of action.
Post a Comment