Thursday, 29 March 2018

"Your Majesty, the Oder belongs to the Russians!"


This scenario is a river assault game set in the Seven Years War. The year is 1758. 

The game gives me the chance to use my new 'wide' river sections, pontoon train and pontoon bridge sections. I have to say, games involving engineering tasks are usually a lot of fun. The pontoon train and bridge cost less to buy than a unit of troops and probably took about the same amount of time to put together for the table; as a cost to fun ratio it definitely works for me.

We will use our amended version of Piquet to play the game. Piquet's unique turn sequence and unbalanced initiative system works well for this kind of scenario - it also has inbuilt rules for engineering ('Sapper') tasks.


General scenario outline:

The Russians have once again invaded Prussian territory whilst the bulk of the Prussian army is away in the south facing the Austrians. They have taken up positions on the east bank of a big meander in the Oder river, guarding the bridges, in order to defend their territorial gains until further instructions arrive from the Empress. 

The Russian game objective is to hold the two towns and their bridges. They might also wish to consider disgracing the Prussians by taking either of the small hamlets (on the Prussian baseline) and holding them for a complete turn in the presence of the Prussian army. Although the Russians will suffer a defeat if they lose either town, they can automatically claim a scenario victory for taking and holding a Prussian hamlet because of the political and morale damage this will have done to Prussian prestige (not to mention the local Prussian commander's career prospects).

Note: Offering the Russians the chance of victory by attacking (the hamlets) was done for two reasons: It gives the Russians more options than to simply hunker down and, more importantly, it should prevent the Prussians simply massing in one place to bring overwhelming force to bear at a single point.


On hearing the news that 'the Oder belongs to the Russians!' King Frederick has sent peremptory orders to counter-attack with the forces immediately available and force the Russians back on their bases in Poland. The local Prussian commander is under no illusions: The Russian advance is an affront to Prussian prestige and further Russian incursions will not be tolerated.

The Prussian objective is to take one of the towns. This will dislodge the Russians and force them back into Poland. Attempts must be made to prevent any further incursion into Prussian territory (the hamlets on your baseline are Russian objectives and should be be defended - see Russian objectives) as any such incursion will incur the wrath of the King and your personal disgrace.

Note: I added two Sapper Task cards to the Prussian sequence deck for activating checks on our version of the Sapper Task table, which I have posted below. 

SAPPER TASK TABLE: adjusted sapper die Vs D8
Factor
Down 2
Down 1
No Change
Up 1
Up 2
Task
Build
Repair / Prepare charge
Destroy
Clear / Improve
Maintain / Detonate charge
Object of activity
Fortification
Stone structure
Wood or earth structure
Trees / Door / Prefab’
Ditch or trench
Task size

Large / Strong / Deep
Average
Small / Weak / Shallow

Acquire Materials
Difficult to obtain locally

Easy to obtain locally or from baggage train
Materials already acquired and on site

UI and time committed
Not sappers
1
2
3 / Each task check
4
Unit quality by morale
D4
D6
D8
D10+

Enemy
In contact
Under effective fire

Over 36”


I counted the abutments at each end of the bridge as constructed before dawn. The bridge takes a minimum of four tests to complete: first, two pontoons are placed, then they are decked, then two more pontoons are placed, then they are decked and the bridge is completed. On each card the sappers roll for a task completion. Failure indicates the task is not completed but they will get the 'Each task check' modifier on the next card. The base die for Prussian sapper task tests is a D8.

(Note: For those that don't know how the Piquet dicing system works, dice get one bigger for each 'Up' and one smaller for each 'Down'. So in this case, for a basic test, the Prussians will be D8 adjusted Dn2, Up1, NC, Up1, Up2, Dn1 (net Up1) giving a D10 Vs D8 test. If the D10 is higher the sappers succeed).

Because bridging requires tests, neither player can be quite sure how quickly the bridge will be built, which adds quite a bit of tension to the game. The construction site can also be fired at which might cause damage to the structure delaying the work further, though I will not bog you down with that; but, needless to say, sappers repairing such damage can't be used to build at the same time and are penalised because they are under fire (on the next card).


Russian OOB and initial deployment:


The Russians are situated, in the main, at three points. They hold the two towns where significant bridges are located and a small, linking hamlet between them. Patrolling is being carried out by bands of roving Cossacks whilst the line troops are content in the comfortable billets being unhappily provided gratis by the local inhabitants.

In the northern town the Russians have two commands. 

1. A unit of grenadiers, two units of line infantry and a battery of field guns. The guns have been sighted in a redoubt with superior fields of fire to cover the bridge. The town section nearest the bridge has been prepared for defence. 

2. Two units of hussars and two units of Cossacks, the latter patrolling west of the river. 

In the southern town the Russians have two commands.

1. Two units of grenadiers, three units of line infantry and a battery of field guns. The guns have been sighted in a redoubt with superior fields of fire to cover the bridge. The town section nearest the bridge has been prepared for defence. 

2. A unit of cuirassier, a unit of horse grenadiers and two units of Cossacks. One unit of Cossacks is patrolling west of the Oder, the other is patrolling just north of the town.

Note: That's a new church with a slightly 'Bohemian' look to it. It's been hanging around the place waiting to be painted for quite some time. I think the green copper roof, though a little ostentatious for a small town / village church, adds something to it. Mostly MDF and balsa wood with War Bases doors and windows).


Between the two towns a small hamlet is being used to billet a small command of two unis of line infantry stationed to support a battery of howitzers sighted to cover the river from commanding high ground.

Prussian OOB and initial deployment:


During the night, and without opposition, the Prussians have advanced to the west bank of the Oder.  Here they taken up positions facing the Russians. 

The night has not been wasted. Using pontoons the Prussians have managed to ferry a unit of grenadiers and a unit of line infantry to the far bank to protect a bridgehead for a pontoon bridge which is now under construction by a unit of pioneers. These form the 'bridgehead' command. 

(Note: The fusiliers I used to represent the sappers is IR 49 which Frederick converted from the 'Pioneer Regiment' into fusiliers at the end of 1758. They are a very pretty regiment, in their bright orange waistcoats and breaches, and provide a good 'double use' unit for this kind of thing).


Stationed to face the northern town the Prussians have deployed two commands. 

1. A unit of cuirassier, a unit of dragoons and a unit of hussars.

2. Two units of line infantry.


Stationed to face the southern town and behind the proposed pontoon bridge the Prussians have placed three commands (not including the 'bridgehead' command).

1. Two units of line infantry, one battery of field guns (directly opposite the town).

2.  A unit of cuirassier, a unit of dragoons and a unit of hussars.

3. Two units of grenadiers, a unit of line infantry, a unit of fusiliers and a battery of heavy guns (stretching behind the wood and behind the pontoon bridge).


The Battle on the Oder


Dawn has broken and the Russians quickly become aware of the work being carried out in the great meander of the river. Rushing troops from north and south to reinforce the command at the hamlet, they concentrate to oppose it.

The Prussians make slow progress building their bridge. Work at the construction site is hampered by constant fire from the Russian howitzer battery.


Russian howitzers lob shells at the pontoon bridge at every opportunity (especially when they have the chance to fire on 'Heroic Moment' cards). This handicaps the Prussian bridge building and buys time to collect together a force that might be strong enough to break into the Prussian bridgehead.


The battle at the bridgehead erupts into full fury. Outnumbered two to one the Prussian position looks precarious but, quality tells. As the bridge nears completion the Russian attack begins to disintegrate.

Note: Pontoons and bridge are scratch made from balsa wood. The wagons are all MDF by War Bases, though the pontoon wagons are simple farm cart conversions.


Towards the end of turn four the bridge is complete and the Russians are falling back towards the hamlet under pressure from the 'bridgehead' command.


At the end of the first game session, the Prussians have begun to cross their newly constructed pontoon bridge. [First shot is of the Prussians crossing on the night, the second is one I staged this morning].


Tuesday, 20 March 2018

A Very British Civil War - LOGW weekend

Belgians, Morris Dancers and the Grenadier Guards rush past Hemingway to face another crisis in Newcastle - you can tell it was cold - they are all wearing coats.

I've returned from yet another thoroughly entertaining game with The League of Gentlemen Wargamers up in the colder reaches of the U.K. The game was a multi-table 'campaign game', the whole representing the north of England up to Berwick and various players were either Scots, Anglican League, Communists, Albertines or British Union of Fascists - I was one of the four players playing the latter and never a game was so well lost! In fact, the BUF were the target of everyone, and who can blame them for that.


Evening all! Communist cavalry, about to get  stuffed by the constabulary. Very pretty unit that, Chris. 

Virtuallyly non of the photos I took came out, so here is a link to Tim's blog, or Bills blog, where they did. 

Tim's blog

Bill's blog

I had a great deal of fun in this game. Except for a brief foray to the east to fight some Albertines (Bill G.) at the start of the two day game, I spent much of my time defending the city of Newcastle. Single-handedly I fought off an Anglican League faction (Angus K.) and Hartlepool Communists (Chris H.) for the rest of the game until Newcastle fell to the Bishop of Durham in the very final turn of the weekend. 


That church in the background is the base of my two faced, conniving, untrustworthy, backstabbing enemy the Bishop of Durham (Angus K.). That jumper belongs to my two faced, conniving, untrustworthy, backstabbing enemy the Hartlepool Communists (Chris H.). That plane is mine and it's about to 'hang another monkey'.
My Grenadier Guards, with support from the constabulary, Morris dancers and Belgians (amongst others) fought to the last man, last bullet, last throw of the dice. I took down the enemy in their droves; at the last count, including the Albertines on day one, I killed 16 units for the loss of only 7. This was largely due to the sterling work done by the Royal Victoria Infirmary which kept depleted units up to strength with troops returning from their sick beds - this was especially true of the Guards who, to a man, must have each been wounded at least three times during the campaign - Angus was definitely hunting bear(skins). 


BUF volunteers, brave but stupid, await the call from Edward VIII. He was unable to make the call because his trip to Balmoral was rudely interrupted by a band of Celtic supporters (Dale S.). 

Mrs. Simpson didn't seem too bothered, she was busy 'doing things' to the Bishop of York (Kieron P.), the eventual winner who, with all the Royals having been killed, and with the death of the Archbishop of Canterbury (machine gunned from the air), would soon find himself crowned King.
Thanks to Colin J. for organising the game, Bill G. for his knowledge of the rules and answering constant questions with such good grace, and Steve R. (of course) for kindly putting me up for the weekend.

Next up, for the LOGW, it will be an old school SYW game organised by Charles G. using rules from The War Game. I think it's planned to be a pan European, multi-table, campaign affair. Should be good......

Saturday, 10 February 2018

The river making has begun - And a new bridge


Some time ago I finished building a pontoon train and a river piece with pontoon ramps and bridge sections, the latter were left unfinished because I planned to make a wide river into which the piece would fit. 

At the time I rather inferred that this would be done soon. Hmmm....

Last week, Tim T. kindly delivered an order of  2mm thick MDF sheets (nine 3' x 4' boards) which had been hanging around in his shop for several weeks. This was the spur for some frantic drawing out of around 7 m of 'wide' river, including turns and tributary entry points. The river will be in sections of between 75 mm and 300 mm long and 240mm wide (the width of water is 180mm with a 30mm bank to either side). At that point work abruptly ceased because I don't have the paint to hand and my hobby budget has been spent for this quarter. 

Needing hobby cash NOW, I've put a few things up for auction on ebay (a couple of unwanted board games and some unpainted odds and sods) with a view to filling the hobby coffers to complete the terrain project within budget - and things are looking good.

To keep up my enthusiasm until the money and paint flows in I decided to build a new bridge.
(I figure that I'll need three and I only have one, excluding the pontoon bridge).

I thought that a covered bridge would be interesting, both to build and as a terrain item, and I decided to build one based on this photo of a German one I downloaded from a wargame blog (sorry, I can't remember who's) not so long ago.

As soon as construction got underway, the plan changed. What I came up with, except for having stone abutments [bridge ends], two sets of 'A' frame timber piers (span supports), and a roof, is completely different from thae bridge pictured above. However, I'm indebted to the blogger for the original inspiration.

Here is the finished construction after the bulk has been undercoated brown. The abutments will be grey stone when it is painted, the span will be natural wood. The roof will be grey 'slate' tiles.


Even though, like most of my buildings, the new bridge is under scale it is still quite a big thing. It measures 360 mm long and is 110 mm high. The model is a little over 70 mm wide; the roadway is 50 mm wide.

It is constructed out of several materials including MDF, which provides the bulk of the main build, balsa wood, card, and plastic. 
One thing about under scale model bridges that is difficult to get around is the length and gradient of the ramps. To keep the length of the bridge manageable the bridge must be lower than it should be. In this case just 17 mm above the 'river'.
The biggest change to the original design was made so that you can actually see the troops as they cross. 

The flag is too tall to go under the roof but it is high enough allow the passage of cavalry figures.
The roof is removable to allow access to the bridge itself. 

I'll spray undercoat the roof black before painting. 

The whole upper side panel construction is plastic welded together with polystyrene cement for strength*. 

The 'X' trellising is from an Airfix pontoon bridge set (I had previously used the pontoons for something else). I was out of plastic rod so I had to improvise the rest of the panels: the long struts across the the top of the trellising are actually made from the sprues of model kits with all of the nobbles cut off, and the vertical railings are off cuts from the Pontoon Bridge set. 

* I find building things out of several materials is always tricky, especially when it comes to securely gluing them together, and gluing wood to plastic, where the glue points are small, can be very problematic.


The roof is very light, too light in my opinion. So I've glued some coins to the underside to weight it down and give it some heft. The lip around the bottom edge keeps it in the correct alignment.


So there we are, a Bridge Over Troubled Water. That will go nicely with the tickets I have to see Paul Simon in July. It might even be finished by then!


EDIT: 
The Bridge has been finished. Here's a pic.


Friday, 19 January 2018

2nd Game of 2018, Battle Report

Peter's Austrians deployed on their right with their strong command cavalry holding the flank. 

The cavalry would suffer early in the battle from artillery fire from the massed Prussian batteries.
Graham's Russians deployed on the left of the Allied line. Their reserve infantry were deployed in columns, ready to react to the Prussian deployment.
The Prussians deployed facing the Austrians.
The distribution of initiative in the session was pretty even. The allies got most at the start, then it balanced up.

The Russians, out on their own, spent much of the early initiative to redeploy onto the Prussian right flank; this threw any hope of a planned early Prussian attack against the Austrians off balance. On the other flank the Austrians demonstrated with their infantry and launched their cavalry into the attack.
The Prussians dispatched infantry and cavalry to slow the Russian advance.
The Prussian cavalry with infantry support duly slow up the Russian attack and temporarily throw its advance elements into confusion. 

By the end of turn two several allied units had been repelled. 
This shot shows the position of the Russians at the end of the first session. 


The Austrians have had one success. Their cavalry has managed to summit the hill first and is now fighting down hill. 

The Prussian infantry, in the wood are seriously threatened by a flank attack. This will be touch and go - will I turn a manoeuvre card before Peter turns a move in difficult terrain card.

This shot shows the Austrians facing the windmill and the Russians, still in columns, massing for their attack.

Note the Prussian Guard infantry holding the windmill. In most games this unit gets clobbered but this time it did sterling work. It has stormed the hill, thrown the Grenzers out of the windmill (both units were routed early on) and is now peppering the Austrian line infantry at the stream.
The Russian position at the end of the first session. Again, the Prussians desperately need an elusive manoeuvre card.
A shot of the extreme left flank of the Russian line. Barely visible, coming up the road behind the wood, the Prussians are trying to bring up a battery to face the Russians.

On the whole, the first session went decidedly in favour of the Prussians and the Allies are facing ever more difficult major morale checks*. However, the Prussian line is threatened on both flanks and I feel decidedly uneasy about my position - next week it's going to be nip and tuck.

*In my amended rules for the SYW we play the effect of major morale in a very different way to that in the official master rules. For one thing, each side has two major morale cards and our rule runs as follows:

MAJOR MORALE CHECK
The routing and pursuing units of both sides move at this time regardless of terrain; they move at their full normal rate; they move for free. Routers always ignore the impediments of terrain.

When this sequence card is turned it is played against the enemy army. The enemy’s C-in-C must take a major morale check. He does this by rolling a d20, adjusted for command quality (-2 to +2 in this case) versus the total number of units he currently has destroyed or routing. To pass the check the die result must be higher. If the check is passed no further action is required. If the die roll is equal or lower than the number required the army fails the check and:
  • The army pays 1 morale chip.
  • The army adds one Dress the Lines card to its sequence deck. 
  • The army must individually check the morale of each of its command groups.

If the army has no C-in-C or morale chips to take the major morale check it automatically fails, the army adds one Dress the Lines card to its sequence deck, 
and must individually check the morale of each of its command groups.

Command groups forced to take major morale checks do so by rolling D12, adjusted for command quality, versus D8. If the command is currently leaderless a D6 is rolled. If the die roll is higher the command passes the check. If the command fails the army loses one morale point; if the army cannot pay a morale chip all of the group’s units are downgraded one battle quality level (determined - eager - ready - battle weary) and any units already rated as battle weary are routed.


Recovering lost officers. On the appearance of this card any officers lost in battle can be recovered on a successful other difficulty check versus D8. Each test costs one initiative point. If the officer is recovered at the first attempt the replacement officer will be the original one (he had just fallen off his horse, or something similar); if not, the officer will be a new officer and his quality will need to be diced for.

Note that we do not add Dress the Line cards for the loss of units.

Wednesday, 17 January 2018

Second game of 2018 - the set up

This game is a re-run of the first game fought this year but with the three players taking control of another army. 

The scenario is a simple one. It is a late SYW affair between a small well led Prussian army comprising an excellent mix of troops including a high proportion of elites and a much larger, poorly led allied (2 player) Austro-Russian army of average composition. Victory will be achieved by forcing the enemy into submission.

Using Piquet rules the quality of command is more easily built in than in other rules. The Prussian C-in-C is classed as superior with two Brilliant Leader cards added to his sequence deck, whilst the ally's C-in-C is classed as poor with one Command Indecision card added to his sequence deck. The Prussian player also deploys up second.

For those unfamiliar with Piquet, a sequence deck is a deck of roughly 24 - 30 cards that governs each side's move sequence. The sequence deck of each side is tailored to reflect what it was good and bad at. Each deck comprises cards that govern the movement rate of troops by arm (infantry, cavalry and artillery), how often troops can shoot, resolve melee, rally, change formation, etc.; there are also do nothing cards, and army morale check cards. Each turn the players get a random number of initiative points (up to about 20) which they use to turn cards from their sequence deck and spend to activate troops using them as they are turned. A Brilliant Leader card is a wild card, redefined each time it is turned, giving the army greater flexibility and freedom of action; a Command Indecision card reduces the army's current initiative to zero and effectively ends the player's go when it is turned.

Working on the assumption that dice rolls even out, all other pre-deployment dice rolls, to discover sub-commander ability and troop quality, will be determined by the players in the usual way. The allied C-in-C (the final arbiter in their sides distribution of initiative points) will be decided by coin toss.

The armies are quite small, with each commander controlling 14 units or less. The OOBs are as follows:


Prussian:

  • Command A: 1 guard cuirassier, 1 cuirassier, 1 hussar.
  • Command B: 1 cuirassier, 1 dragoon, 1 hussar.
  • Command C: 1 guard infantry, 1 grenadier, 1 infantry, 1 heavy battery.
  • Command D: 1 grenadier, 2 infantry, 1 heavy field battery.

Russian:

  • Command A: 1 horse grenadiers, 2 hussar.
  • Command B: 1 grenadier, 2 infantry, 1 field battery.
  • Command C: 1 grenadier, 2 infantry, 1 howitzer battery.

Austrian: 
  • Command A: 2 cuirassier, 1 horse grenadiers, 1 dragoon, 1 hussar.
  • Command B: 3 infantry, 2 grenzer, 1 heavy field battery.

Because the forces are smaller than those I usually deploy I decided to clutter the table with lots of terrain. Here's the table I came up with. This terrain should localise the combats and allow some clever manoeuvring of the forces - it did in the first game. The table is 12' x 6'.

The Austro-Russians will deploy first. Their initial deployment zone will be approximately 2' on table and 18" from the flank edges. Within that zone, they can deploy as they like. The Prussians deploy after the Austro-Russians anywhere in a similar zone (on the other side of the table).

We will start to fight this battle tonight (it will probably go to two sessions). A report will follow.


Sunday, 14 January 2018

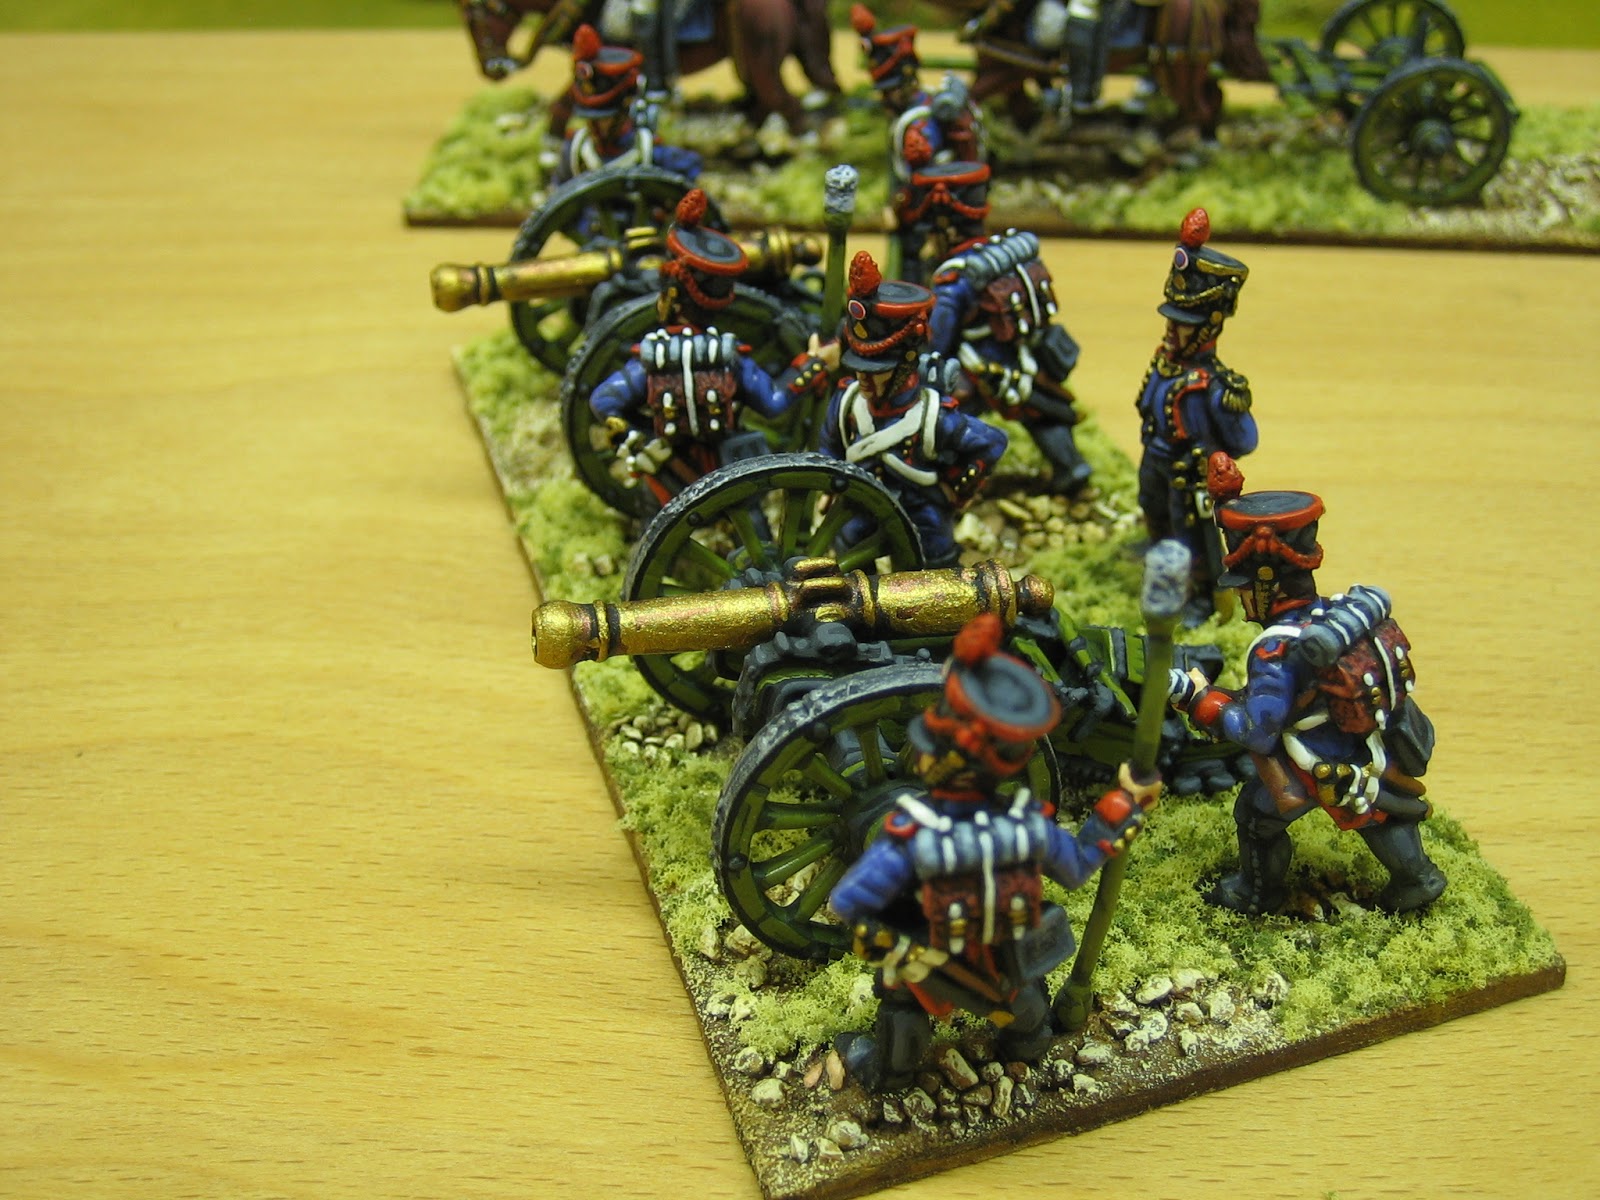
French foot artillery

I have made a decision about my artillery batteries. They will each be two guns strong with a single 'train' piece, either a limber or caisson, to represent the artillery battery when limbered.


The latest addition to the project is a battery of French foot artillery. Bizarrely, I've got very little uniform information about artillery so had to rely on my ever reliable single combined volume of Funcken books (has all the Lace Wars, Napoleonic and Franco Prussian in it) and google for most of the details.


Though it would be nice to have a limber per gun, possibly with a caisson added too, I think one train piece will be adequate for game purposes. In some games I've played, where the full panoply has been fielded, the train ends up being put back on the shelf because its footprint takes up too much room on the table - so I wonder if having more train pieces might be a waste of money and painting time.

At some point I might add the traces but, for now I'm leaving them off.

One thing worth pointing out about the photos is that the French artillery green isn't quite so green in the flesh (lighting?).


I think they came out alright, and hope you do too. The figures are all Front Rank.


Monday, 8 January 2018

First batch for the Peninsular project in 2018

Over Christmas and New Year, I decided to use some of my 'holiday time' to get ahead of the game with the project quota for January. Most of the rest of this month will be taken up painting commissions, probably long into the night, so I'm not expecting too much more to be completed for my Peninsular project until well into February.


The units I chose to add were three battalions of the 27th Ligne. 

Figures are by Front Rank. They were painted by yours truly using Humbrol enamels (mainly). 

The tricolour flags are by GMB Designs and the fanion is by Flags for the Lads; the latter had to be cut down because the GMB flags are several millimetres smaller than FftL flags. 

Another difference between GMB and FftL flags is the paper they are printed on. GMB paper is 'shiny' and consequently the colours seem more vivid than FftL. However, GMB paper is also much heavier and doesn't bend as easily for the 'on the fly' look. 
The reason I chose this regiment is visible here. The regimental distinction is not only a colourful one one, it's also blindingly obvious, even from a distance.
These are the last troops in campaign dress that I had in the lead pile. 

The next six battalions of Ligne will be in full parade dress. 

I have chosen to field the French in both uniforms (full and campaign) because I like uniform variation and French full dress is very striking.

I rather fancy doing a converged grenadier battalion, or two, in great coats for even more variation.
The later voltigeur uniform for this regiment is wonderful! I rather wish all French regiments had adopted it. Yellow shako bands and chevrons, yellow tuft over green ball plume and yellow metal epaulettes with yellow crescents and green fringes (the grenadiers have yellow metal epaulettes with red crescents and fringes).

Now Santa has been, I will be able to do the three battalions for 2nd Legere - with grenadiers in bearskins. 

Speaking of Santa and wargaming, he was very good to me this year. He also brought another battalion of Legere (bringing my total lead pile to six); a regiment of Polish lancers; a couple of companies of riflemen; Six battalions worth of Portuguese line skirmishers in shakos which, having wrongly ordered in barretinas over a year ago, Alec at Front Rank kindly replaced; a hardback copy of Brent Nosworthy's Battle Tactics of Napoleon and his Enemies; Osprey's Napoleon's Polish Troops. Ta, Santa!