Tuesday, 24 May 2011

Lake Trasimene Scenario


Historical Summary

In the last days of 218 BC Hannibal defeated the combined Roman consular armies of Scipio and Sempronius at the Battle of Trebia. The Roman Senate was shocked by the defeat but used the winter, when little military activity took place, to renew its efforts in the prosecution of the war against the invader.


The new consuls for 217 BC were Servilius Geminus and Caius Flaminius. Each was given command of a newly levied consular army, bolstered by the survivors of Trebia, for the coming campaign. Hannibal was still the wrong side of the Appenines with only two possible routes into the Italian peninsular. Geminius’ army was posted to Ariminum (modern Rimini) to cover the eastern, and easier route; Flaminius’ army (c. 30,000 men) was posted to Arretium to cover the western route.


As soon as the weather allowed, Hannibal moved south. He chose the western route over the Appenines and then crossed the marshes of the Arno which had flooded after the winter rains. The marshes proved especially difficult going, and for three days the army struggled through them without dry ground on which to rest: Hannibal lost an eye to ophthalmia during this march because conditions did not allow proper treatment. But his strategy was sound. His choice to move early, by the hardest route, allowed him to cross the last major natural obstacle into Italy without interference and he now stood in the fertile plain of Etruria.


Hannibal quickly bypassed Flaminius at Arretium and marched his army (c. 50,000+ men) south, pillaging and burning as he went. It must be remembered that it was immensely humiliating when an enemy violated the fields of a state or its allies without interference and it is doubtful if any consul, at this time, could stand by whilst it was happening. Flaminius had no choice but to follow, and follow quickly, to avenge the insult – he could not, with honor, wait for Geminus to join him.


Hannibal continued south, provoking the Romans with every step he took and every farm and village he sacked and burned. When he reached Lake Trasimene the Romans were only a day’s march behind and coming up fast. Studying the road which led through a narrow defile between the hills at the lake’s northern edge and the lake itself, Hannibal saw an opportunity to deal Flaminius and Rome another devastating blow. During the night of 20 June 217 BC Hannibal set a trap for the Romans by laying an army sized ambush.


Polybius, our best source for the 2nd Punic War, says: “He himself [Hannibal] occupied the hill at the eastern end with his African and Spanish troops. His slingers and pikemen were ordered to make a detour and march round from the front under cover of the hills, and were posted in extended order to the right of the valley. The Celts and the cavalry were moved round to the left of the valley and likewise stationed in a continuous line under the hills, the last of them being posted at the entrance to the defile between the hillside and the lake. All these dispositions were effected during the night, and having surrounded the valley with his troops posted in ambush Hannibal made no further move.”


When Flaminius’ army made camp, on the night of the 20th June, his camp was in sight of Hannibal’s camp. At first light Flaminius led his army into the defile. Being so close behind he must have been sure that he could catch up to Hannibal before the day was out, stop his freedom of movement and deprivations, and bring him to battle. How right and, at the same time, how wrong he was.


Polybius continues: “That morning a thick mist still hung over the lakeside. Then, as soon as the greater part of the Roman army had entered the defile and was already in contact with the Carthaginians [the slingers and Libyan spearmen at the head of the defile, which the Romans wrongfully thought were a rearguard], Hannibal gave the signal for battle, passed the word to the troops who were lying in ambush, and fell upon the Romans from all sides at once.”


Polybius says that 15,000 Romans perished in the valley, amidst the reeds and croaking frogs, or sheltering neck deep in the lake (where they became sport for Punic cavalrymen after most of the fighting was over). Flaminius was killed, fighting bravely, with his men. Up to 15,000 Romans were taken prisoner, including 6,000 Romans who managed to escape as a body by breaking through the troops directly to their front (they were captured without a fight on the following day). Many hundreds managed to escape the valley in small groups, arriving at their homes (including Rome) over the days that followed. Hannibal’s casualties were minimal, perhaps as low as 1,500.


NOTE: There has been much debate over the composition of Flaminius' army. Some authors contest that Flaminius had a standard consular army of 20,000 or so men, but the casualty and prisoner totals go against this. Personally, I favour Flaminius having a standard consular army bolstered by the remnants of a Trebia consular army in addition (about 10,000 extra men). Apart from the quoted casualties, I have three other reasons for this:

Firstly, it would be logistically easier to raise two new consular armies rather than 'refit' two battered ones that had suffered 50% casualties - manpower was not an issue in 217 BC.

Secondly, given that the strategy was to split the consuls to guard both the eastern and western routes into the Italian peninsular, and that two consuls had been defeated at Trebia the previous year, I find it hard to believe that Rome would risk giving battle with an army half that size.

Thirdly, we know that Geminus had 4000 cavalry and this is a double complement. Some argue that the extra were raised from the allies in addition to standard numbers. I think it would be more likely that the standard 1800 were raised for Geminus' standard consular army and the rest were remnants from Trebia - which tends to favour my 'consular army plus' theory.

If nothing else, it makes the game less lop sided.

The Wargame

This scenario was written for use with Ager Sanguinis Punic Wars rules. I have recently spoken to Andrew Hubback of Miniature Wargames Magazine and it looks likely that the rules will be published in that magazine later this year. Hopefully, it will be published in a similar manner to Ager Sanguinis Crusades - a multi-page (12?), advertisement free, centrefold pull out with cover page.

My armies are somewhat larger than most wargame armies for this period so feel free to scale numbers - the rules were not written with only large games in mind.

My Roman Army for Trasimene

The Roman army is split into 6 command groups. Each legion is comprised of a Roman legion and its ala which form two triplex acies formations. My army totals 580 figures.


  • Extraordinarii: 1 officer stand, 2 units of 8 cavalry, 2 units of 12 velites, 2 units of 24 hastati.
  • Legion 1 (deployed in triplex acies): 1 officer stand, 2 units of 12 velites, 2 units of 24 hastati, 2 units of 24 principes, 2 units of 12 triarii.
  • Legion 2 (deployed in column): 1 officer stand, 2 units of 12 velites, 2 units of 24 hastati, 2 units of 24 principes, 2 units of 12 triarii.
  • Legion 3 (Trebia remnants, deployed in column): 1 officer stand, 2 units of 12 velites, 2 units of 24 hastati, 2 units of 24 principes, 2 units of 12 triarii.
  • Roman cavalry (deployed in column): 1 officer stand(Flaminius), 2 units of 8 cavalry.
  • Allied cavalry (deployed in column): 1 officer stand, 4 units of 8 cavalry.
  • Libyan Phalanx 1: 1 officer stand, 3 units of 24 Libyan spearmen, 2 units of 16 Libyan javelinmen.
My Carthaginian Army for Trasimene

The Carthaginian Army is split into 7 command groups. Hannibal is a 'floating' officer stand without a command group. My army totals 857 figures.


  • Libyan Phalanx 1: 1 officer stand, 3 units of 24 Libyan spearmen, 2 units of 16 Balearic slingers, 1 unit of 16 Numidian javelinmen.
  • Libyan Phalanx 2: 1 officer stand, 3 units of 24 Libyan spearmen, 2 units of 16 Libyan javelinmen.
  • Spanish infantry: 1 officer stand, 4 units of 36 Spanish scutarii, 2 units of 24 Spanish Caetrati.
  • Gauls 1: 1 officer stand, 4 units of 44 Gallic warband, 2 units of 12 Gallic cavalry, 1 unit of 16 Gallic cavalry.
  • Gauls 2: 1 officer stand, 2 units of 44 Gallic warband, 2 units of 12 Gallic cavalry.
  • Spanish cavalry: 1 officer stand, 4 units of 12 Spanish cavalry.
  • Numidians: 1 officer stand, 4 units of 12 Numidian cavalry.
Scenario notes

The Romans will use a D10 sequence deck and army die. All commands will used a D10 motivation die, except for the extraordinarii which will use D12.

The Roman army comprises 121 unit integrity points and will draw 6 cards from the characterisation deck; morale chips are doubled.

On the first two initiative rolls of turn 1 Rome will use its initiative second. For the duration of turn 1, all manoeuvre cards will be treated as group manoeuvre cards.

The Carthaginians will use a 12* sequence deck and a D12 army die. Libyan phalanx, Spanish cavalry, Spanish infantry commands and Hannibal will use a D12 motivation die; other commands will use D10.

The Carthaginian army comprises 160 unit integrity points and will draw 7 cards plus a stratagem card from the characterisation deck; the stratagem will be number X - Surprise Attack. Morale chips are doubled.

Here are some shots of the Ilkley Lads Trasimene game at Triples this year. I have now finished with Trasimene and I will not bore you with it any longer!

Monday, 16 May 2011

Punic Update: The Trasimene Armies

At last, I have finished the armies for the Battle of Lake Trasimene for the game at Sheffield Triples this coming weekend. Here are some shots of the figures ready for packing.


Breakdown:

ROMAN ARMY
Cavalry: 8 units of 8 figures = 64

Hastati: 8 units of 24 figures = 192

Principes: 6 units of 24 figures = 144

Triarii: 6 units of 12 figures = 72

Velites: 8 units of 12 figures = 96

Command: 7 stands, 15 figures total

Total 583


CARTHAGINIAN ARMY

Spanish Cavalry: 4 units of 12 = 48

Numidian Cavalry: 6 units of 8 figures = 48

Gallic Cavalry: 4 units of 12 figures, 1 unit of 16 figures = 64

Libyan Spearmen: 6 units of 24 figures = 144

Spanish Scutarii: 4 units of 36 figures = 144

Gallic Warband: 6 units of 44 figures = 264

Spanish Caetrati: 3 units of 12 figures = 36

Balearic Slingers: 4 units of 8 figures = 32

African Skirmishers: 7 units of 8 figures = 56

Command: 7 stands, 17 figures total

Total 853

Next up on the painting list, the last of the Romans and two elephants for a big Trebia battle, a mere 100 figures or so. Then I'll be finishing off the other national contingents, Gallic, Spanish and African, a rather more substantial 800 odd. Ho Hum, but at least I'm down to three figure totals.

Thursday, 5 May 2011

Into the Valley of Death..........

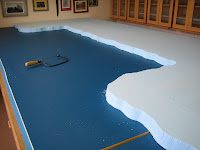
The Battle of Lake Trasimene is now taking shape. My 'hill stuff' arrived today; it was sunny; rain forecast for tomorrow; paint brush down and take up the saw. The hills at Trasimene are substantial and form three sides of a bowl - no 'cow pat hills' for this game.


The hill material is 50mm thick DOW Floormate by Sheffield Insulation. You can buy it online, but this means buying quite a bit - eight sheets, each 2450mm x 600mm x 50mm. With VAT and carriage this runs in at £123.00 a shot, but time is short and I had to bite the bullet. This job uses about half of it, though quite a bit is 'uncut filler'.

I cut the sheets in half with a normal saw (into 2 x 4s), laid some pieces on my table and began to mark out the forward slopes with some basic lines.


After remarking a wavy front edge I cut them vertically with a coping saw, marked out the top contour 3" in, then cut the slope by cutting on the angle between lower front edge and the contour line. This method gives a fairly uniform slope.


Coping saws are an essential, fairly cheap, tool for this kind of thing as you can vary the angle of the blade within the saw bow. In this case I shifted it through 90 degrees.


Once I had done the first contour - all 20 feet of it - I started on the summit pieces in a similar manner.


Once the cloth was thrown over it, the lakeside was added with a few trees and a few troops it began to look quite good. I still need to paint 36 Gallic cavalry and 48 hastati before Triples, and several units will need basing, but all is well in hand now. Also, my table is only 12 feet long and the table for Triples will be 14 feet, so imagine, if you will, two foot more hill between the central 'summit / knoll' and the hill on which the Numidian cavalry stand. 


I hope that this set up meets with the approval of those who know this battle.

Tuesday, 26 April 2011

A simple lake shore for Trasimene

Continuing the work for the Battle of Lake Trasimene game at Sheffield Triples next month, this weekend I tackled the lake shore. This will form one side of the battlefield and is 12 foot long (the table will be 14 to 16 foot long). I could, of course, just declare one edge of the table as the impassible lake shore - but there is no fun in that, and the casual onlooker might not grasp the predicament of the Roman army - trapped and ambushed between hills and lake. 


I decided to construct the shore from 2 foot sections of 2mm thick MDF. Each length is 8 inches wide. I painted the water first using household emulsion with a bit of artists acrylic and ink added for some subtle shading - it's a bluesy, greensy, black. I then applied some muddy bits using artists acrylic (tubed stuff) in a thick sloppy manner; once dry it was dry brushed, lighter towards the drier bank. I then applied two coats of yacht varnish to the water.

I wanted a proper bank that was higher than the water, but only slightly as I didn't want it to look like an 'embanked canal'. I used string, glued on with wood adhesive, back filled with Plasticine to give a constant height. This was sealed with a couple of layers of wood adhesive, painted and then flocked. It has the look of a lazy lake creeping up onto the gently sloping land and I'm happy with it.

This kind of terrain always looks a bit dead. It needs some vegetation to add some life. But adding vegetation to the lake pieces makes them hard to store; so I decided on applique reeds, made from the natural bristles of a sweeping brush, painted green, and glued to penny pieces to go on the mud. The rest can be dressed with existing terrain pieces.


The finished (I still have to drybrush some reed bases) and 'dressed' lake shore: That will do nicely.

I'm now planning the hill sections which will go along the other three edges. These will be made from 2" thick insulation boards. Using the baize cloth, which can be 'thrown over' them, will mean that they only need cutting to shape - the baize cloth! - there is method in my madness.

Friday, 22 April 2011

Great Scot, I think I have it!

I hung the cloth on the clothes line again today and added another four tins of spray paint to the mix. These included, three quarters of a tin of  caramel; a third of a tin of desert sand; three more tins of yellow. Each tin was 300ml.

To remind you of how I left the cloth last time, here is a photo.
Here is how it looks now - much, much better, I think.

Finally, the cloth with an off cut (even I will never need a 23 foot long cloth) to show the overall change of shade.

This job is now done. Next on the 'terrain to do list' will be the hill shapes and lake shore for The Battle of Lake Trasimene. This will be The Ilkley Lads demo game for Sheffield Triples next month. Time is pressing and running out fast; and I still have another 150 figures to paint and base.


Monday, 18 April 2011

Good God, it's still too green!


Two images of my 'snooker green' baize cloth after having sprayed it - and it's still too green! The effect I was hoping for can be seen in the middle of the first shot - a pale, mottled, green. Much of it is the colour of the second shot.

The cloth is 16' x 6' 6". I knew that I would have to use a lot of spray paints to get a good effect (it's a big space) but, quite obviously, I have underestimated the amount needed. I started with a tin of black to 'take the edge off' and darken the green. Then a tin and a half of dark brown, then half a tin of beige, then a tin of dark green, then a tin of lighter 'grass' green, then the remainder of the beige, then 3 tins of yellow. When it was hanging on the washing line (for spraying), in bright sunlight, it looked quite light in tone; when I brought into artificial light it's greenness was shocking.

I've ordered another three tins of yellow and a tin of 'caramel'. This should be enough for the finish I'm after - I hope.

My advice to anyone doing this job is to follow the steps I took (darkening the cloth first, with black, dark brown and dark green) as this has given a good depth of shade (I'm not sure that the light green was worth the effort, though the beige worked well) - but when you buy the lightening yellow tone to bring it all 'up' and bind it all together buy lots and LOTS, as you will need cans and cans of the stuff.

For those with a mind to price, the paint bill (including the extra tins) currently stands at £60.00. Not cheap, but the cloth cost me nothing - thanks, Ken.

Wednesday, 30 March 2011

Ager Sanguinis Punic Wars, How It Works, Part 2

The Ager Sanguinis turn sequence is not like that found in most sets of rules. It does not follow a set sequence of actions (such as U move, I move, U shoot, I shoot, etc.) and it has no set duration. This is because it is driven by initiative phases and the army sequence decks. To quote from the rules:

“Game turns consist of a variable number of initiative phases. The army die is used to determine the number of initiative pips in an initiative phase. Each player rolls his army die. The difference in the army die rolls is the number of initiative pips each player may use in his initiative phase. Both sides receive the same number of initiative pips during their portion the initiative. The player who rolls higher chooses to use all of his initiative pips first or second………………

…………..The side acting first turns sequence cards from his shuffled face down deck, one at a time, spending 1 initiative pip per card turned. As each card is turned the player can choose to act on the card showing or not, sometimes action is mandatory. When he has spent his initiative pips, or he runs out of sequence cards (in this latter event, the player going second may only use as many initiative pips as the first player used to finish his deck), the initiative transfers to the player going second. After the initiative is ended the process is repeated……………

………….. If the army die rolls are equal, or at the end of a complete initiative one player has exhausted his deck, the turn ends……..”

TURN 1 PHASE 1

Both players roll off army die. Carthage, rolling D12, scores 10; Rome, rolling D10 scores 1. The difference is 9 so each player will get 9 initiative. Carthage makes Rome go first – a common gambit early on, but risky with such a large initiative.

Roman cards (there are no photos of what the Romans did because, frankly, they didn’t do much):

Command – no action.

Stubborn Army Morale – no action.

Group March – Left most infantry command.

The Romans must roll the officer stand motivation die, which in this case is D10, Vs D8 (always Vs a D8 for movement). They score 6 to 3. The command can move twice because it is more than the D8; the die roll is even so moves can be used to maneuver. The command’s velites occupy the woods wheelin one unit to face the open hill, and the rest of the command moves to the base of the hill.

Maneuver – no action.

Lull – a chance for the enemy to steal the initiative. Both sides roll off army die. Carthage scores 8, Rome scores 3. Carthage can turn one card and act upon it. Carthage turns Group Melee – no action.

Melee – no action.

Missilery – nothing in range or visible through the woods, no action.

Command – no action.

Melee – no action.

Rome’s initiative is over and the initiative passes to Carthage.

Carthaginian cards:

Maneuver – no action.

Missilery – no action.

Group Maneuver – no action.

Lull – both sides roll off army die. The scores are equal, Carthage holds the initiative.

March – A general advance:
Cavalry command on the left, motivation die D10 Vs D8. Score is 5 to 7. The score is less than the D8 so the cavalry can move once, which they do. The score is odd so no maneuvers are allowed.

Infantry command, motivation die D10 Vs D8. Score is 10 to 2. The command can move three times because it tripled the D8; the die roll is even so moves can be used to maneuver. The infantry move off echeloning back to their right.

Cavalry command on the right, motivation die D12 Vs D8. Score 9 to 4. The score is more so they can move twice, which they do.

Maneuvre – Wheels and formation change card.

Spanish cavalry wheels to face the velites in the wood. The velites shoot catching them in the flank before they turn (yes, you can shoot at any time, even as the reactive player provided the target is moving or shooting). They use their base combat die adjusted by the combat table Vs the defence die of the target (see note below). They roll D10 Vs D6, scoring 3 to 5 for no effect.

Note: Each unit has a base combat die for its class (war band, elite, etc.), usually a D6, D8 or D10. Each unit also has a defence die, usually a D6 or D8 for its class. The defence die never changes, but the combat die is adjusted by the modifiers in the combat table. Factors in the combat table are the usual kind of things – terrain advantage, initiating a new melee (charge), fierce in first round, etc. But here’s the thing, rather than adding to a die result the modifiers adjust the type of die up or down. A D6 adjusted by up 2 becomes a D10 (two types bigger). A D10 adjusted down 3 becomes a D4 (three types smaller). The lowest die is never less than a D4 regardless of the downs. D12 is the biggest die and any additional ups are added to the result except the maximum score possible is 12 – a D12+2 rolling 11+2 is 12.  Because of the dice range combat is always risky and tension building.

Melee – no action.


Melee – no action.

March – general advance:

Cavalry command left, motivation die D10 Vs D8 scores 3 to 2. The command can move twice which it does.

Infantry command, motivation die D10 Vs D8 scores 6 to 3. The command can move twice, but before it does two of its skirmisher units shoot at the velites in front of them. One unit misses, the other scores 8 to 5 which causes 1UI loss (3 pips positive difference) and because the velites defence die was odd it is also vexed (a disordered state); first blood to Carthage. Rome loses 1 morale point for losing a UI.

Note: In the picture above note the stone counter for 1 UI loss, the tuft counter for vexed, and the blank counter on the skirmishers for being ‘unloaded’.


The Spanish and Gallic infantry on the extreme left of the line advance to clear the velites in front of them. They shoot, but to no effect, then advisably evade. The Spanish and Gauls could keep moving, but as this would cause them to go vexed ‘chasing’ they choose to halt in good order on the ground vacated by the velites.

On the right of the line there is an exchange of javelins by both side's skirmishers, to no effect, before the Gauls move into the woods to clear out the unit of velites facing them. A melee card is not required to initiate a melee Vs skirmishers but this is not bad terrain for velites (skirmish order [shock] unit) and they have a terrain advantage for being up hill. Both sides roll off their adjusted combat die, in this case D12+2 for the Gauls Vs D12 for the velites. Disaster, the Gauls score 12 and the velites score 2 – the velites lose 3 UI and are routed. Rome loses 3 morale chips for the UI loss. Double disaster – this has exposed the flank of the other velites to an attack by the Spanish infantry who are now coming up the hill; the velites evade.

Cavalry command right, motivation die D12 Vs D8 scores 8 to 2. This is a very good roll as it is a triple move, and because the roll was even it allows cavalry and fierce units to melee contacted enemy units after contact. The melees are hard fought.


Carthage chooses to fight with its two small elephant units first, and as they are rolling D12+2 after adjustments who can blame them. The facing Roman cavalry is rolling D4 because horse is down 2 for facing elephants!

The first score is 7 – 3 and the cavalry loses 1UI, is pushed back 3”, and is vexed for losing on an odd roll – but these are stubborn Romans and by spending an extra morale point (2 in total) they negate the push back and any follow up modifiers.

Surprisingly the next Roman unit does even better (the same dice of course) and holds the elephants with a tied 4 result; both sides lose 1 UI and a morale point.

The Gallic cavalry on the extreme right of the line now fights its opponent rolling D12+1 (fierce in first round is awesome) Vs D10 and scores 6 – 4,  a UI loss each for a close fought melee and a Gallic follow up (there is no actual push back here, the follow up is for scoring higher) but the Romans negate it by spending an extra morale chip – stubborn again!

The next Gallic cavalry unit is fighting the Roman cavalry with the UI loss (basically following up the damage by the elephants). Adjusted combat die are D12+1 Vs D8, scores are 11 to 4 causing 2UI more and the Roman unit is routed. It cannot convert the rout into a push back (for being stubborn) because it now has zero UI and will be routed anyway.

Next up it is the veteran Spanish Vs Roman cavalry. Combat die are D12 Vs D10, score is 7 to 9 for Roman marginal win. Both sides lose 1UI Romans count as following up.

The Roman unit at the end of the line now gets peppered by Numidian javelins, but escapes with a vexed result only.

Note: Regardless of the number of units with which a unit is in contact, a single unit can only fight one melee on a single card.

Note: In the photos above I am using melee in progress “Follow Up” markers. The sword denotes direction, crossways is an ongoing melee with no follow up. Follow up gives an up 1 in the next round of melee, BTW.

The first initiative phase is completed. Both sides roll off army die for the next initiative.
As you can see, this game is not for the feint hearted. Things move quickly. I’m doing this solo, and although I know the rules, that lot took me less than 20 minutes – a lot of which was spent carrying dice and morale chip (poker chips) boxes from one end of the table around to the opposite side of the table (30 foot a trip) and taking notes / photos. It does not take much time to turn cards!

Part three of this piece will be a continuation, including some triplex acies action. I’ve already played out the rest of the turn, I just need time to type it up.

Sunday, 27 March 2011

Ager Sanguinis Punic Wars - How it works - Part 1


Ager Sanguinis Punic Wars is based around the mechanisms found in three previously published sets of rules. Piquet (sometimes referred to as Classic Piquet) by Bob Jones. Field of Battle (a Piquet derivative) by Brent Oman. Ager Sanguinis (a Field of Battle derivative for the Crusades) by me. Piquet and Field of Battle are published by Piquet Inc. Ager Sanguinis was published by Miniature Wargames. Ager Sanguinis Punic Wars will, hopefully, be published by Miniature Wargames.


Recently, I've had some email enquiries about how Ager Sanguinis Punic Wars works and how it is different from Ager Sanguinis (Crusades). Here, using a fictional clash between Hannibal and Rome, is a run down of what it is all about. I'm not going to reproduce the rules here, but I’ll try to give a good, fairly detailed, overview.

The set up
The composition of each army is selected and the units are sorted into command groups ('divisions'). Each command group has an officer stand. A note is taken of the total Unity Integrity value of each army. In this case 127 UI for the Romans, 128 UI for the Carthaginians.


Unit Integrity [UI]: Each unit and officer stand has an integrity value. Unit integrity is the all encompassing title given to the physical and morale strength of a unit. Unit integrity is lost, mainly in combat, until a unit reaches zero when it is routed. At minus 1 unit integrity a unit is destroyed. Unit integrity can be rallied back during the game.

 
Each army now rolls D12 to determine its army die. The army die represents the overall enthusiasm of the army and the ability of its commanders to do battle 'on the day'. The army die is in constant use during the game. For this game the Carthaginians will add 4 to the roll because the commander is Hannibal; the Romans will get no adjustment.
The Carthaginians roll 11 (7+4), The Romans roll 6. A table is consulted. The Carthaginian army die will be D12*. The Roman army die will be D10.


The army die determines the sequence deck that the army will use during play. This sequence deck sequences the actions of each army during a game turn. There are 12 types of cards in the sequence deck. Each sequence deck is 26 cards strong. The composition of cards varies according to the army die (D8, D10, D12, D12*) - the higher the army die the better the deck.


The card decks for each army is as follows. The Roman deck composition is numbered first, the Carthaginian second.

Army Morale: 3/3
Command: 4/4
Group Command: 0/0
Lull: 4/2
Manoeuvre: 2/2
Group Manoeuvre: 1/1
March: 3/4
Group March: 1/0
Melee: 4/3
Group Melee: 0/2
Missilery: 2/2
Tactical Advantage: 2/3

Group cards: A new addition to Ager Sanguinis, these only allow the card to be used for one command group, chosen each time the card is turned. Other cards apply to any and all command groups as standard.

The army die also adjusts the command motivation die roll for the officer stand of each command group and the C-in-C (D8, D10, D12). This is used for movement and rallies (mainly).


The sequence deck is not the only thing that gives character to the army. Each side divides the total Unit Integrity of its army by 12 and draws that number of cards from another deck called the Army Characterisation Deck. This gives the army a morale chip count and various other cards that replace cards in the sequence deck or are added to it. The Carthaginian draw of ten cards is on the left. The Roman draw of ten cards is on the right. The draw is kept secret from one's opponent!


Morale Chips: Morale chips are lost for each UI loss or voluntarily spent during the game. On reaching zero the army is in big trouble as it can no longer rally back lost UI and, more importantly, becomes vulnerable to army morale checks on army morale cards.

This set up process might seem complex, but it actually takes very little time. What is more, we now have armies that have fighting ability and command and control represented not only in the ability of the player, the strengths of his units and the luck of his dice throwing, because rather more is going on – the army itself has some ‘soul’.

Both armies are now ready to deploy.


On the Roman left the Romans have one command group of six cavalry units. The cavalry is all drilled, close order, stubborn armoured cavalry counting 3 unit integrity points per unit.


Facing them the Carthaginians have one command group of twelve units. These comprise three units of Spanish warband, close order, veteran cavalry; four units of Gallic warband, close order, elite cavalry; three units of Numidian warband, loose order, cavalry; two small units of fierce elephants. All cavalry counts 3 unit integrity points per unit, elephants count 2 unit integrity points per unit.


In the centre the Romans have three command groups each comprised of two triplex acies formations. Each triplex acies formation comprises a unit of velites, drilled, skimish order [S] infantry (3UI); a unit of hastati, drilled, close order, stubborn infantry (4UI); a unit of principes, drilled, close order, stubborn, armoured infantry (4UI); a small unit of triarii, drilled, close order, stubborn, veteran, amoured infantry (3UI).


Triplex acies: The infantry are deployed in serried lines to ease the deployment of miniature figurines during play. The spaces that should exist between the maniples of each line, in game terms, is a 'virtual' thing.


The Carthaginian centre is one large command group. It is comprised of four units of Libyan spearmen, drilled, close order, stubborn, veteran, armoured infantry (4UI each); four units of Spanish scutarii, warband, loose order, veteran infantry at 150% strength (4UI each); four units of Gallic, warband, loose order, fierce infantry at 200% strength (5UI each); four units of Libyan javelin men, warband, skirmish order [M] infantry (3UI each); two units of Balearic slingers, warband, skirmish order [M] infantry (3UI each).


On the Roman right the Romans have one command group of four units. Two units of cavalry and two units of velites (as per similar units detailed above).


The Carthaginians have one command group here. This comprises two units of Gallic cavalry and three units of Spanish cavalry (as per similar units detailed above).

Each command group officer stand is worth 1UI but counts double for army strength, the C-in-C's are 1UI but counts triple for army strength. The Romans have an army worth 127 UI. The Carthaginians have an army worth 128UI.

Part 2 of this post will feature a turn or two of the battle.