Friday, 4 March 2016

Representing historical terrain on the table-top

For some time I've been looking at trying a re-fight of Paltzig 1759. This is an unequal contest between the Prussians (outnumbered 2:1) attacking, over a marshy stream, with the Russians stood on commanding ground with well sighted artillery. I wondered if the reason for it not often being fought was more down to the terrain over which it was fought rather than the odds. Because of the complexity and extensiveness of the elevated terrain I was sceptical about my ability to ever do it.

My biggest mental block has always been this detailed map

I have added the three red stars marked A, B, C (see below)
This map is a belter for detail, but having virtually walked the road between A and C, using google street view, and given the place a thorough google earth mouse search, I think it gives a completely unrealistic feel to the terrain in question. 

When I first saw this map I visualised a flat marshy bottomed valley running north to south with ground rising steeply to either side and a long narrow topped, tree sided spur extending from Russian position towards Kay, south of which was a broad flat bottomed valley running east to west. The Russian hill has a saddle with two 'knolls', a small one to the south and a much larger one just to the north east of Paltzig: It all made perfect sense but looked increasingly difficult to do.

In wargames terms, the whole battlefield is two big hills facing each other over a narrow valley with an area of low ground at its southern end. As we all know, hills this extensive are always difficult (even when using a cloth over formers of one kind or another) to do, especially on a big table. I thought I could do this one without raising the drop leaf extension on my table, a straight 12 x 6, if I miss off the extreme northern sector (north of the northern knoll) and skew the table's long axis to north north east to allow deeper deployment room at the southern end - all providing, of course, that I could do the hills and they have always been the sticking point.

Then, this week, I took to google earth. The area is still largely unspoilt by human developments but the area is now more heavily wooded. As I dragged the mouse over the map I kept checking the elevation. For sure, there is high ground here. The large northern knoll, for example, is 22m (about 70 feet) above the height of the open water north of 'B' which stands at 70m above sea level (my mouse was on that stretch of water when I screen saved this shot). But this aerial shot of the ground doesn't look that hilly, does it? The resemblance of the map to the shot, for the position of stuff, is excellent but where is that steep sided spur? Where are the steeply rising hillsides?


Down to street view. There are two useful roads here. The first traverses the route between Kay and Paltzig, the second less useful one snakes out of Kay and goes up the northern side of the southern valley bottom (it's wooded for most of the useful length and without good views northwards. Presumably these woods follow the southern slopes of the spur.) I have chosen three points along the Kay Paltzig road, A, B, C to show just how un-ruggedly hilly this terrain is. I would have chosen other points off road, given a choice of anywhere, but street view has to suffice and I think it a very valued commodity much underused by gamers.

 So starting at A. On the road just outside of Paltzig there is a nice treeless spot to look from. First looking south, this track must roughly follow the Russian second line in front of Paltzig just before it angles back. I believe the trees to the left might be the start of the small knoll. However you look at it, the knoll isn't an obvious feature.
 Looking roughly NE from 'A' the ground has a definite cant to it but it doesn't look like the large very prominent feature on the map. It would however, given the height and shallowness of the slope, be an ideal position for artillery giving good LOS and allow for round shot grazing fire. 
 From 'A' looking towards 'B'. This shot is useful because it shows that any trees in the valley would block line of sight to the opposite slope. There were no trees here in 1759, but there were farther south where the Prussians attacked.  The height of the 'hills', north to south, is roughly the same along their length so this is important.
 The open water at point 'B'. I think we can safely call this impassible terrain. 
At point 'B' looking towards Paltzig. The road is slightly raised but the water level (through the trees on the right) shows by how little. This is not a steep sided valley; I can't find any sudden drops in elevation.
At point 'C' looking due north towards the Prussian batteries. The tree line marks the summit of the Prussian side of the valley. It is over 95 meters at its northernmost end, where the guns were. 


 Two final shots from Google Earth. The first is the church at Paltzig. It was built in 1735.
Secondly, the Water Mill at Kay. This might not be contemporary, but the brick arched windows are a feature of 18th century industrial buildings. If it was there, the Prussians filed past it before forming up to attack. I'm pretty sure the smaller building is later.

So where does that leave me. Well it leaves me pondering what to do about modelling the high ground. The high ground is there, but it doesn't quite have the robust look of the contour map. I have two choices.

1. Have three large two contour knolls (two on the Russian side and one on the Prussian side) for the combatants to put there artillery on, because these were the key topographical features, and represent the rest of the hills with few smaller one contour elevations. The knolls would count as high ground, the other elevations would be merely representative of generally insignificant higher ground. 

2. Ignore the evidence of Google Earth and go for terrain that feels more like the map. I have plenty of blue insulation board sitting idle and I could do some simple 45 degree slope 2" contours to represent the hills (including the spur) either side of the stream then use my hill stock for the knolls.

I know, let's have a poll. We have not done one of them for a while. It's in the side bar, at the top.

I love Google Earth, and street view is fabulous for taking a look at at stuff you can't just pop out and see. Have a look and wander at Zorndorf  52 39 27.44 N 14 40 32.88 E. Next time I visit a battlefield I'm going to take notes of the photos I take and I'll try to attach them (if possible).




Sunday, 14 February 2016

A Close Shave

Wilki Gillette, expert in polarity beam technology and amateur archaeologist, scratched his trowel across the small area of earth he was carefully excavating. The ring of metal on metal drew his eye to the gleam of gold. 

'Bic! Quickly come over here, lad' he called. The shadow of a figure passed over Wilki and he looked up. 'You're not...' Wilki's world went suddenly black.

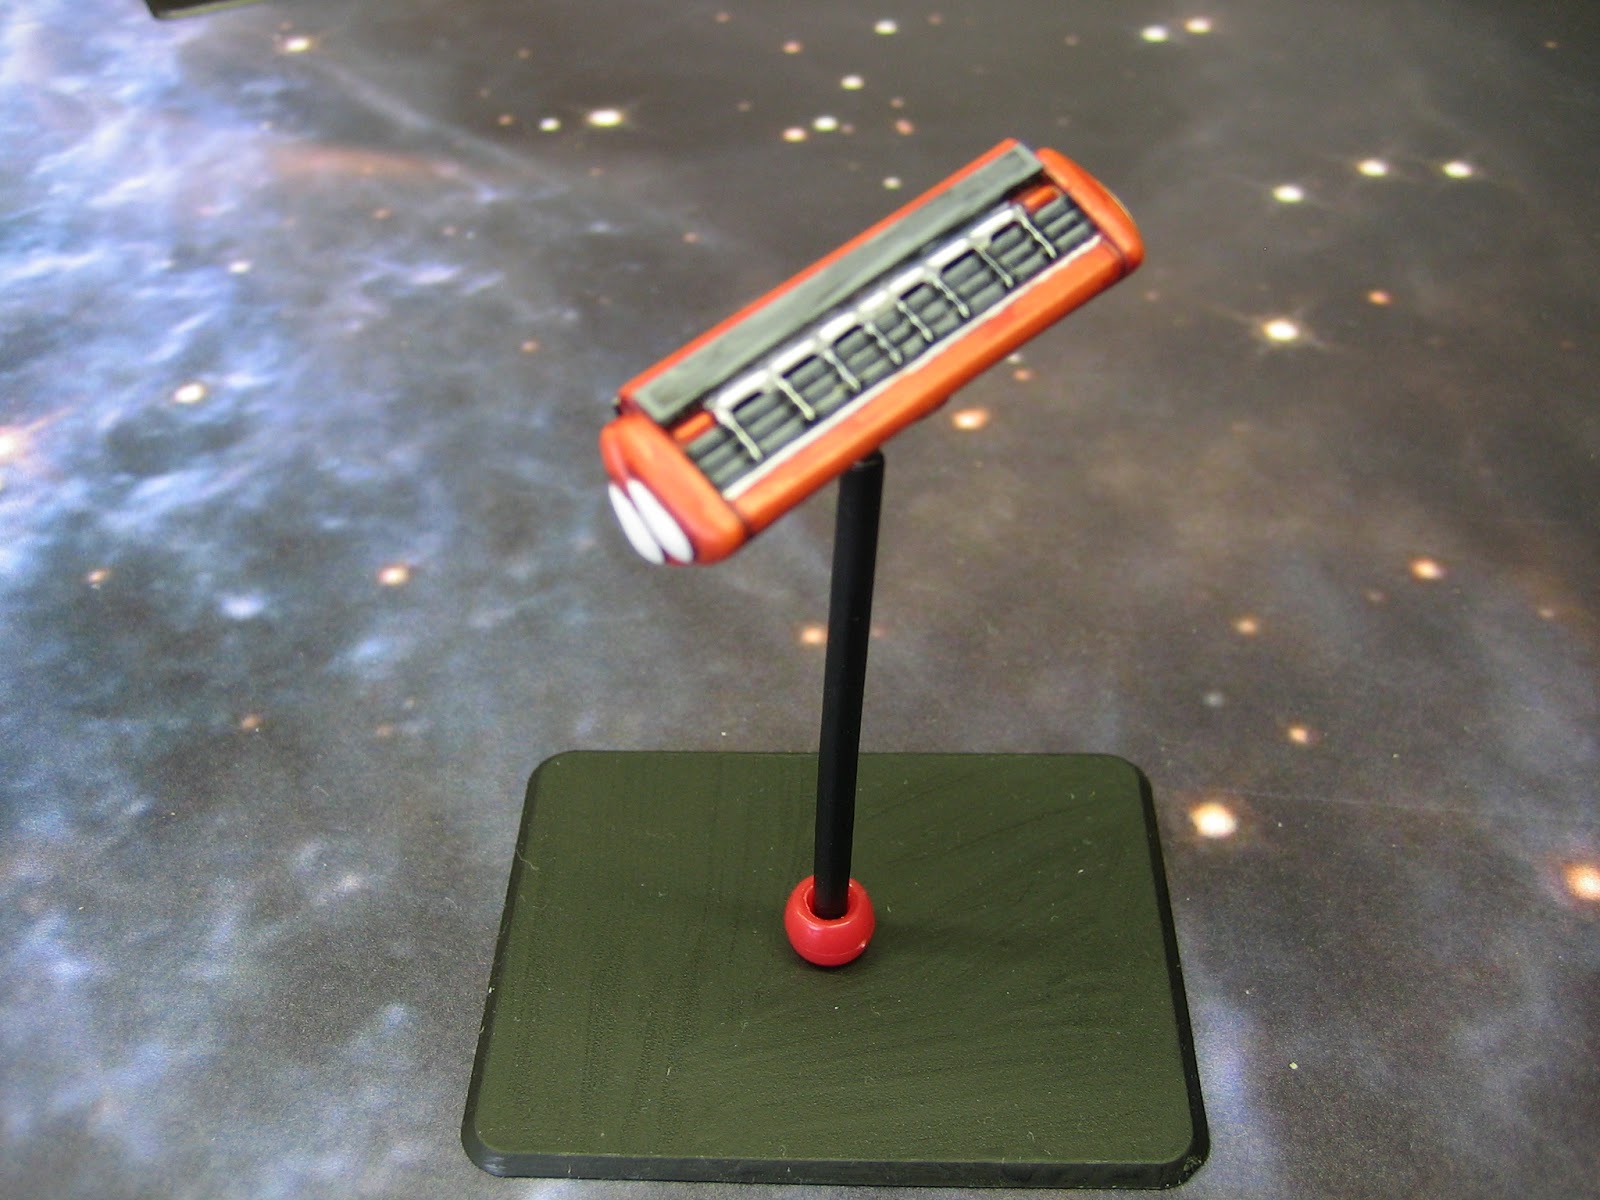
A Wilki Gillette polarity beam emitter.
Note the red bead at the bottom of the stand - we'll get to that later.
Wilki Gillette's claim to fame is that he invented polarity beam technology for the Rebel Alliance. He is largely responsible for setting up several polarity beam defence nets protecting several outposts and planets. Polarity beams are ion beams that travel between two points, in this case between to two transceivers in the net, and because they do this the range and power of the ion beams is greatly increased. 

Reports of Wilki's disappearance, along with his only son Bic, soon reached Rebel Intelligence. It didn't take long to discover that they were both in the hands of the Empire and Wilki was being coerced to help them devise measures to bring down polarity beam defence nets. 

Discovering the target of the Empire's efforts was much harder. In the nick of time agents have uncovered where and when the Empire will strike - the rebel base on Remington 5 - and an enemy task force is already on its way. The target is well chosen. The composition of the asteroid belt around Remington 5 will prevent the approach of enemy ships being picked up on long range sensors. The Imperial plan is a simple one. From aboard a specially equipped Lambda shuttle, Wilki Gillette will be forced to collapse the defence net and allow Imperial bombers through.


Lambda class shuttle craft
Aboard a Lambda class shuttle, Wilki Gillette was struggling to bring down the defence net. It was partially collapsed but secondary systems, that were designed by Wilki to stop such an attempt, were intermittently bringing the net back on line. 

'Sir.' The Lambda's captain was called over to the shuttle's censor screen by its operative. 'Enemy fighters approaching. They are attacking, sir.'

And so the scene is set. 


The playing area for this scenario is 6 x 4. It has been set up with seven asteroids and three polarity beam transceivers (each colour coded with a bead at the base of the flight stand - red; yellow; blue). Just off table, marked here with a die to make them easier to see in the photograph, are three more transceivers. These are also colour coded, with a small round sticker, in the same three colours. The shuttle has also been pre-deployed.


This photograph shows the spotted PBDN die, the coloured sticker marking the
location of the off table PBDN emitter, and the dice used to highlight the
emitters location in the deployment photograph (see above). 
THE POLARITY BEAM DEFENCE NET (PBDN):

The PBDN has almost collapsed. However, until it finally does its transceivers will intermittently spring to life. 

Each turn, after manoeuvre dials have been placed the PBDN (colour spotted) die is rolled twice. If the dice shows two different colours the on table transceivers with those colours will become active and the beam will intermittently pass between them. If the colours on the dice are the same the beam will pass between the on table and off table tranceivers of that colour.

Any ships passing through the beam, or caught in it at the start of its move, manoeuvre as normal then roll one attack dice.

On a hit result the ship is struck by a partial, low intensity beam and it receives an ion token. 

On a critical hit result the ship is struck by an intermittent but strong strength beam and it receives an ion token plus a critical damage.

IMPERIAL FORCES AND SCENARIO NOTES
Forces: 145 points, see above.

Mission: Defend the shuttle until the PBDN is fully collapsed.

Collapsing the defence net: The defence net can only be collapsed by Wilki Gillette from the Lambda shuttle. The Lambda shuttle is so completely full of special equipment that it has been stripped of its primary armament to make room for it (the lambda shuttle has an attack level of 0). The PBDN is collapsed during the combat phase by the lambda rolling one attack die versus any transceiver within arc and range: on a hit result the net collapses one level; on a critical hit the net collapses two levels; on a focus result the net gains one level (up to a maximum level of eight). The net completely collapses when it loses eight levels.

REBEL FORCES AND SCENARIO NOTES
Forces: 130 points, see above.

Mission: Destroy the threat to Remington 5 by destroying or capturing the Lambda shuttle. 

Capturing or destroying the shuttle: To capture the shuttle you must destroy all of the Lambda's escorting fighters. If you destroy the shuttle you will have achieved a partial victory. Wilki Gillette is a good man who has always served the rebel alliance well. He is acting under duress, so total victory will only be achieved if the shuttle is captured and Wilki is freed.

I'm not sure how this scenario will work. My knowledge of the X Wing game is very limited so this is very much a case of best guess. Given the appalling Seven Years War scenario I devised for the last game I'm hoping this works much better. I'm not going to bother writing up the last two sessions of The Battle of Neue Strassen because it was a stinker of a game - we couldn't even be bothered to finish it. 


Friday, 29 January 2016

The Battle of Neue Strassen - AAR part one

 The terrain for the Battle of Neue Strassen before deployment. Scenario notes on the terrain and forces can be found here.
Peter (in a blue jumper) took command of the Austrians. Graham (in white jumper) took the Prussians. Why do things work out that way?
Both players chose a cavalry command as vanguard. The Austrians deploy their vanguard on the Der Grat. The Prussians deploy their below Neue Strassen facing Mautbrucke. 

The Austrians begin to arrive. The Grenzers and hussars advance quickly towards the Schlammigenstrom. This will be the only time the Austrians will be ahead of the Prussian deployment. From this point on the initiative is well and truly with the Prussians.

Although it's the Austrian troops which arrive first, its the Prussians that arrive in force. 
Before the Austrians can get onto the field of battle the Prussians are deploying around Neue Strassen and massing cavalry facing Mautbrucke and the Schlammigenstrom.
At Mautbrucke the Prussian cavalry, led by squadrons of 5th Hussars launch repeated attacks against the Grenzers that are occupying it. 

It takes three attempts, two repelled with heavy loss, but the Prussians break into Mautbrucke and cross the Sclammigenstrom.
 Meanwhile, Prussian infantry are streaming through Neue Strassen.
Before turn two is over, the Austrian left, with their commander watching on from Die Pickle, is coming under increasing pressure
 And the Austrian main force is still in the process of arriving.
It's going to be a close run thing for the tardy Austrians. 

On Die Langenhugel the Prussian infantry can be seen preparing to launch an attack in considerable strength against the Grenzers in Schlammigenwaldchen.
This is the only place where the Austrians have formed anything like a battle line.
Frederick arrives at Kibitz. Better late than never.
At the close of the first night's play everything it set for a major clash, and it's the Prussians who have the jump on the enemy.

Sunday, 24 January 2016

X-Wing 'jettisoned freight container', or something

Today I've made a prototype 'jettisoned freight container' for X-Wing. Of course, it could just as easily be something else, a weird looking communications satellite perhaps.

 It took about five minutes to make and a little longer to paint.
 It has plenty of inbuilt detail from all angles.
It is, of course, made from a couple of razor heads glued together back to back. I've added two thin pieces of plastic over the bit that is supposed to be good for the skin (pale green on this one) because it is actually quite rough, and a piece of 3/32 aluminium pipe along the top. I'll make another two; another red one and a blue one I think.

Whatever it is, I think it looks to be about the right scale, and whatever scenario it appears in is bound to be called "A Close Shave".

Saturday, 23 January 2016

You laughed at my smokes, now you can laugh at my asteroids

Some time ago I made a load of smoke screen markers out of sponge because I was fed up with small bits of cotton wool getting stuck to bases and figures. To say they raised the odd eyebrow is a bit of an understatement; I think several of you feared for my sanity.


However, I'm still a great believer in stuff made out of cheap sponge, especially for the smaller scales. I remember when I collected 1:300 and 1:200 stuff I made several feet of hedge and several dozen trees out of it with some success. The other day, whilst feeling quite poorly, I was looking at the gubbins that came with the X-Wing starter sets and decided that the asteroids, although serviceable, were a bit 'flat'. When I'm not well I find it hard to paint figures because of the extended periods of concentration required. Making stuff, especially simple stuff, is quite another matter so rather than spend the day in bed I knocked these up.

These eight asteroids are simply pieces of cheap kitchen sponge that have been torn and pinched into rough looking rock shapes, some with small impact craters made by 'pinching' deep. 


They were undercoated with household emulsion that was heavily soaked into the sponge - to make them dry 'solid'. They were then painted with artists acrylic paints and acrylic inks - very dark brown then given a three shade drybrush with the last dry brush only added to the 'ridges' to bring out the shape of the asteroids.

Initially I thought about buying flight stands for them. Then, with several odds and sods I constructed these. They are large bases by Battlefront (50mm x 64mm), with a 3mm hole drilled through the centre. Into the hole I superglued a length of 1/8" aluminium tubing that I had bought by accident a couple of years ago.  I painted the stands with satin black enamel.

Into the asteroid, I glued a short length of 3/32" aluminium tube. I glued some of these tubes off centre (centre of gravity) in an attempt to give the asteroids the look of weightlessness - I'm not sure how well this worked. The tube in the asteroid fits perfectly inside the larger tube on the flight stand; you can spin the asteroid in the stand which might prove a useful thing. 

Not permanently fixing the asteroids to the stands means I can use the stands for other stuff too. 

For something made whilst ill, I'm quite happy with them. I'm thinking of making some space mines and cargo containers next.

Sunday, 17 January 2016

The Battle of Neue Strassen 1758ish

This will be a fictional meeting engagement scenario set during the Seven Years War. 

This scenario has come about in rather an odd way, in so much as the terrain over which the scenario will be fought was created before anything else was decided upon. It came about this way because my primary aim was to see just how well my new road stock worked. I wanted to see just how well it negotiated hills, and to see just what kind of road systems I could build. This is what I came up with on my table (set up, without the drop leaf extension, 12 x 6). I didn't quite use all of the road I have - there is still another four feet of it in the drawer - and the road network seems quite extensive. I certainly think I have more than enough road to be going on with.

My only reservation about the Early War Miniatures track sets is the lack of 90 degree angle junctions. You can use the 'Y' junction to produce a 'T' junction with a judicious use of 45 degree turns, but I do like something more angular, especially for junctions in villages and so forth. Fortunately, I bought enough road sections to cut a few up and, although not a perfect solution, by cutting away some 'verges', I came up with this. This will do until EWM make some new bespoke junctions. 


(BTW. The roads are latex rubber. They came unpainted and I chose to paint them dusty so that they would fit with all of my 28mm collections - my rational being all rough roads get dusty in a dry summer).

You can see a photo of one of the T junctions in use below. It is at the centre of Neue Strassen. As near as I can figure it, this represents about twenty five feet of road network. I'm very pleased with EWM road as I can now have my roads going up and over hills, something I had to mostly omit before.

MAP FOR THE BATTLE OF NEUE STRASSEN
The title of the scenario shouldn't need explanation.


And this is what the terrain, and roads, look like on the table.

All hills, except for Die Pickle, have type I slopes not effecting movement. The Pickle has type II slopes. To count superior position a unit must be clearly at higher elevation than the enemy. Troops firing up hill do not count inferior position.


Buddenwald and Eichenwald are type III terrain to cavalry and type II terrain for infantry providing type II cover to all.


Die Schlammigenstrom and Schlammigenwaldchen are type III terrain. Schlammigenwaldchen provides type II cover. 

Die Hexe Teich is impassible.

All enclosed fields are type II terrain for movement and provide type II cover. They do not effect line of sight.

All built up areas count as 'Town' and provide type III cover.

All roads add 25% to movement rate provided that the troops using them start and end their movement fully on the road in column of route. The road exits marked 'A' are the possible entry points for the Austrians, those marked 'P' are possible entry points for the Prussians.

A shot showing the complex of roads and fields around Neue Strassen. 

This where the Prussians will arrive. 
From behind Die Langenhugel, looking down on Mautbrucke (Tollbridge).

The Sclammigenstrom (Muddy Stream) and the Slammigenwald (Muddy Wood) will be very heavy going.

Behind the boggy ground is Die Pickle (The Pimple). 


The Prussian army in four commands. 

The army comprises three units of grenadiers, five units of musketeers, two units of fusiliers, four units of dragoons, four units of hussars, two heavy batteries and a battery of horse artillery. 

The Austrian army in five commands. 

It comprises one unit of grenadiers, ten units of German musketeers, one unit of Hungarian musketeers, five units of Grenzers, four units of cuirassier, two units of dragoons, two units of hussars, two heavy batteries and a battery of howitzers.

The Scenario
The scenario is a simple meeting engagement. The objective, for both players, is the destruction of the enemy army. 

Each side may deploy the units of one command containing cavalry, up to 24" on table, in any formation, anywhere along the players short edge of the table. This is the army's vanguard.

Except for the vanguard all other units must enter the table by road in column of route. Each player must mark the road 'exit' where each of his commands will enter using the counters provided (Prussian 2 - 5 of spades, Austrian 2 - 6 of diamonds). Aces will mark the entry point of the C-in-Cs, though they may enter at any time on the appearance of an officer check card. 

The only timing restrictions for entry are: 

  • Only one command may newly arrive on the appearance of each appropriate move card, thus staggering the arrival of each army.
  • Units must arrive in a single column of route at each entry point; simply getting off the road as soon as possible will not allow the next unit to move on table at full rate. 


Thursday, 14 January 2016

Last night in a galaxy far far away

I finally succumbed to the dark side.


In 2014, I played X-Wing using the quick start rules with the models from the starter set but, until last night, I've played nothing since. Over Christmas, whilst loading various gift vouchers I thought of X wing as something to spend them on - Kerching! 

All of the X Wing stuff I ordered over Christmas and New Year having arrived, I was itching to play a proper sized game using the full rules. 

The game I set up was initially done with three players in mind, two versus one, each flying three spaceships; each side was 120 points. As it was, Graham was absent so it ended up with one player playing with six. Peter and I flipped a coin to decide sides and Peter ended up being the over worked Imperial player.

Someone kindly pointed me in the direction of this X Wing squadron builder site which I found quite excellent as it remembers what expansion sets and cards you have. I have started to print my squadrons off and file them for quick pick-up use. As a complete novice at building squadrons I have very little idea of how things work in combination so this was a real stab in the dark.

These are the lists for the Imperial and Rebel fleets used in the action.
A couple of turns into the game things were pretty equal. Then the Imperial fleet suffered some collisions between vessels of it's own fleet. With most of the Rebels moving last, this meant they could escape the confusion and gain a position of advantage.

This was also the moment when Chewbacca, manning the turret mounted laser cannon of the Falcon, started to come into his own. The wookie just couldn't miss - his accuracy was astonishing. On four occasions in the game he rolled maximum hits, rolling four hits a time on two occasions. With such effective fire power, it wasn't long before exploding Tie fighters rocked the vinyl fabric of space.
At the mid point of the game the momentum was with the Rebels but the issue was not settled. 

It was the droids in the X-Wings that swung the issue beyond doubt as they repaired nearly all of the light damage sustained before it became truly destructive. 

The Wookie took out another two Tie, including Darth Vader in his Tie Advanced, with a flurry of fearsome shooting. Four kills to Chewbacca.
With just one Tie Fighter left, and that with critical damage to its weaponry, Peter threw in the towel.

Overall, the game had been decidedly one sided. All of the rebel ships came off almost unscathed. Luke's X-Wing and the Falcon were still defending with shields, the former's down to R2 D2, though Luke had suffered damage to his sensor array earlier in the fight. Bigg's ship was nearest to being taken down - his ship was without shields and damaged (1 card).

The one sidedness was in no way down to any superior flying skill or tactics on my part. I think we flew with similar efficiency. My fearsome dice rolling versus the usual rubbish rolled by Peter, who couldn't shoot for toffee, was the deciding factor. I still think this is, Peter's dice rolling not withstanding, an excellent game. We played this game out in about two hours, which I though pretty pacey for two novice players. 

Several people told me that a six by four playing surface was far too large an area to fight X-Wing: a three by three being much more appropriate. Consequently, I ringed off a three by three area with a piano wire and place holder boundary. The area was sufficient but I confess to finding it a little cramped, possibly due to my unfamiliarity with small playing spaces. With so many ships in the area it was difficult not to have several targets available most of the time. The next game I play will probably be just four ships a side, and I'll set it up in the same nine square feet then, to compare how it plays, I'll game the same ships in all twenty four square feet my 'galaxy far far away'.

In the near future I'm planning to expand both fleets, initially by the two 'Aces' expansions and an A-Wing. I suppose I'm looking at combined fleets of thirty or so vessels by the time I'm finished. Peter has just bought Armada, but I'm hoping to keep clear of that money pit.

One annoying thing I have noted, is the basic set does not come with enough dice. I bought two starter sets, so I have six of each type, so I do have enough but looking at the cards I have, I think five attack and four defence, per set, would have been better. In production cost we must be talking pennies difference and given the high quality of the rest of the product I'm surprised at this niggling oversight.