Firstly, for those wishing to see how the game was set up I have edited the scenario post for Mollwitz by adding notes on unit and officer quality, the effect of terrain and weather, and some special rules. The notes are intended for use with Piquet rules, but most could be converted for use with other sets of rules. Mollwitz Scenario link
The only change I made to the deployment pictured in the notes was to move Frederick to the left wing. Apparently he went forward with Schulenberg.
The Austrians choose to 'rig their deck' as per the special rule for Romer's charge.
Romer is on his way.
Romer's cavalry are soon in among the Prussians .
Schulenberg's command begins to disintegrate.
Infantry from the Prussian second line is rushed to hold up the right flank.
With the Prussians under stress, the Austrians advance with their infantry.
This shows the general situation at the end of turn 1.
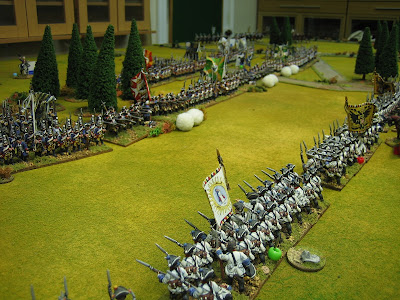
Beads are:
- Red, battle weary.
- Green, ready.
- Blue, eager.
- White, first fire unused.
The first lines of infantry begin to exchange long range musketry.
What do you know, Frederick fails his major morale check rolling D20 Vs 3 he rolls 3! Fearing the worst, Frederick leaves the field and Schwerin takes over.
The Prussians slowly gain the upper hand, but the Austrians are getting all the initiative and are able to keep pace with the Prussian volleys.
On the Prussian right infantry begin to empty the saddles of Romer's cavalry. Romer's attack has been held.
Schulenburg is dead. Caught between Romer's cavalry and Leopold's infantry it is difficult to assertain which side actually killed him.
Counters are:
- Stones, unit integrity lost.
- Tuft, disordered.
- Wheel, shaken.
In the centre the volleys of musketry are incessant but, due to the extreme range, it's effects are not telling. It is now the end of turn three.
The Prussian infantry are looking menacing. If they can win some initiative they will be unstoppable.
The Austrian cavalry on the Austrian right wing are content to stand in readiness to exploit any success of their infantry.
Whilst their hussars, having seen off the Prussian hussars, attempt another lonesome charge against Rothenburg's cavalry.
On the Austrian left, Romer begins to pull back. He only has two units of cavalry left, though another might return from pursuit at some point.
I think this game has another three turns in it.
The Prussians have 14 morale chips and are rolling against 6 for Major Morale.
The Austrians have 8 morale chips and are rolling against 3 for Major Morale.


6 comments:
I like your battle presentations so much, James! This clear painting, in every details and the composition of splendidly arranged battalions on your pictures - this is a great joy!
My deep respect for your oeuvre.
Peter
A very interesting development. Keep it up!
Wonderful AAR once again James. I always look at your set-up and very much enjoy the felt playing surface and the wonderful array of beautifully painted figures and buildings on the table. Very well done indeed!
Fantastic stuff!
Can I ask on your base sizes. They look really tight which is good to see. I'm finishing my first unit of foundry Prussians and need inspiration for basing
Awesome stuff!
Couldn't tell me your base sizes - they look great and tightly packed. I'm finishing a unit soon and need base inspiration! :)
Infantry are 45 x 45, cavalry are 45 x 60, guns are 67.5 x 90. Officers are on round 45s, CinCs are on two 45 rounds.
I cut all of my own bases from 2mm MDF sheet with a stanley knife and steel rule. I buy five 3' x 4' sheets at a time for about £25. You get it from picture frame materials suppliers (they sell on line); it's used as backing for pictures.
Post a Comment